
Mobile App – Auto-Payments for recurring invoices
Meet Auto-Payments for recurring invoices and POS transactions — the fastest way to collect payments without chasing clients every billing cycle. Capture the first payment instantly, set your schedule, and let the system handle the rest. No follow-ups, no manual charges, no missed payments.
:rocket: What’s New (and why you’ll love it)
Set it and forget it – Turn on Auto-Payment when scheduling a recurring invoice and watch payments roll in automatically.
Multiple payment sources – Choose to charge from:
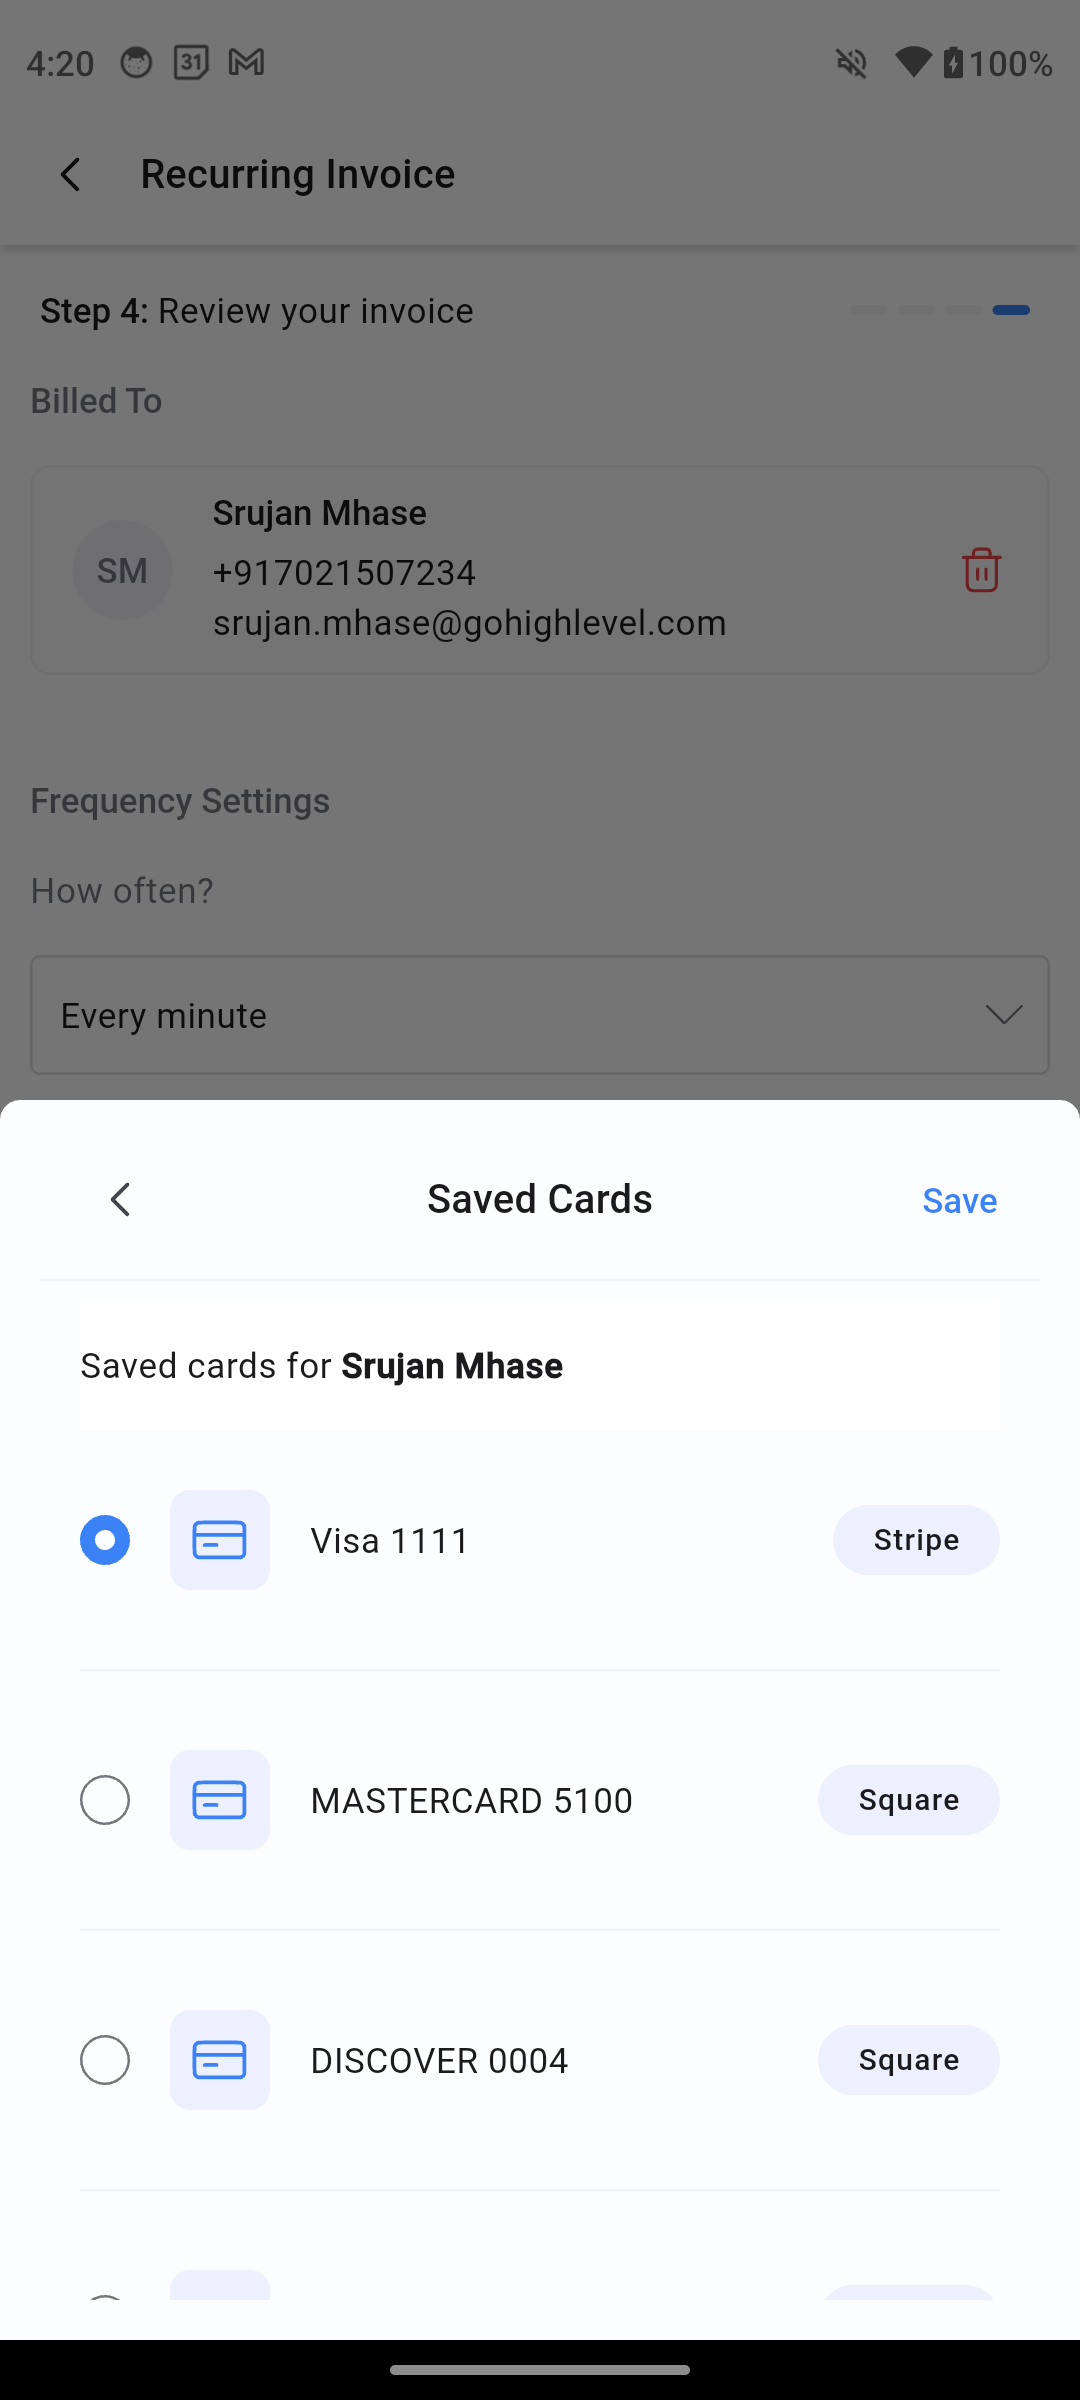
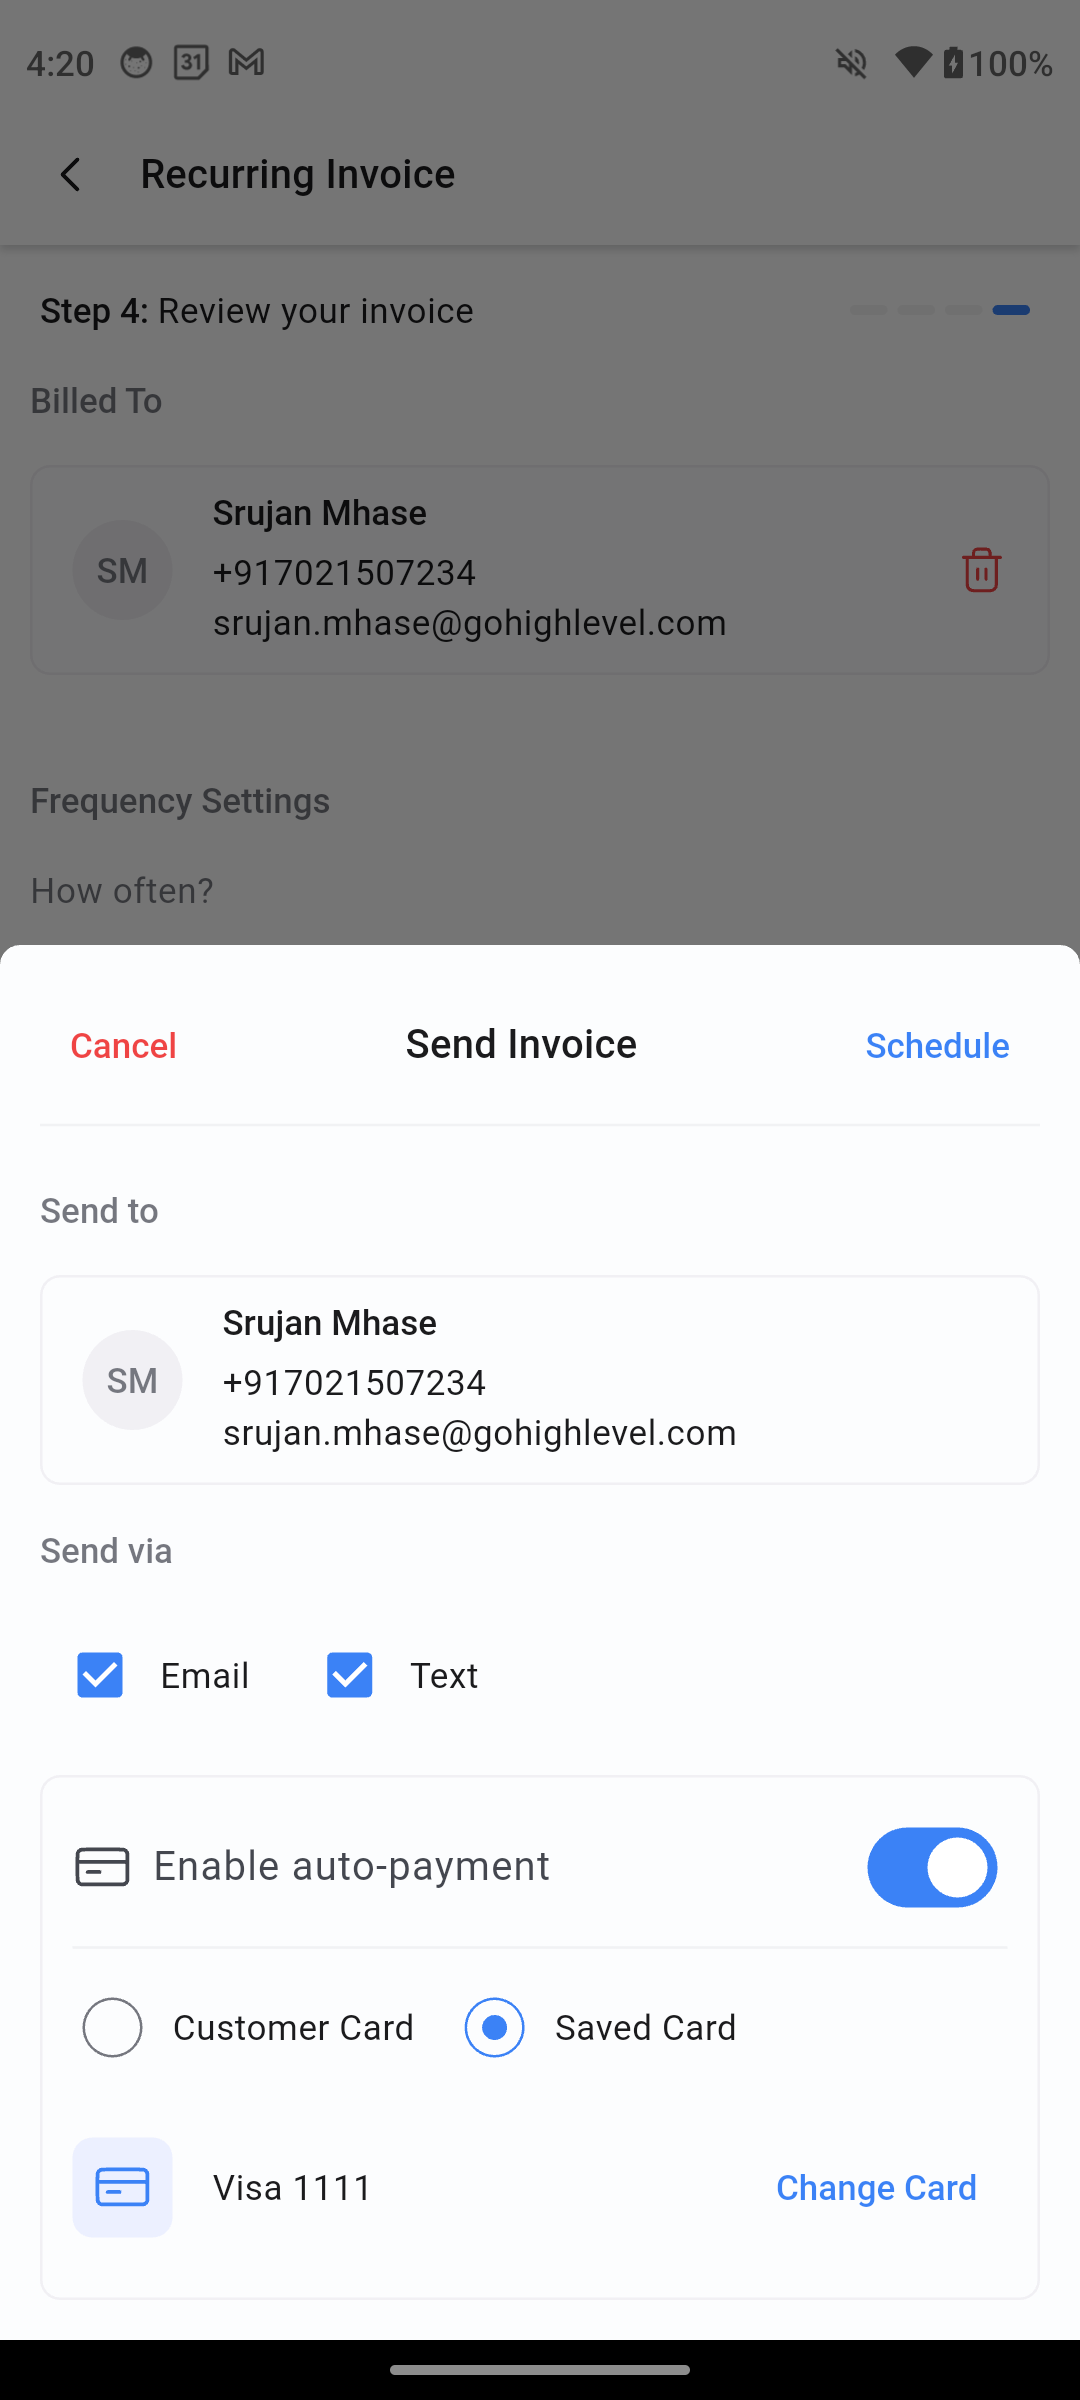
Saved card – Select from any stored cards for that customer.
Customer card – Use the card captured via Tap to Pay, Card on File, or online checkout.
Frictionless checkout – No extra steps for your customer after the first payment.
Stay in control – Toggle Auto-Payment on or off before sending.
Works where you work – Available for Recurring Invoices.
:sparkles: Why This Changes Everything
No more chasing – Every payment is auto-collected on the due date, without awkward reminders.
More cash flow confidence – Predictable payment timelines mean steadier revenue.
Delight your clients – Smooth, “one and done” checkout experience.
Save hours of admin – Set it up once and let automation handle the rest.
:arrows_anticlockwise: Already Sending Recurring Invoices? Here’s the Upgrade
Instant enablement – Turn on Auto-Payment right from your invoice scheduling flow.
Smarter workflows – Your card selection is remembered if you toggle Auto-Payment off and on again.
More payment flexibility – Access any saved payment methods for your contact.
Seamless POS integration – When using PoS, add recurring products to cart & select “convert to invoice”, then set it up while scheduling the same.
:white_tick: Prerequisites
Recurring invoice created via the Invoices or POS module.
Customer payment method on file (Card on File, or online card capture).
Payments must be via card — Auto-Payment is not available for cash or manual entry.
:builder: How to Use This Feature (Quick Start)
Create – Go to Invoices or POS and start a recurring invoice.
Add details – Select a customer, items, and billing frequency.
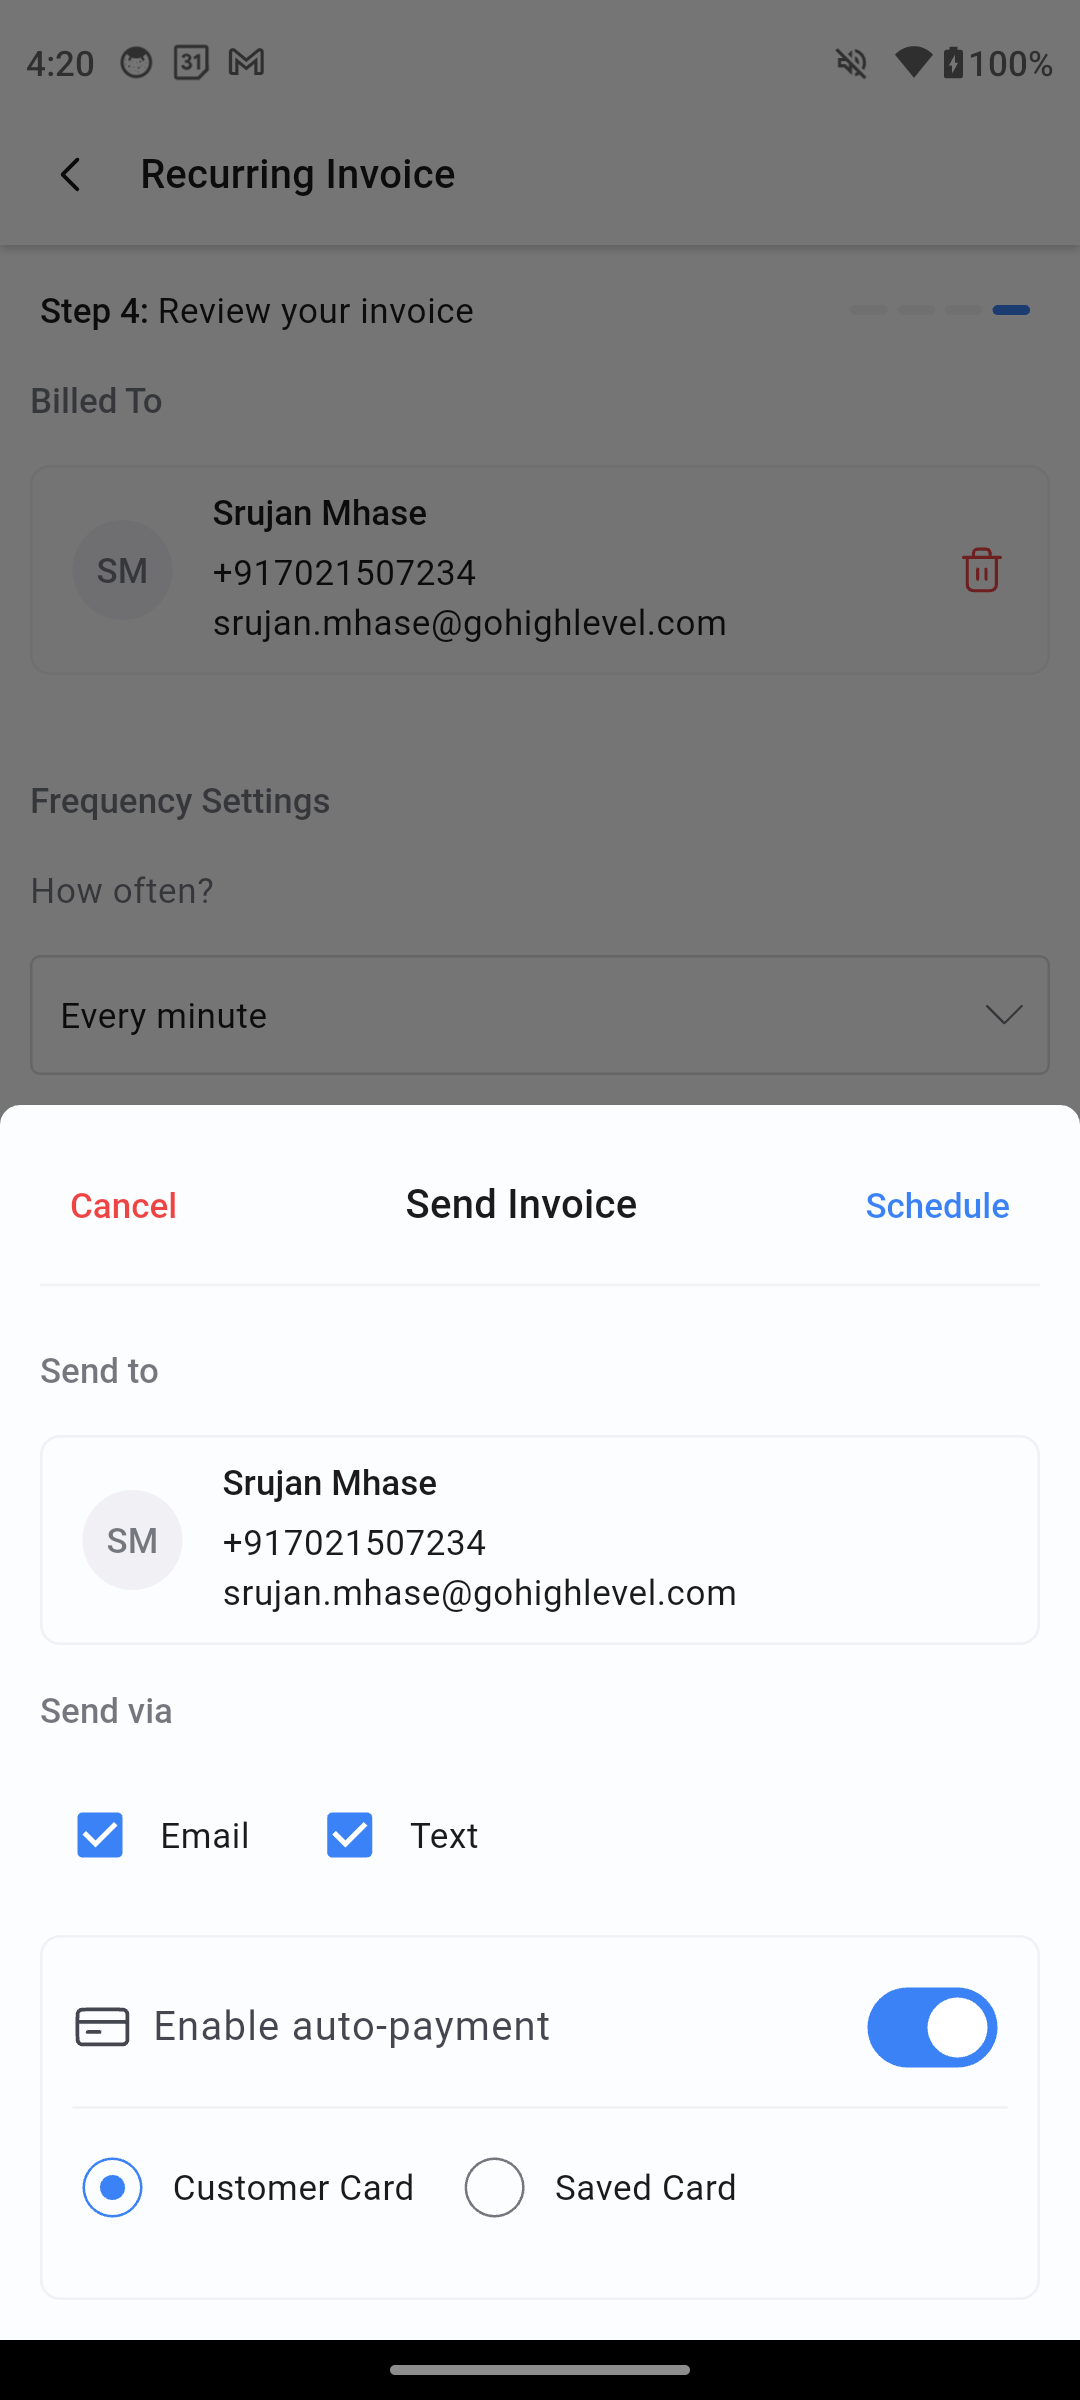
Enable Auto-Payment – On the scheduling sheet, toggle Enable Auto-Payment.
Select payment method:
Saved Card – Pick from saved payment methods.
Customer Card – Use the payment card captured via Tap to Pay or online checkout.
Send – Confirm and send the recurring invoice or POS schedule.
Sit back – Payments are auto-processed on each billing date.
Pro tips for speed:
Always confirm the right payment method before sending.
Keep cards on file updated to avoid payment failures.
Workflow – Copy Actions between Workflows
Copy Workflow Steps… Anywhere!
One of the most requested feature is HERE and it’s going to save you HOURS…!!!
Workflow building just got a turbo boost!! You could already copy workflow actions within the same workflow but now you can copy steps from one workflow to another in seconds — no more rebuilding, just copy-and-paste magic.
What’s New?
– Copy Workflow Actions Across Workflows
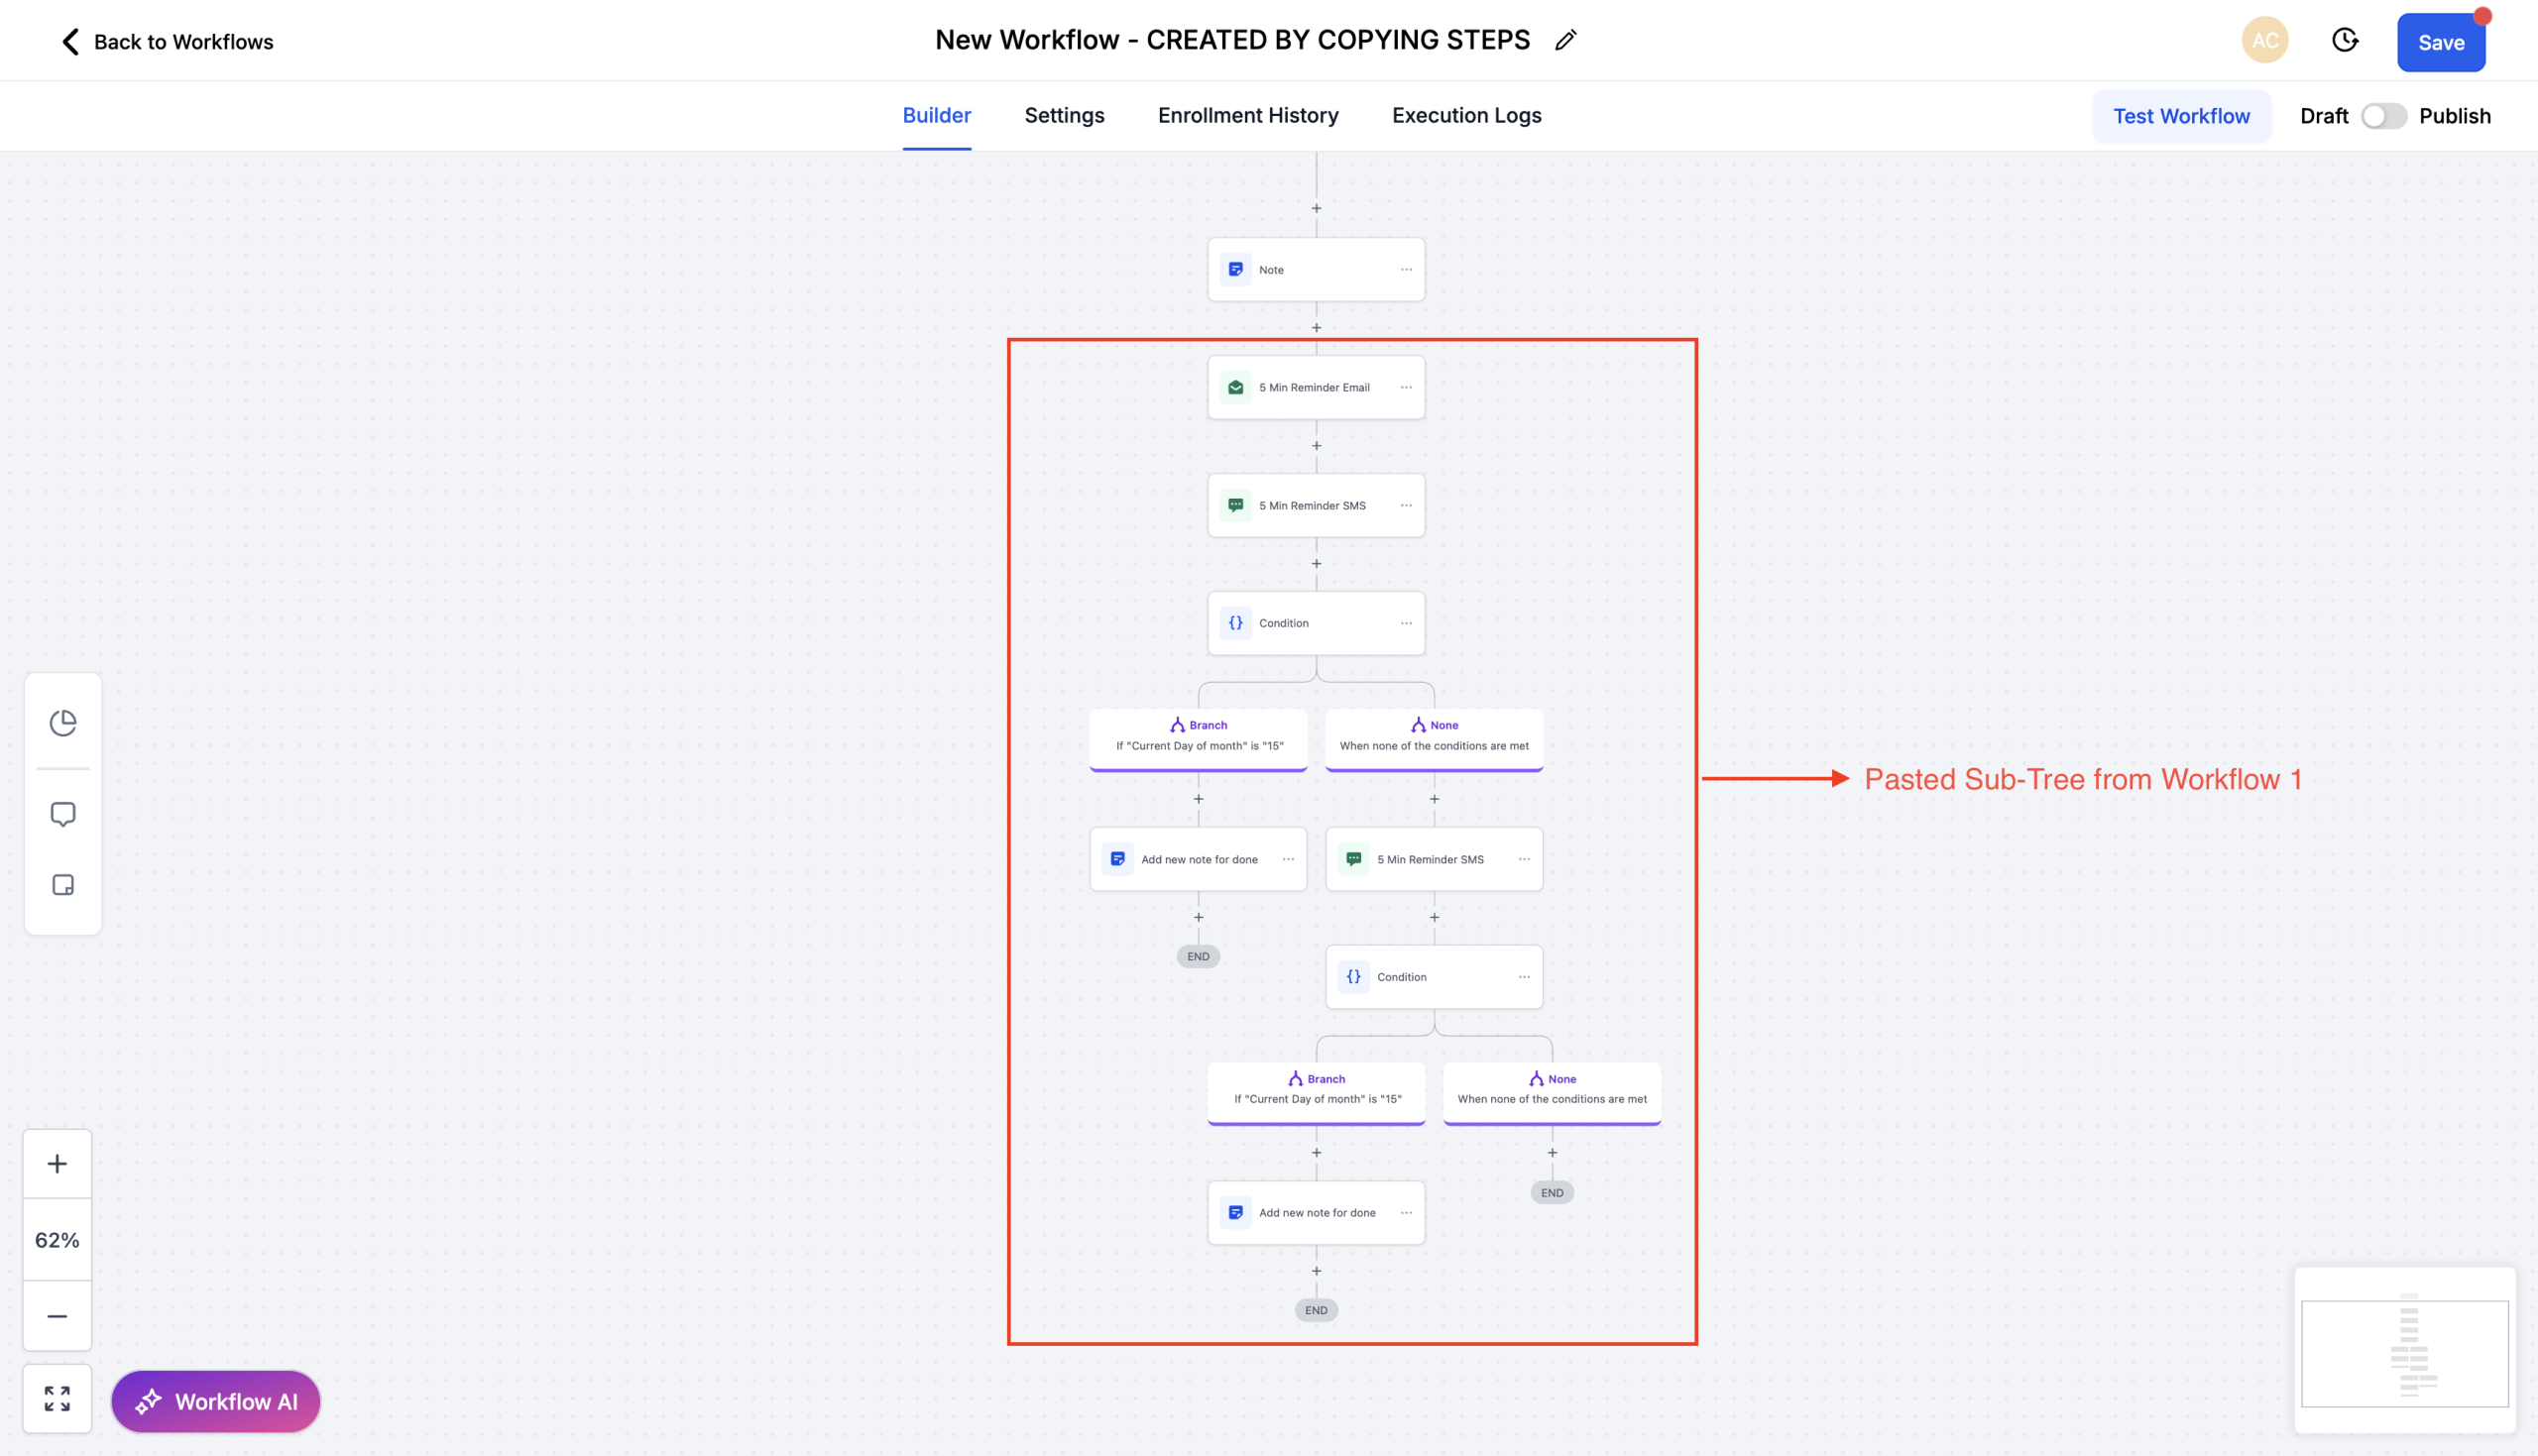
– Copy any single action or an entire block of actions from one workflow.
– Paste them directly into another workflow in seconds — even if it’s in a different tab.
– Works for all workflows within the same sub-account.
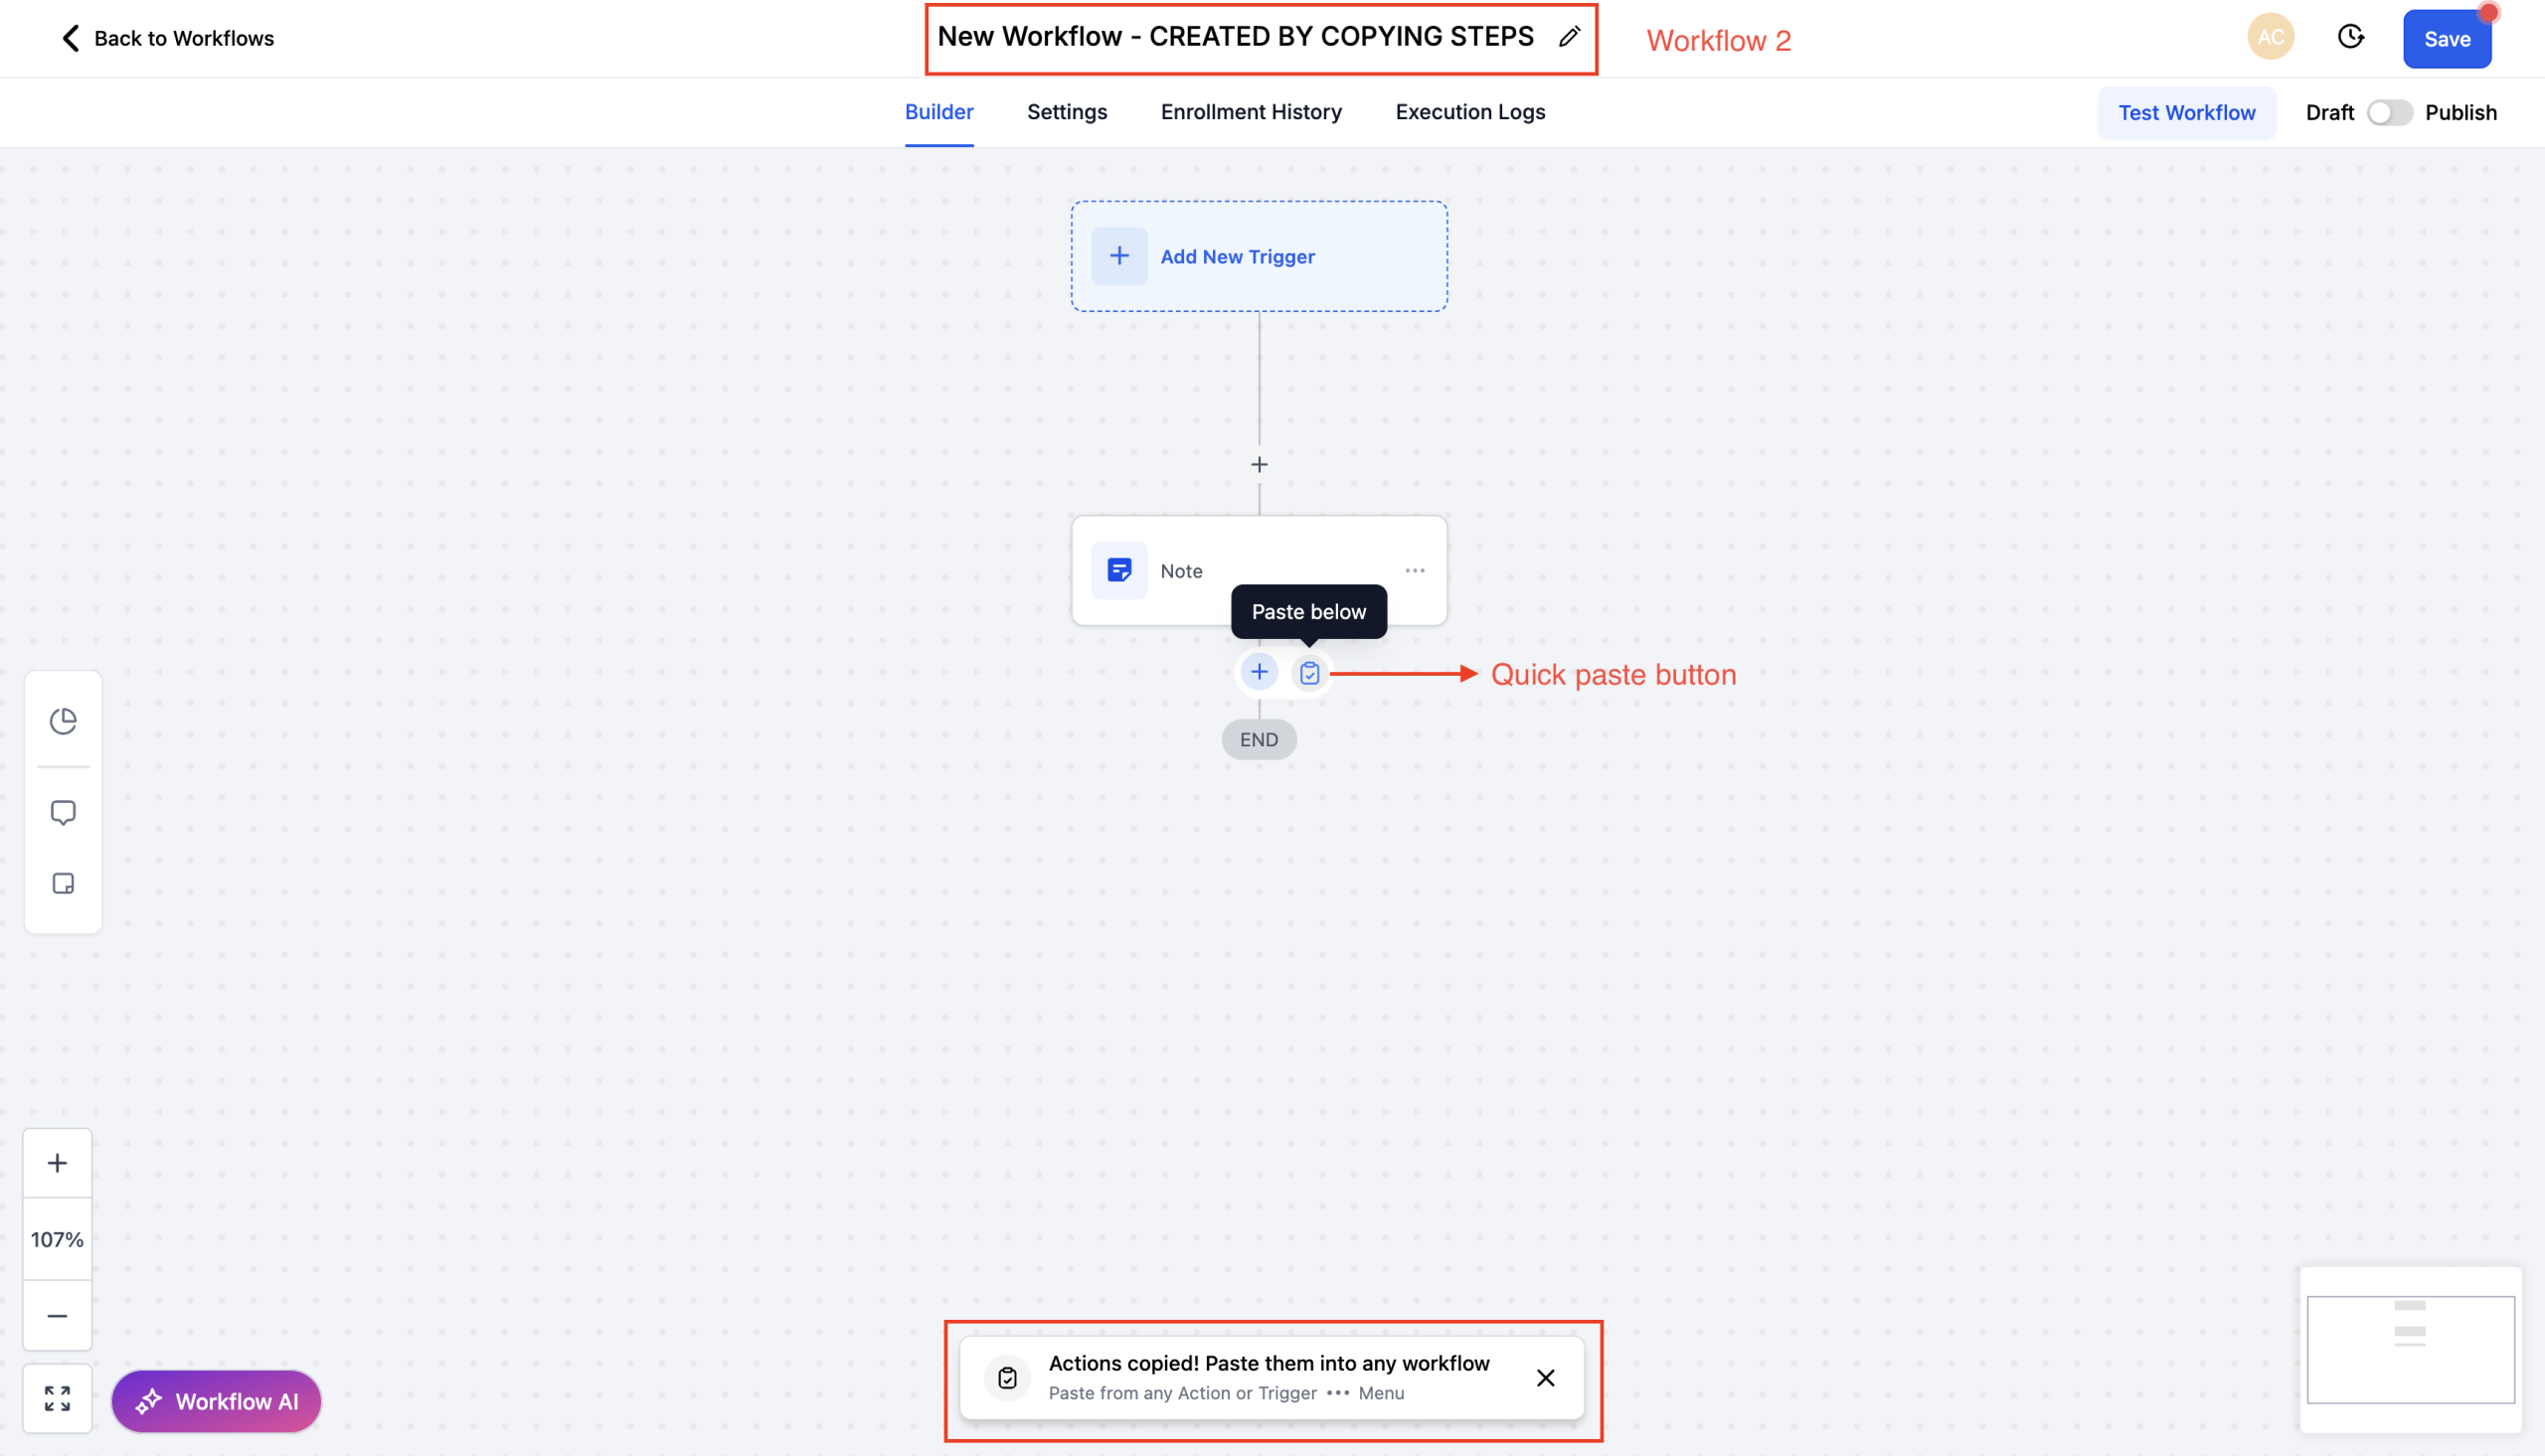
– Copied actions stay in clipboard for 15 minutes so that you can paste in multiple workflows at once.
How It Works?
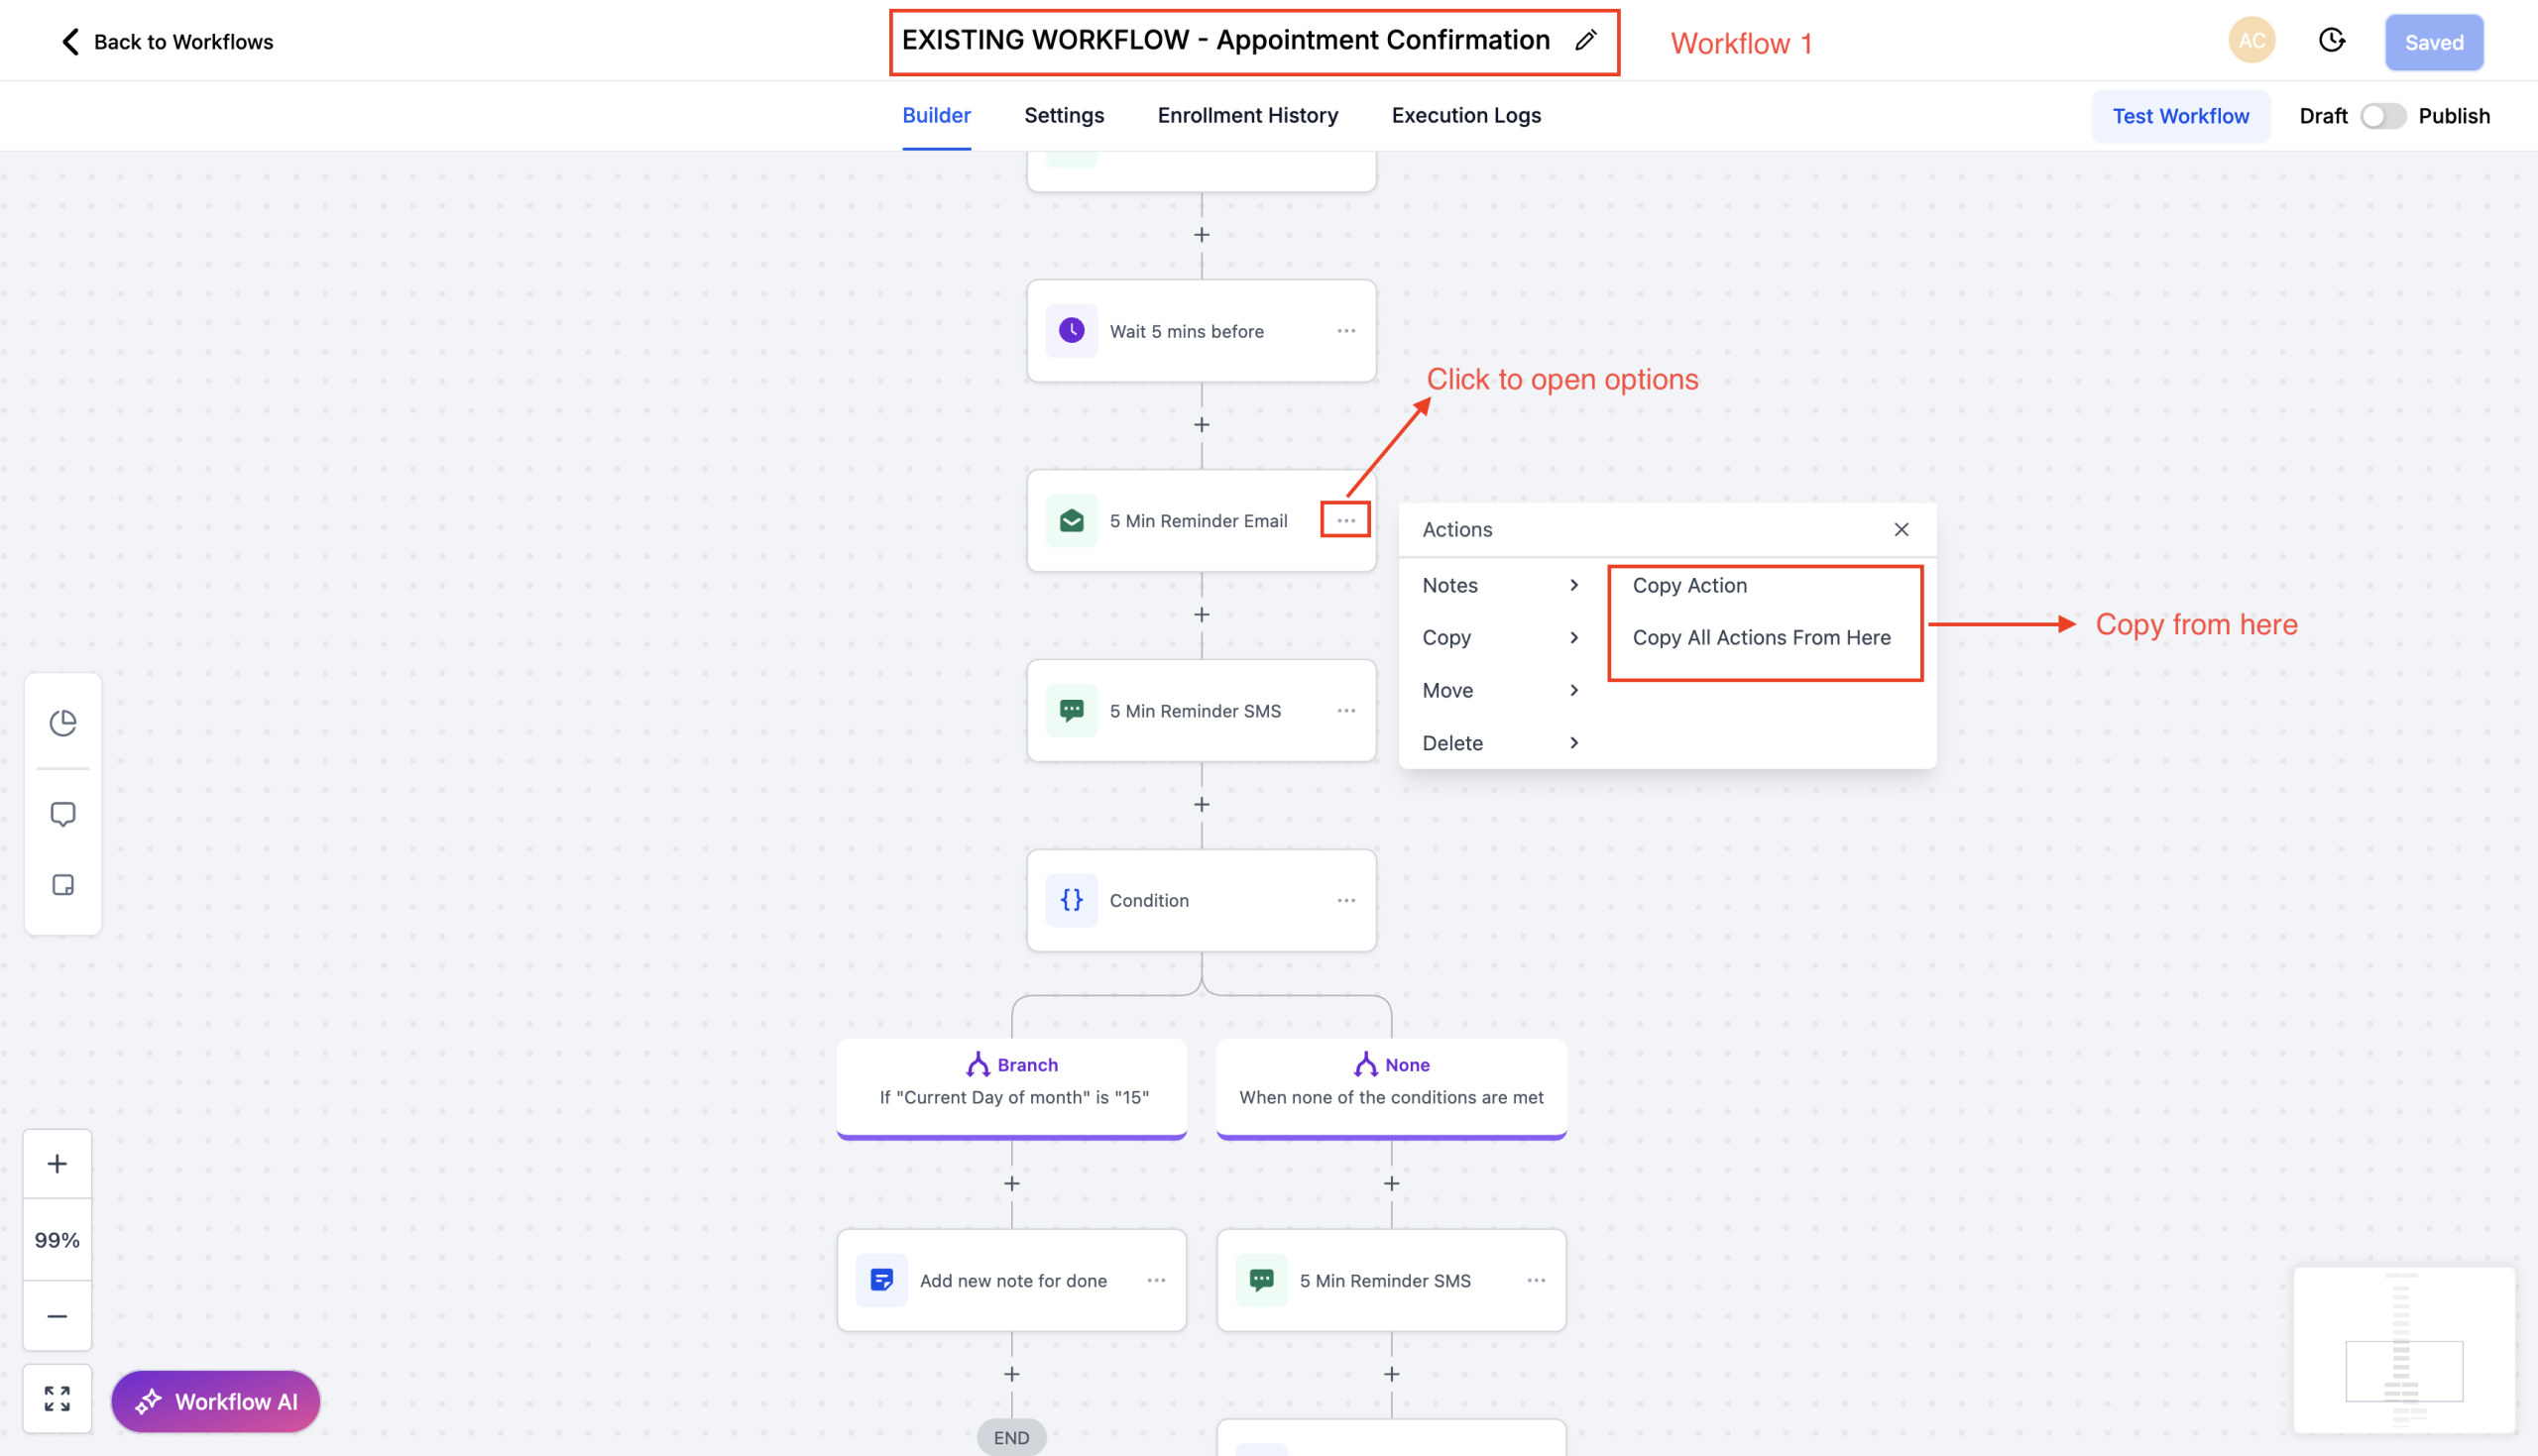
– Open any workflow and click the three-dot menu on an action.
– Pick “Copy Action” or “Copy All Actions From Here”.
– Head to your target workflow (different tab or same one—your choice).
– Look for the Quick Paste button next to the “+” button for adding new actions.
– Or… choose “Paste Below” from any action three-dot menu.
– Validate Pasted Actions before saving workflow.
– Sit back and admire your freshly cloned brilliance.
Workflows – CC/BCC Support in Internal Email Notifications
What’s New?
We’ve enhanced the Internal Notification action within Workflows by adding cc/bcc support for emails — one of the most requested updates from our customers.
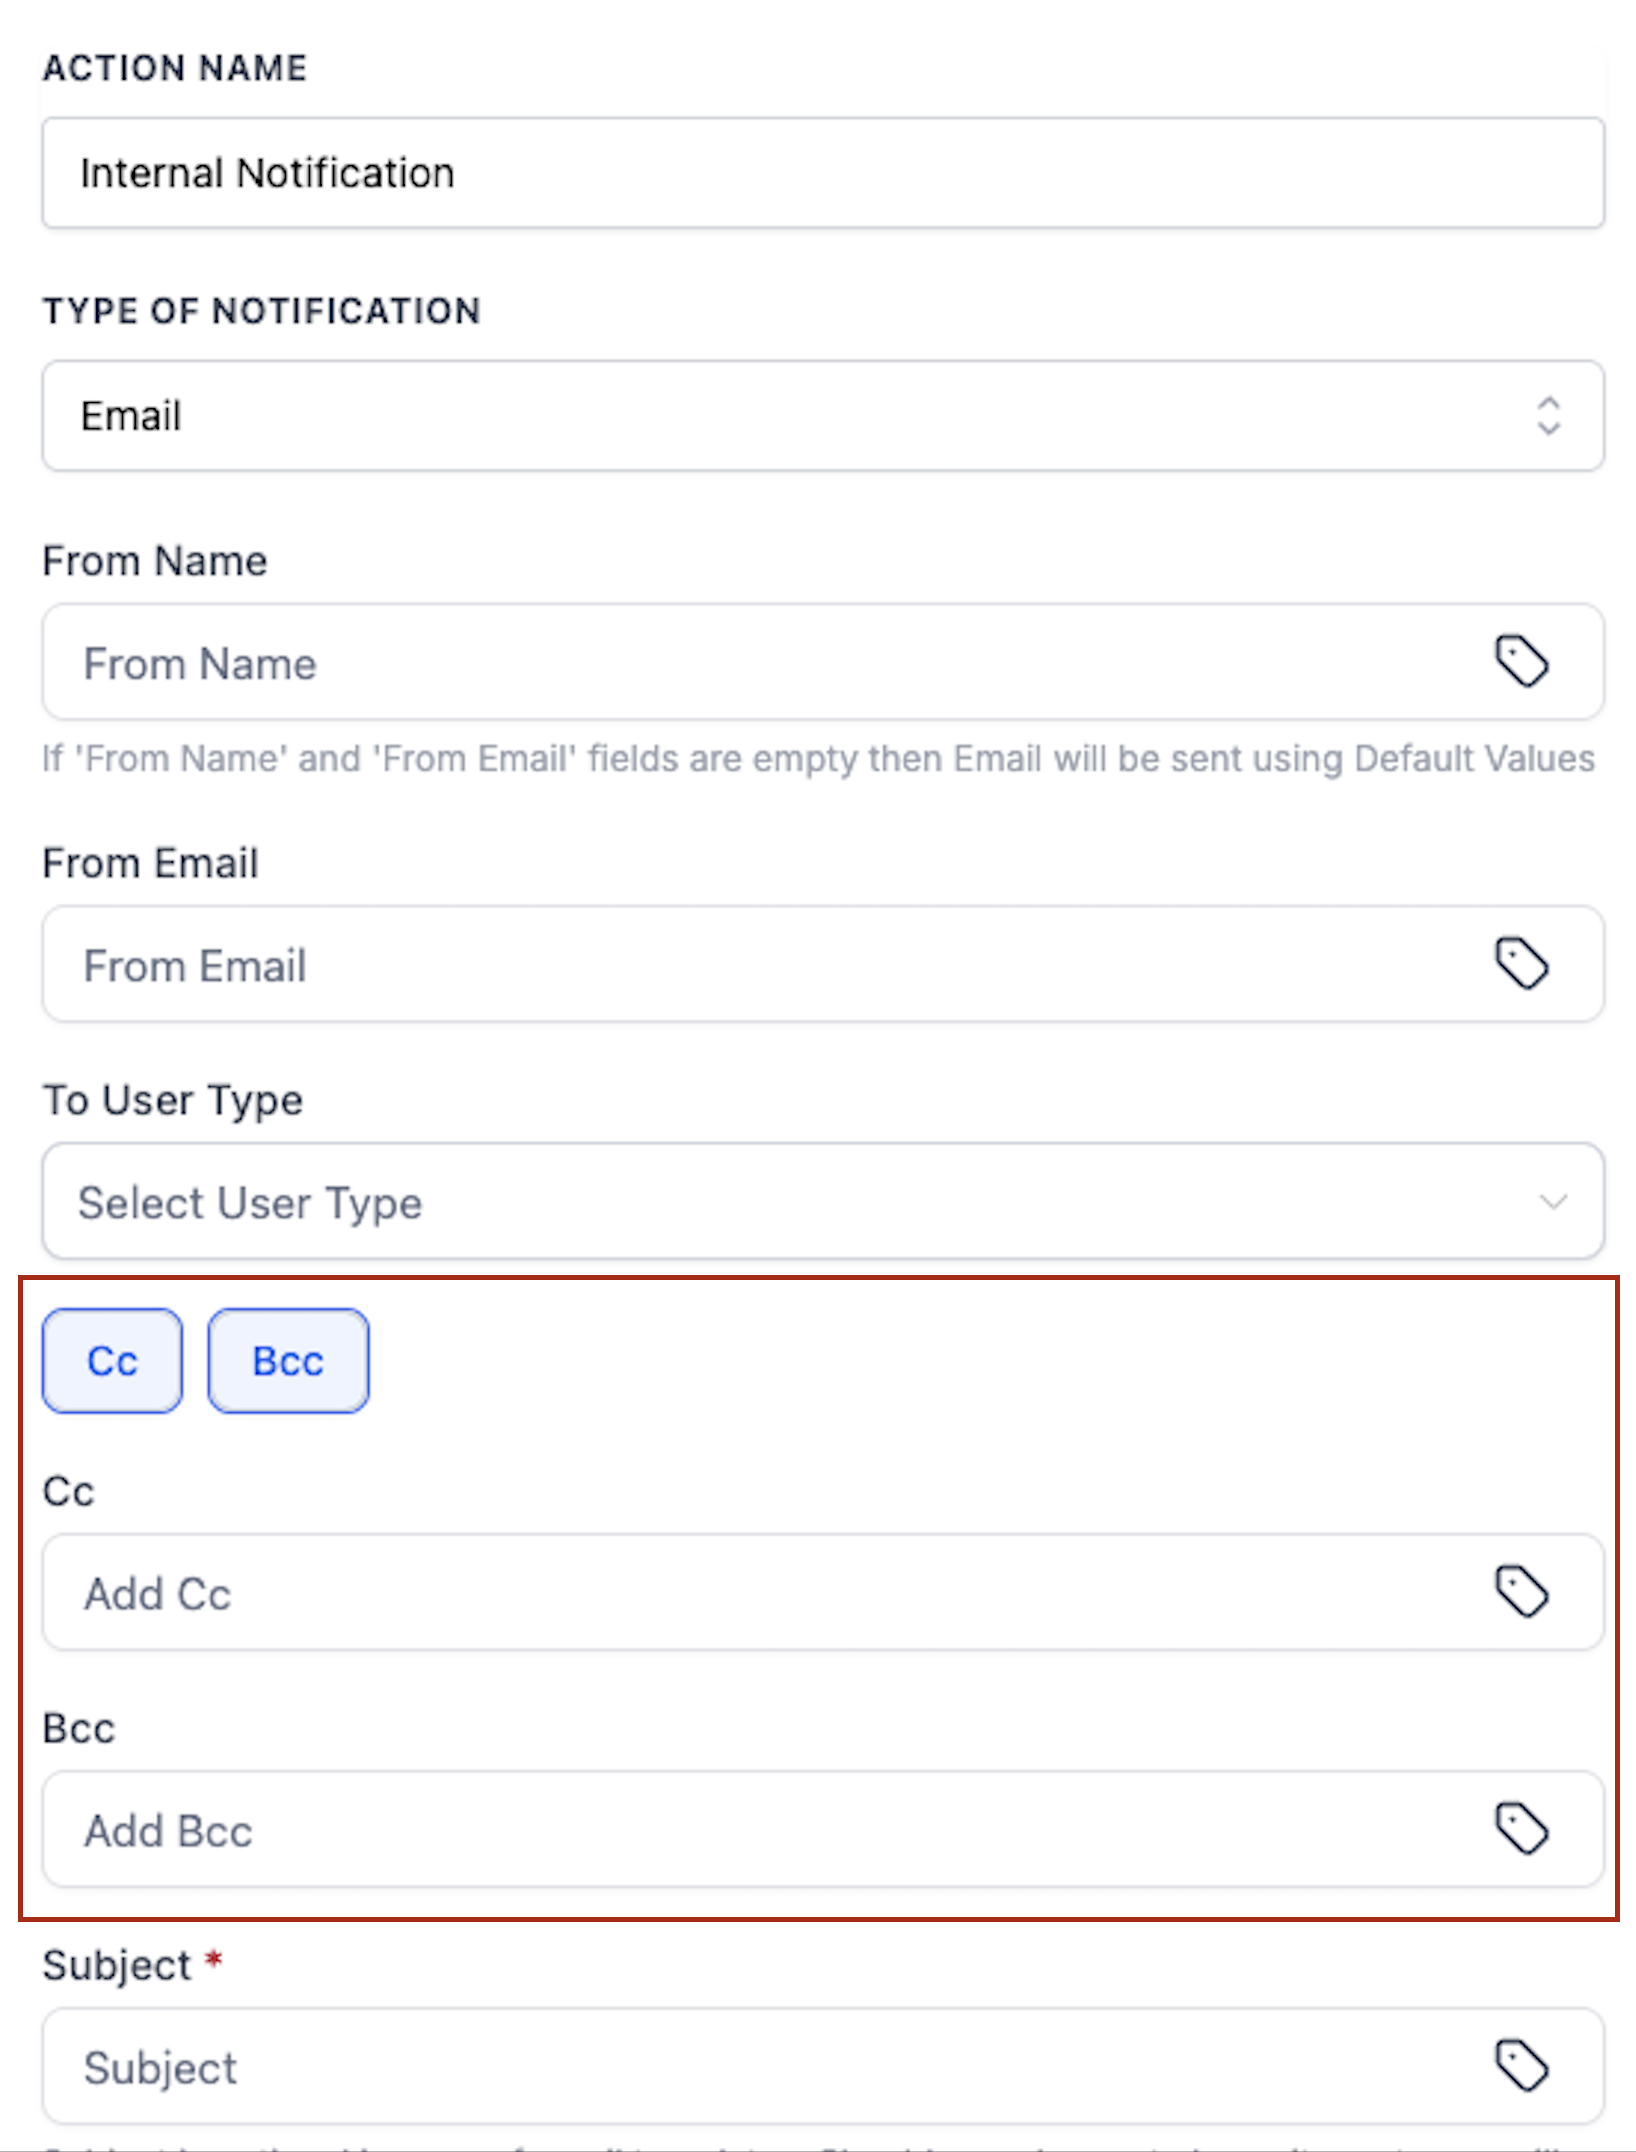
– cc/bcc in Internal Email Notifications
– You can now add cc and bcc recipients to internal email notifications, making internal communication faster, more seamless, and more collaborative.
– Previously, this capability existed only in the Email action. Now, it’s available in Internal Email Notifications too.
How to Use
– Add an Internal Notification action to your workflow.
– Select Email from the Type of Notification dropdown.
– Choose the appropriate User Type.
– Enter CC and/or BCC recipients in the new fields.
That’s it — your internal email notification with cc/bcc is ready to go..!!
LaunchPad Permission Controls
Keep your workspace clean and relevant — choose where LaunchPad appears so it’s visible only to the people who need it.
🔍 What’s New
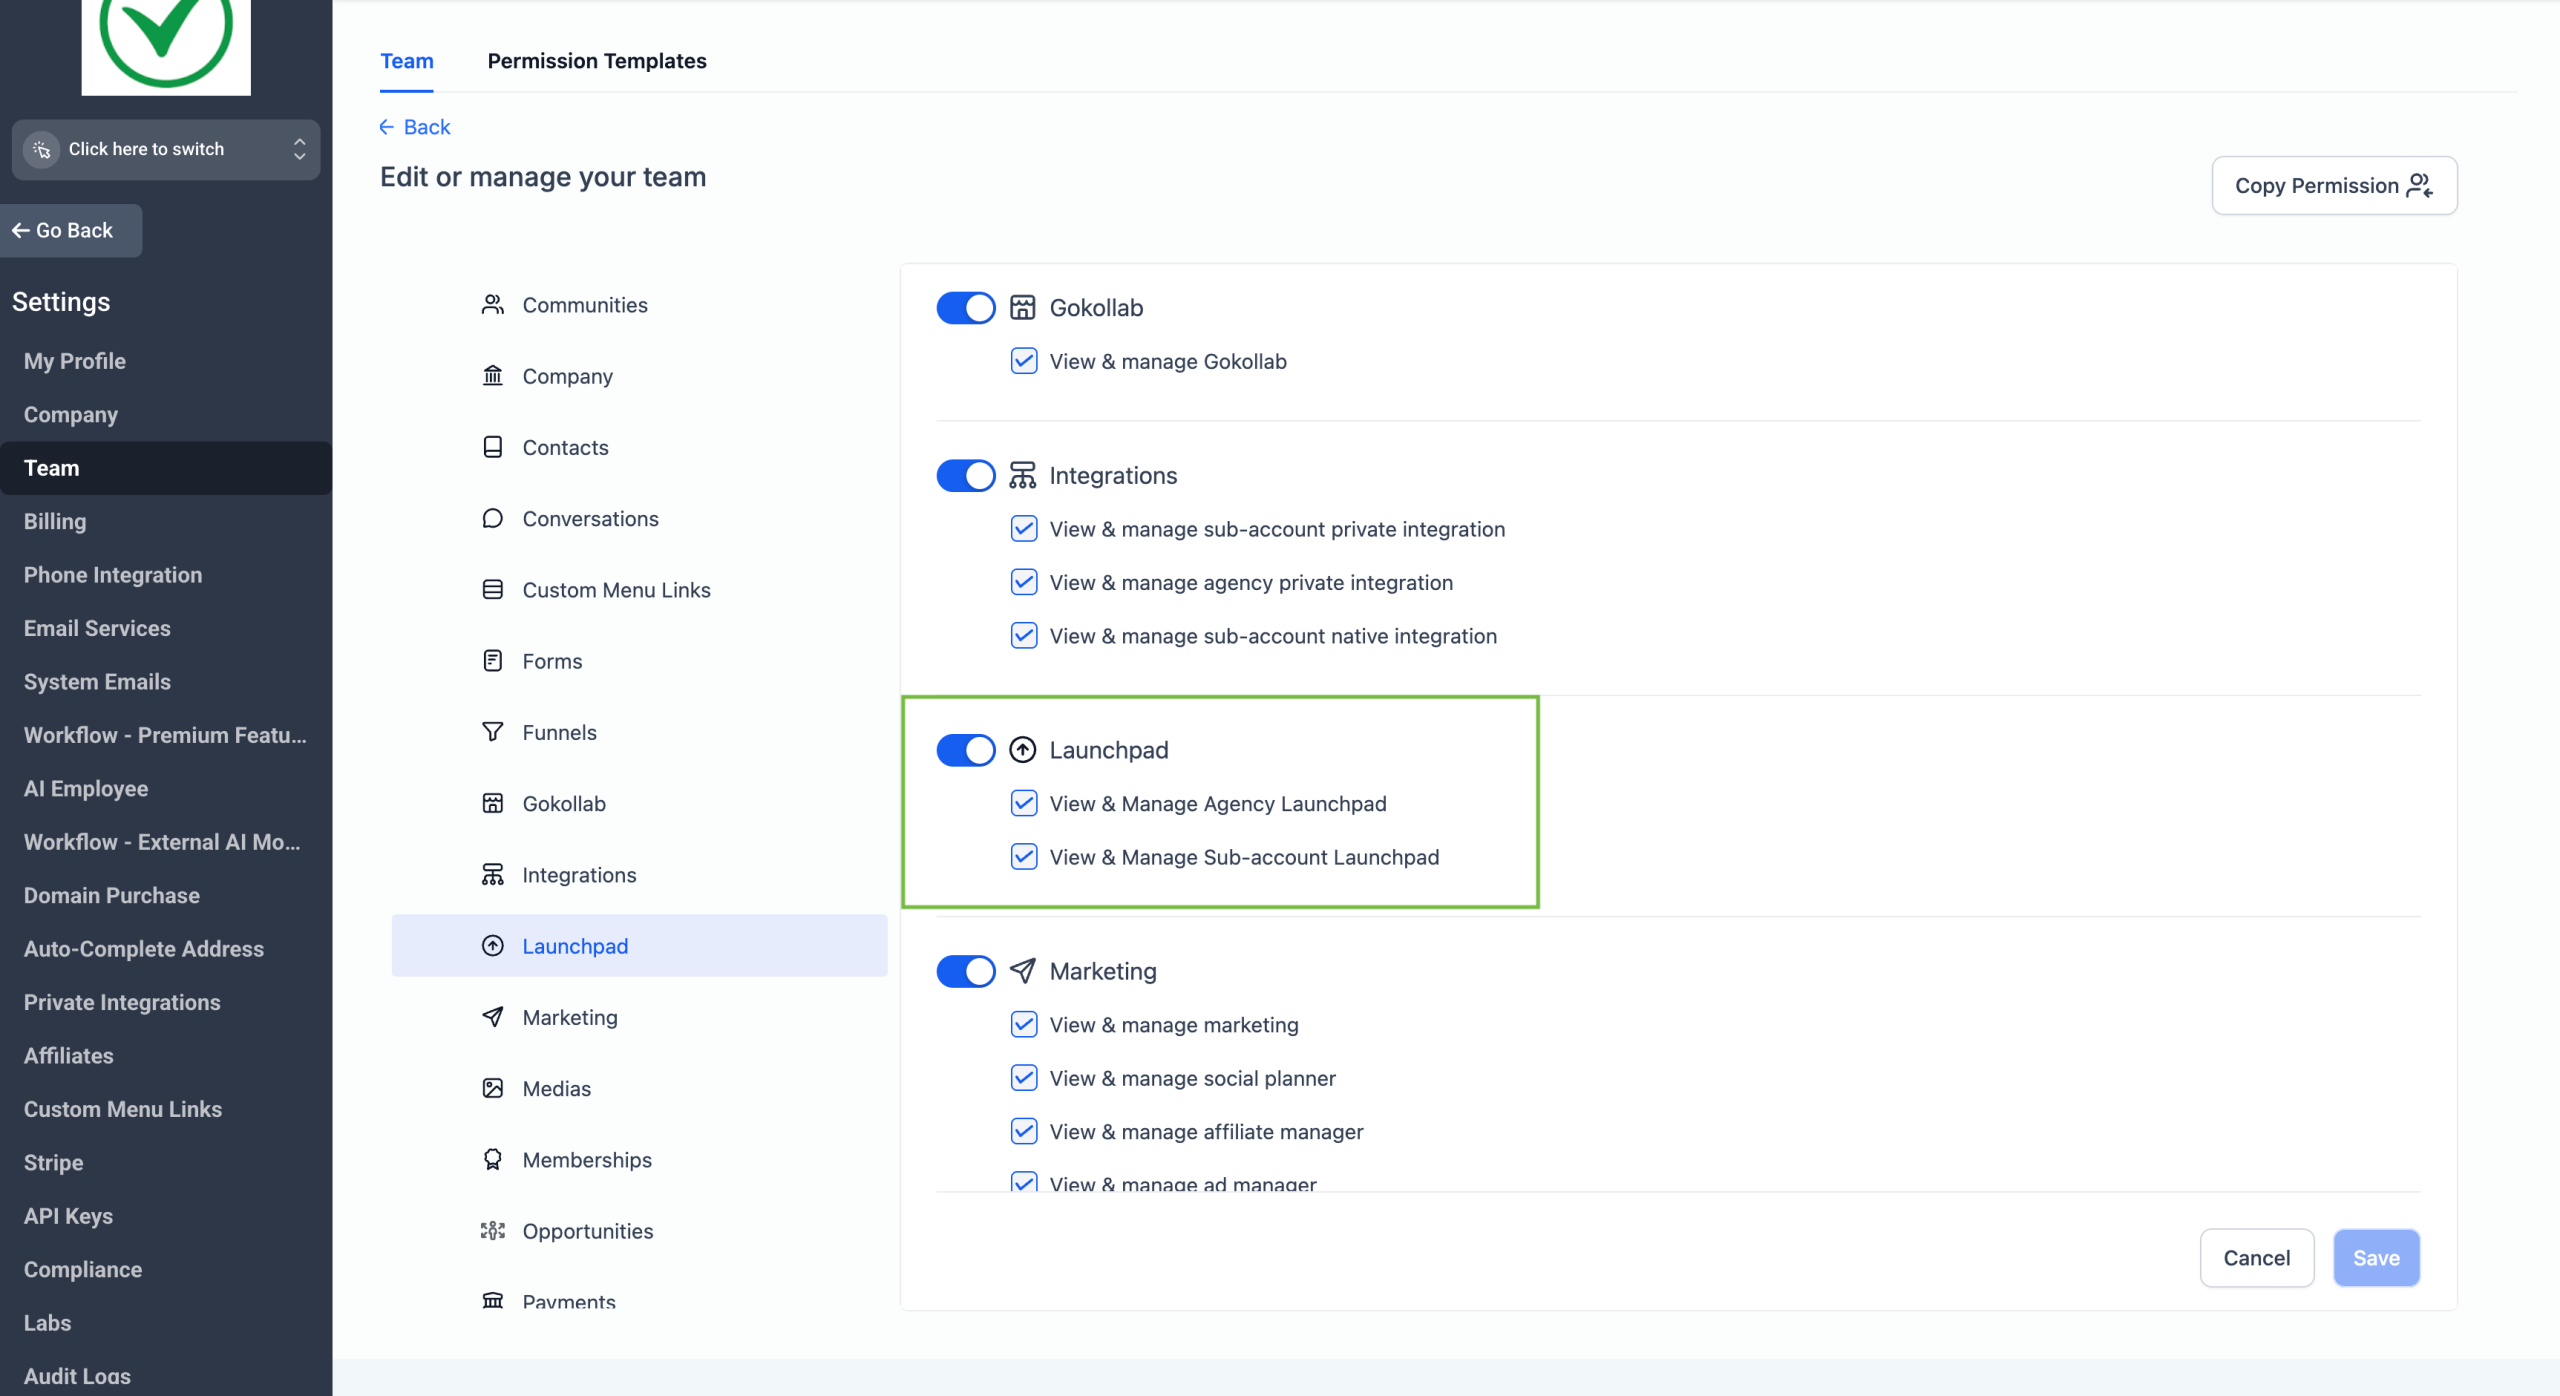
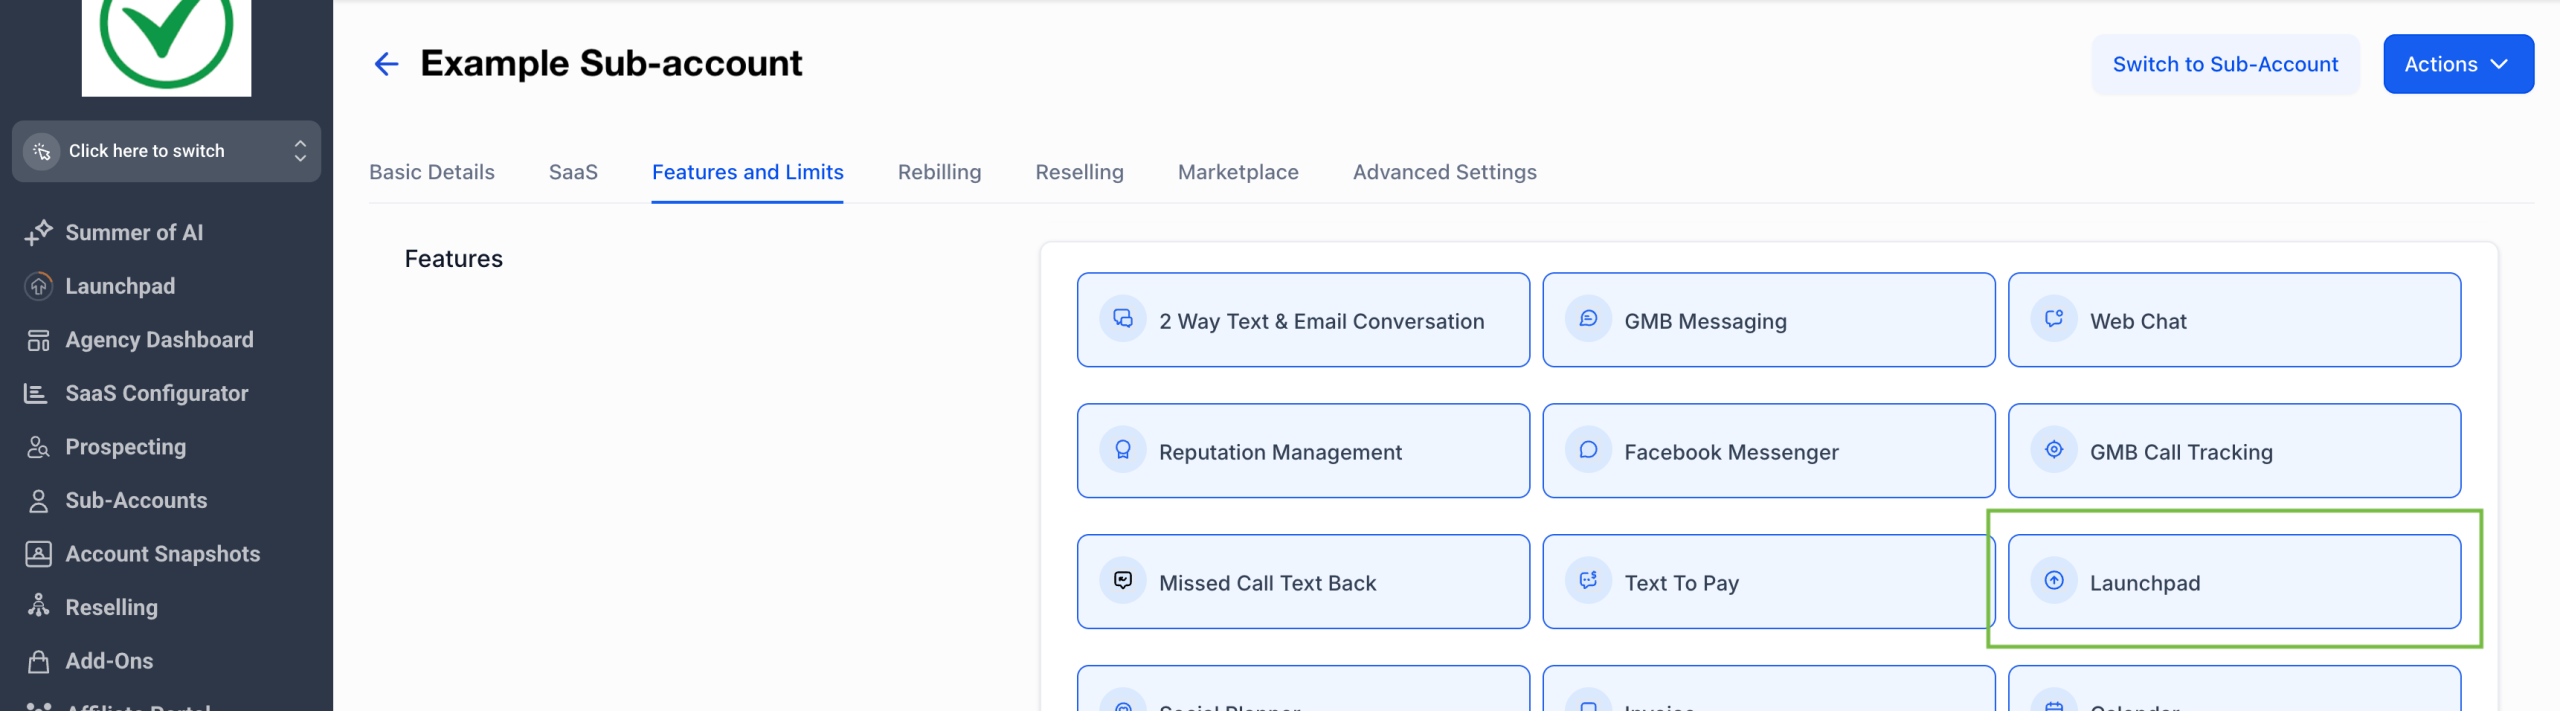
– Sub-Account Control: Show or hide LaunchPad for each sub-account.
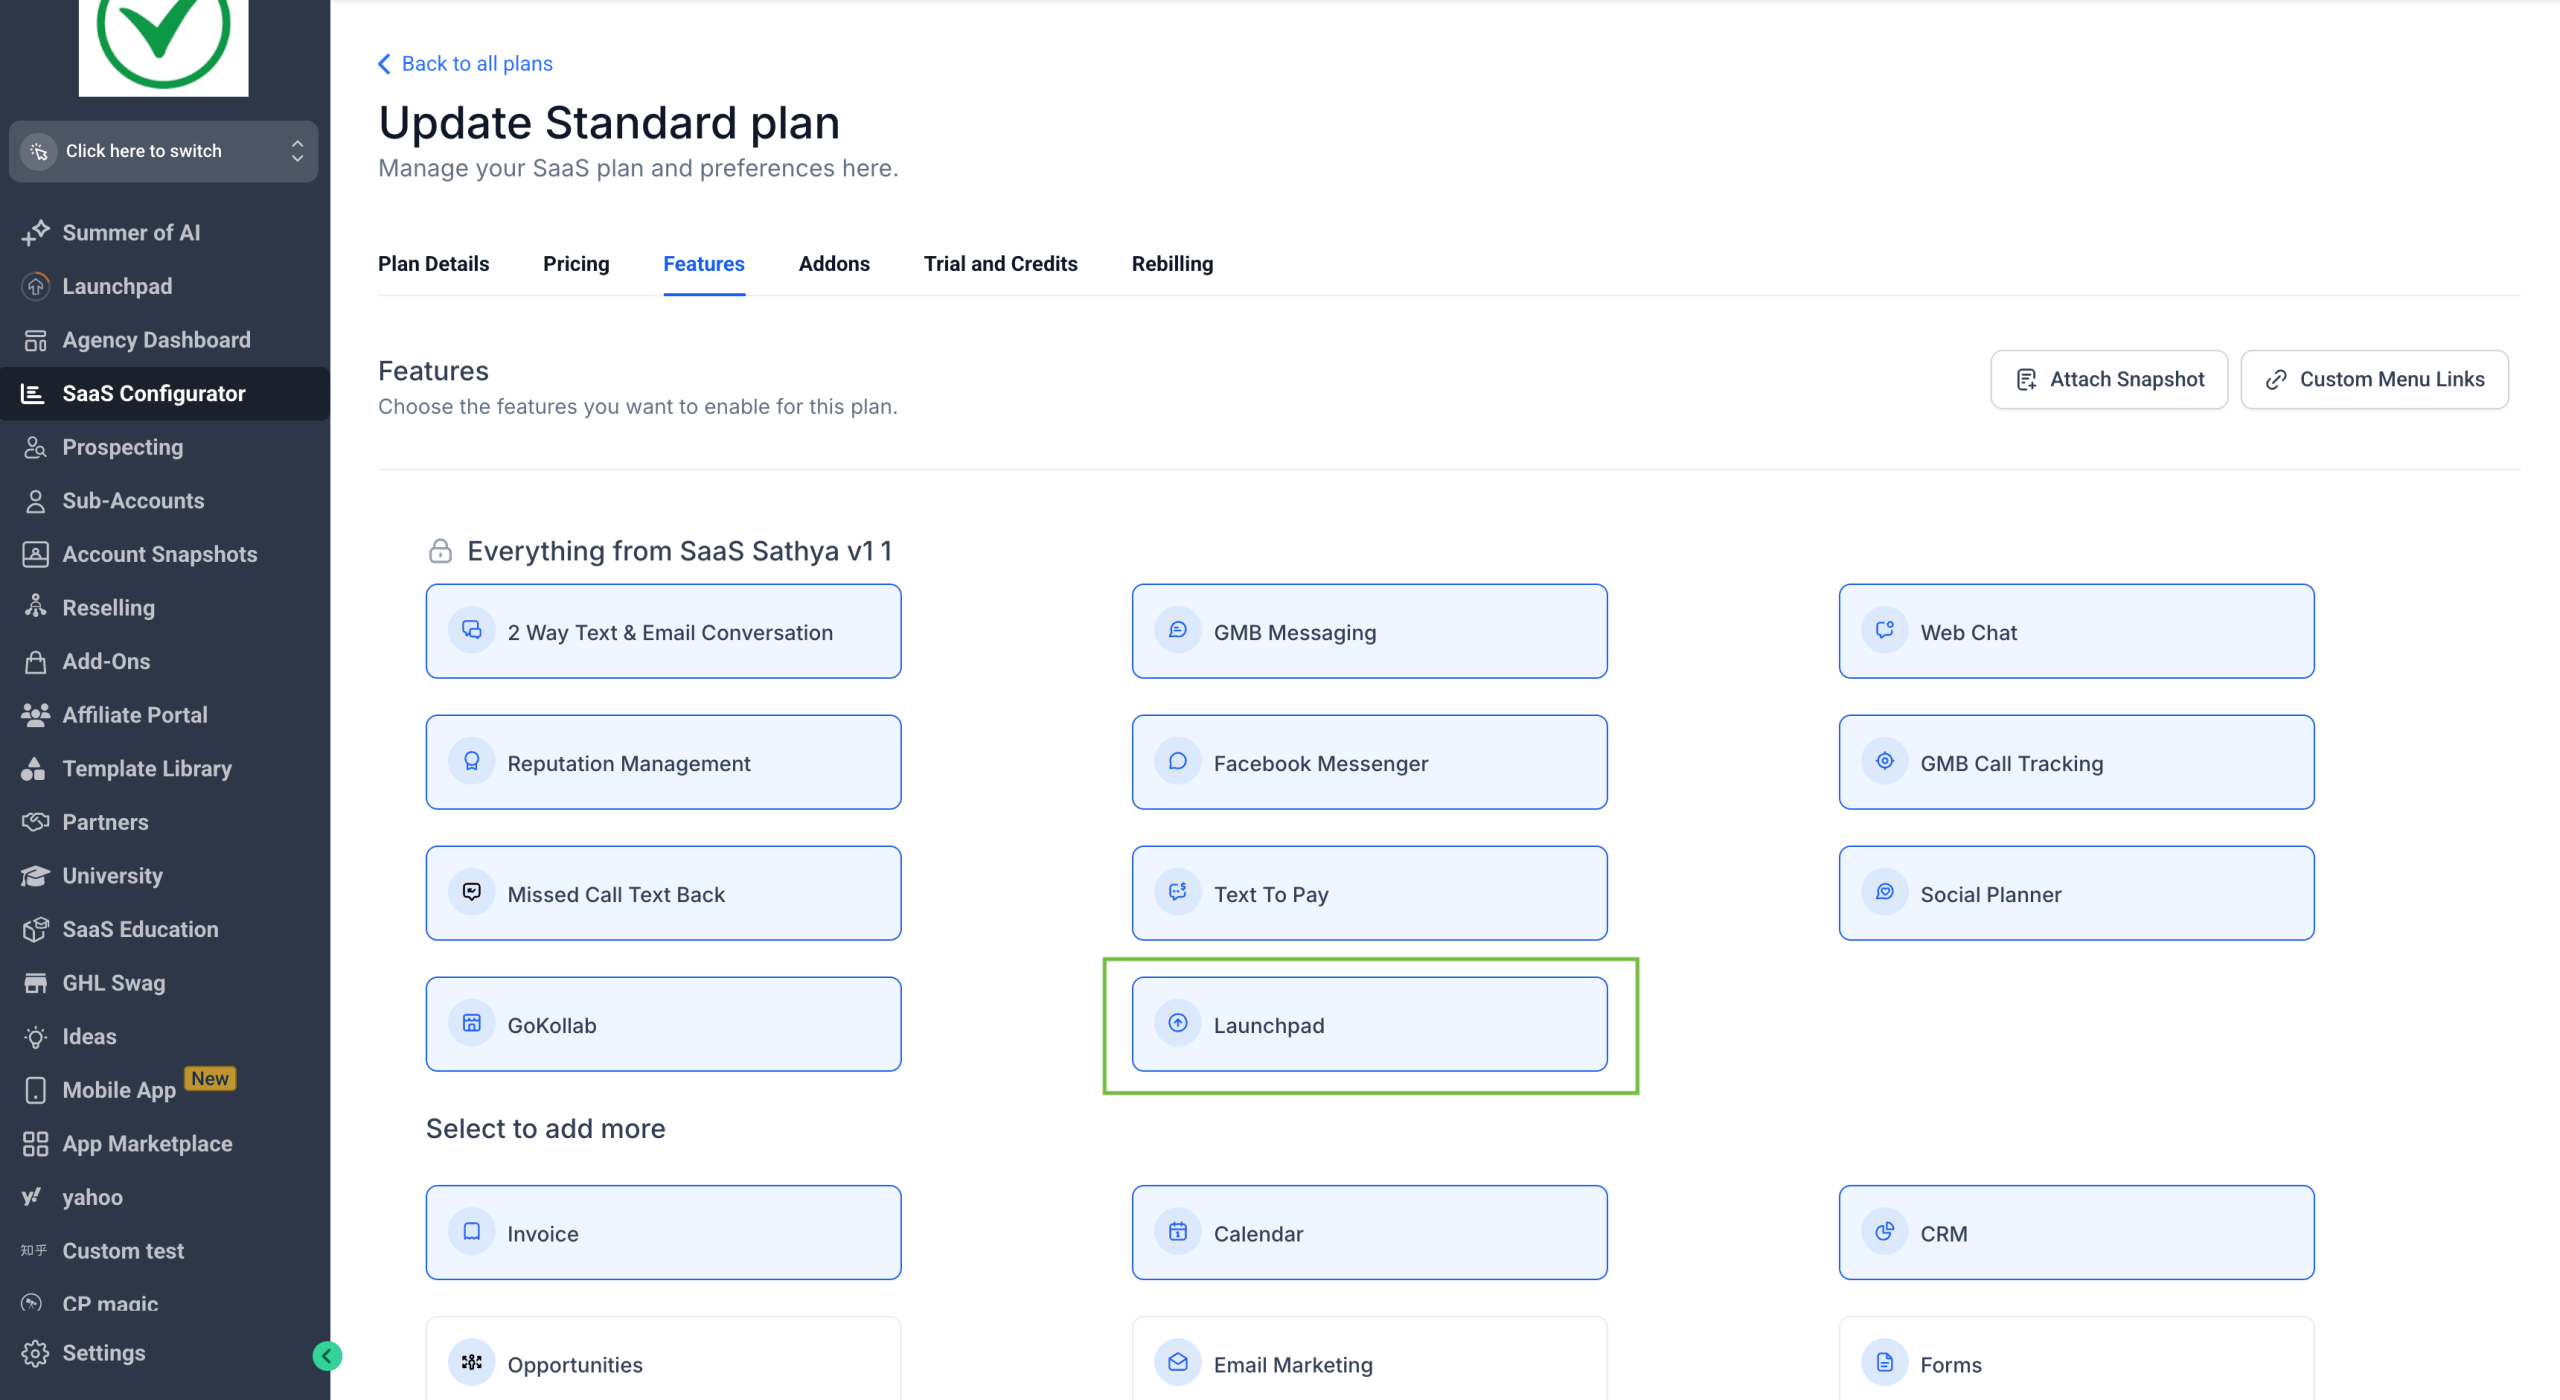
– SaaS Plan Control: Show or hide LaunchPad for all accounts under a plan.
– User Role Control: Choose which roles can access LaunchPad.
💡LaunchPad is visible by default at all levels – you can hide it anytime using the controls below.
📍 Where to Find It
– Sub-Account Settings → Feature and Limits
– SaaS Plan → SaaS Configurator → Edit Plan Details
– Team/My Staff → Roles and Permissions (Agency or Sub-Account)
💡 Why It’s Useful
Keep things focused for your team by showing LaunchPad only where it’s needed — whether for onboarding new users or keeping advanced users’ workspace clean.
GPT Action Now at 5% Below Market Price
-We have reduced the pricing for our GPT Action to make it even more cost-effective for our users.
– After moving it rack pricing, we are now offering an additional 5% discount—making our GPT rates lower than the current market price.
– It is now cheaper to use OpenAI in Workflows than directly using it.
– This change ensures that agencies using our AI capabilities get the best value in the industry.
What’s New?
Pricing Improvement
– GPT Action is now 5% cheaper than the market rate.
– Pricing change applies across all workflows using GPT.
How It Works:
– Use the GPT Action in any workflow as usual.
– The updated discounted pricing is automatically applied.
– Enjoy market-leading AI capabilities at the lowest cost available.