
Customize, Act, Close Faster 🚀 Opportunities V2 – Mobile App! Lead Management Reimagined for You!
From customizable stages to full-detail views and lightning-fast actions, here’s what’s new and why it helps you close deals better than ever.
🤔 You spend hours digging through pipelines, clicking into cards just to find key details, and switching between tabs or tools to take the simplest action. Quick follow-ups get buried, important context gets missed, and your team wastes time on clicks instead of closing deals.
✨ We’ve reimagined lead management so your pipeline works with you and for you. From personalized card layouts to quick actions and integrated tabs for notes, tasks, and appointments — everything is now connected in one modern, intuitive workspace.
🏆 How This Supercharges Your Business
– Save Time: Fewer clicks, instant details, faster actions.
– Boost Revenue: Quick follow-ups lead to more closed deals.
– Empower Teams: Customizable views for clarity and control.
– Delight Customers: Respond faster, follow up consistently.
🛠️ How to Get Started
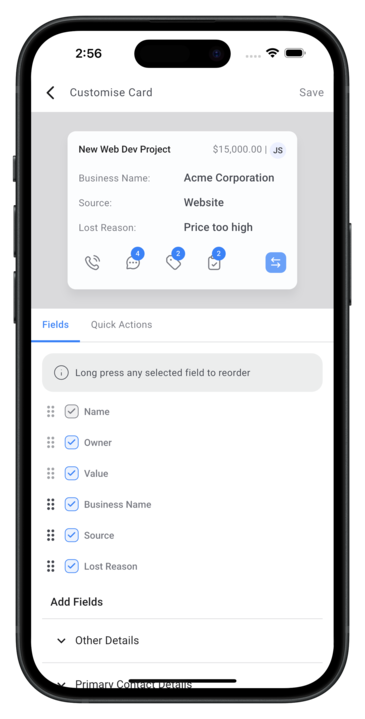
1. Customization
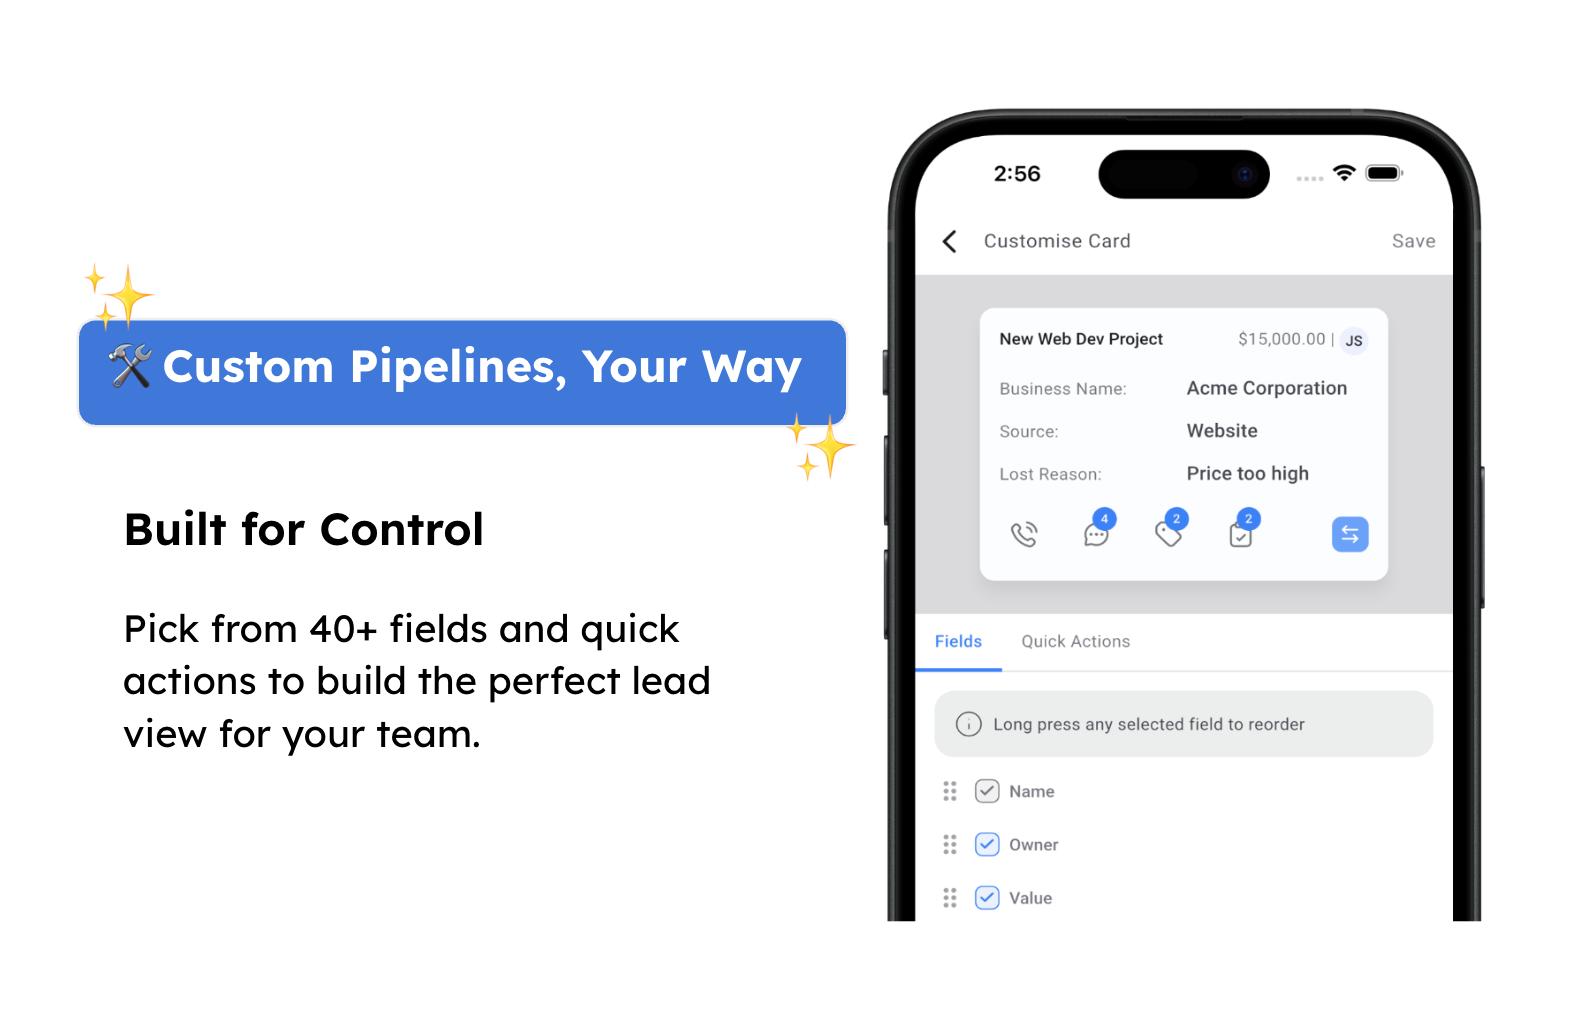
– Go to Opportunities → Settings → Customize Cards → Choose from 40+ fields and Quick actions
– Activate: Select up to 7 fields and choose your quick actions
– Save and see your personalized cards instantly in the pipeline
2. All New Pipelines
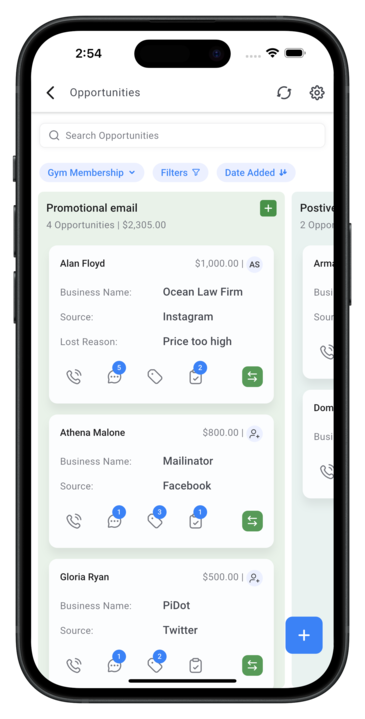
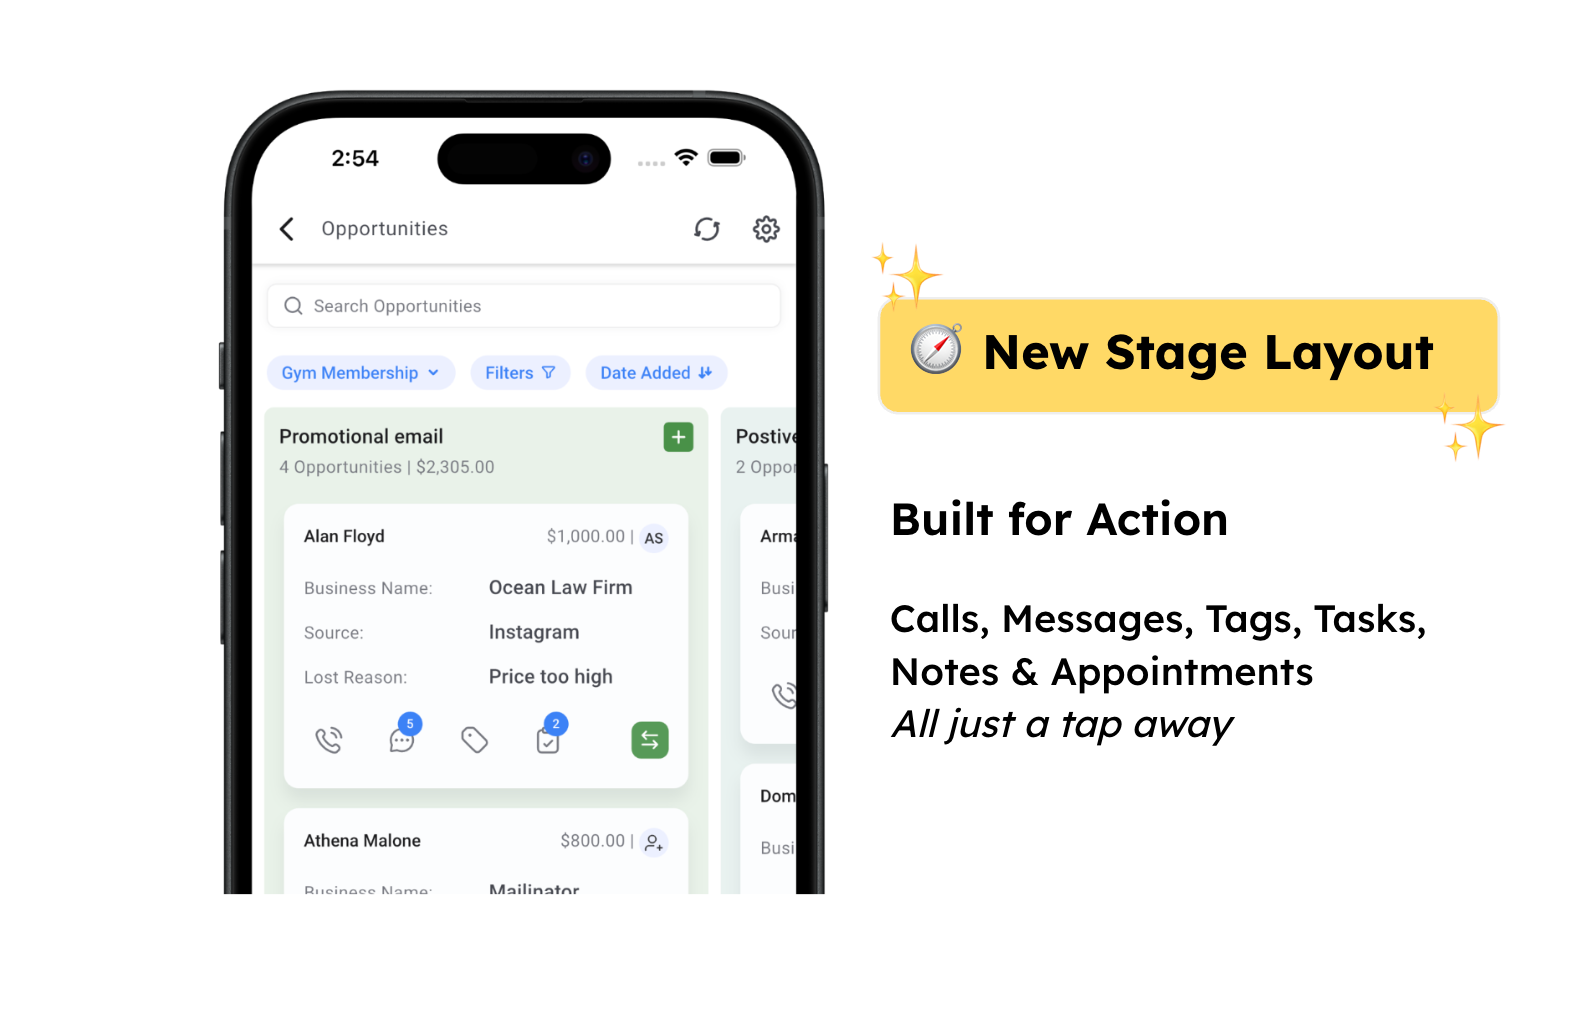
– Go to Opportunities → Pipelines to view your updated stages
– Interact with customized cards — take quick actions (call, notes, tasks, tags, stage change) directly from the card, with badges showing active items
– Work faster with a clean, modern pipeline view that puts everything you need just a tap away
3. All-in-One View
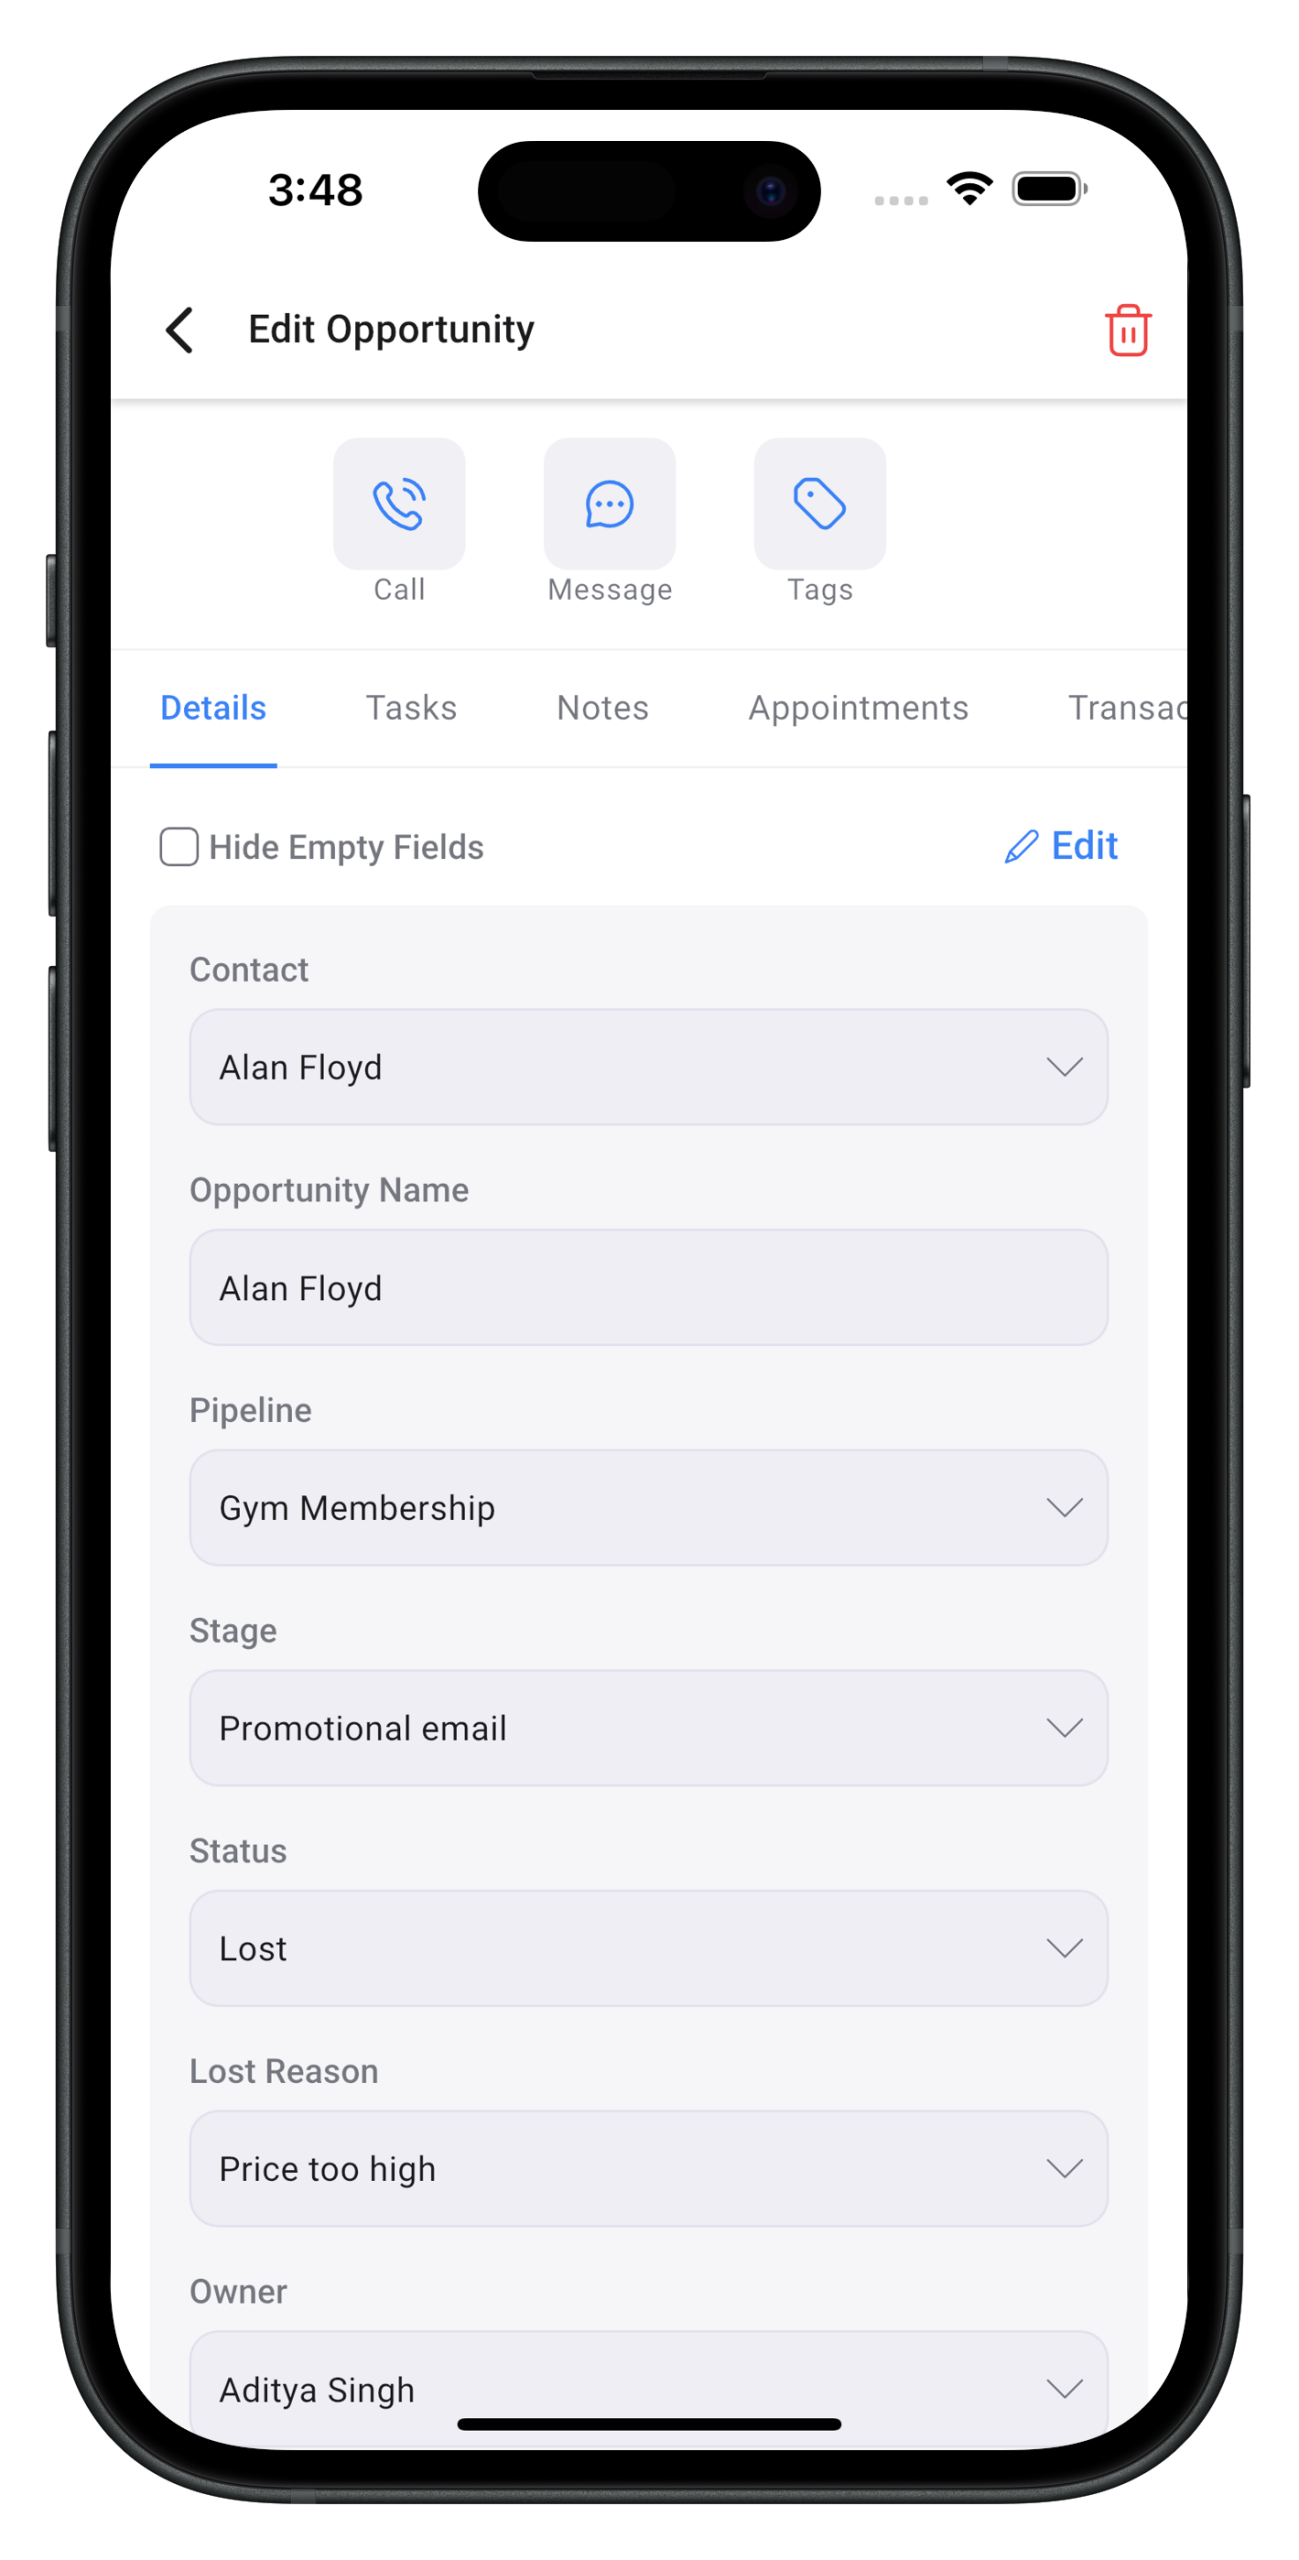
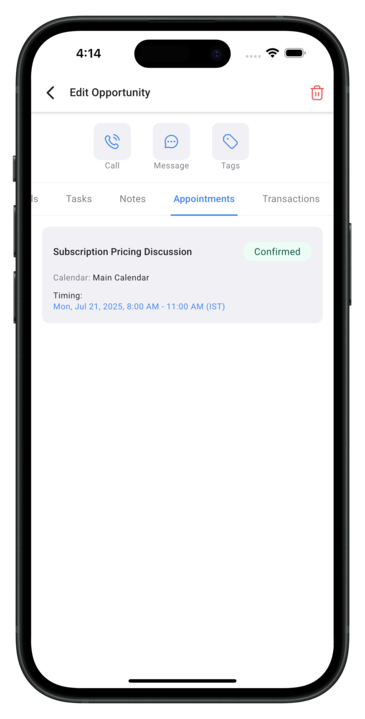
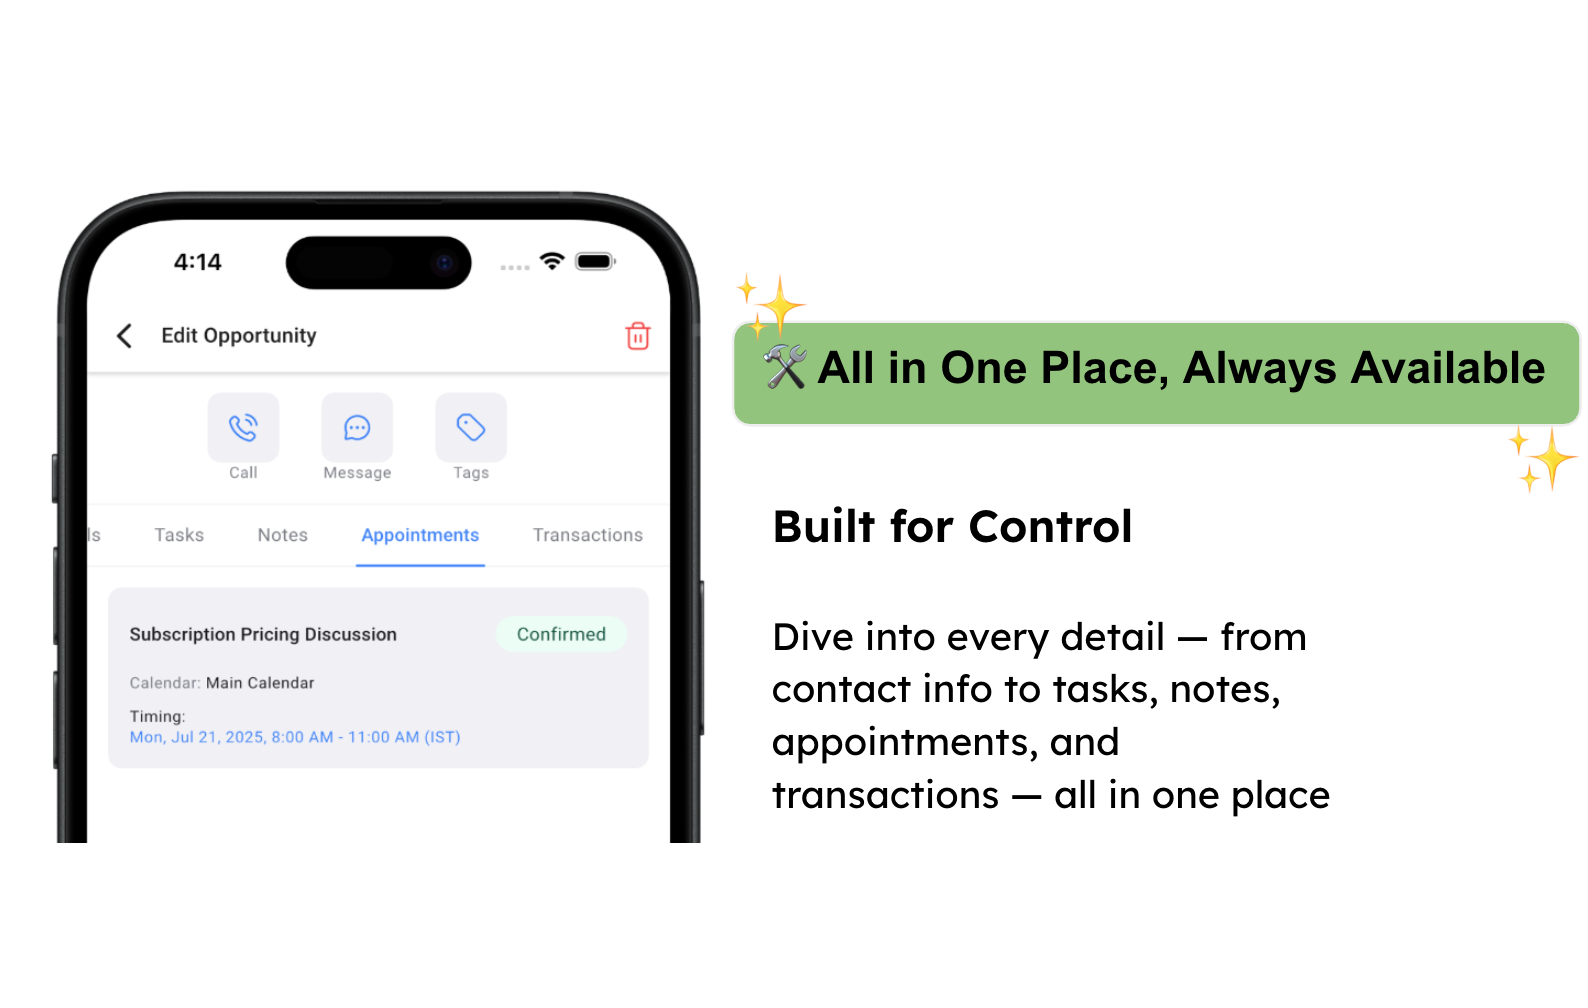
– Click on any Opportunity Card inside your pipeline
– Use the top quick actions (call, message, tag) or switch between tabs — Details, Tasks, Notes, Appointments, Transactions to manage everything in one place – Edit info, add updates, and track activity seamlessly without leaving the opportunity view
💡💡 Pro Tip: Watch for counters on conversations, notes, tasks, and tags so you never miss an update.
📌 Important Info
Q1: When is this going live?
A: This is live! Update the mobile app to start using.
Q2: Will this reset the way cards and fields currently appear on mobile?
A: Yes, this update will reset your current mobile card layout and fields.
Q3: What will be the default fields on the new Opportunity cards?
A: Name, Value, Owner, Source, Business, and Lost Reason
Q4: How many fields can I show on each Opportunity card?
A: You can display up to 4 custom fields on each card. In addition, 3 bonus fields—Name, Value, and Owner will always appear on the top line of every card by default when selected.
Q5: What will be the default actions available on cards?
A: Message, Add Tag, Add Task, and Move Opportunity
Q6: Will this customization change how Opportunities appear on desktop?
A: No, this change is limited to the mobile app only.
Q7: Is the new version and changes applicable only to mobile app?
A: Yes, the customization and layout updates apply to the mobile app only. All of this is already available on Web, will continue to work as per your setup on Web.
Q8: Will change in customization on Mobile change the Web layout and vice versa?
A: No, changes made on Mobile app applies only to layout on the Mobile app and same goes for Web.
Availability:
Status: Live
HighLevel v3.106.4 and above
LeadConnector v3.106.4 and above
White Labelled apps – Update to be requested
WhatsApp: Interactive Message for Chatbot flow
📖 Overview
We’re excited to announce Interactive Message Types for WhatsApp inside Automations!
This release enables richer message formats, branching capabilities, and compliance with WhatsApp’s latest conversation rules — helping businesses create guided and engaging customer experiences.
✨ What’s New
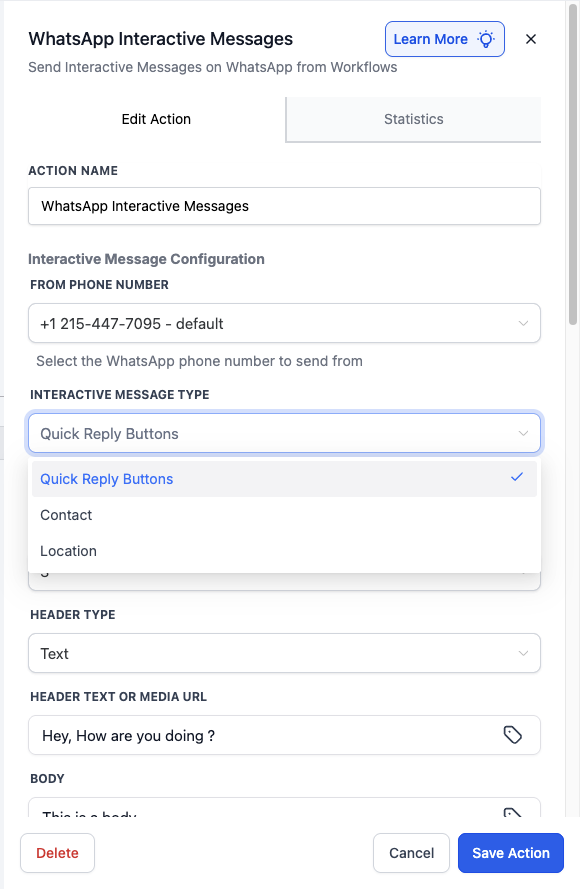
Supported Interactive Messages
You can now send the following Interactive WhatsApp Messages in Automations:
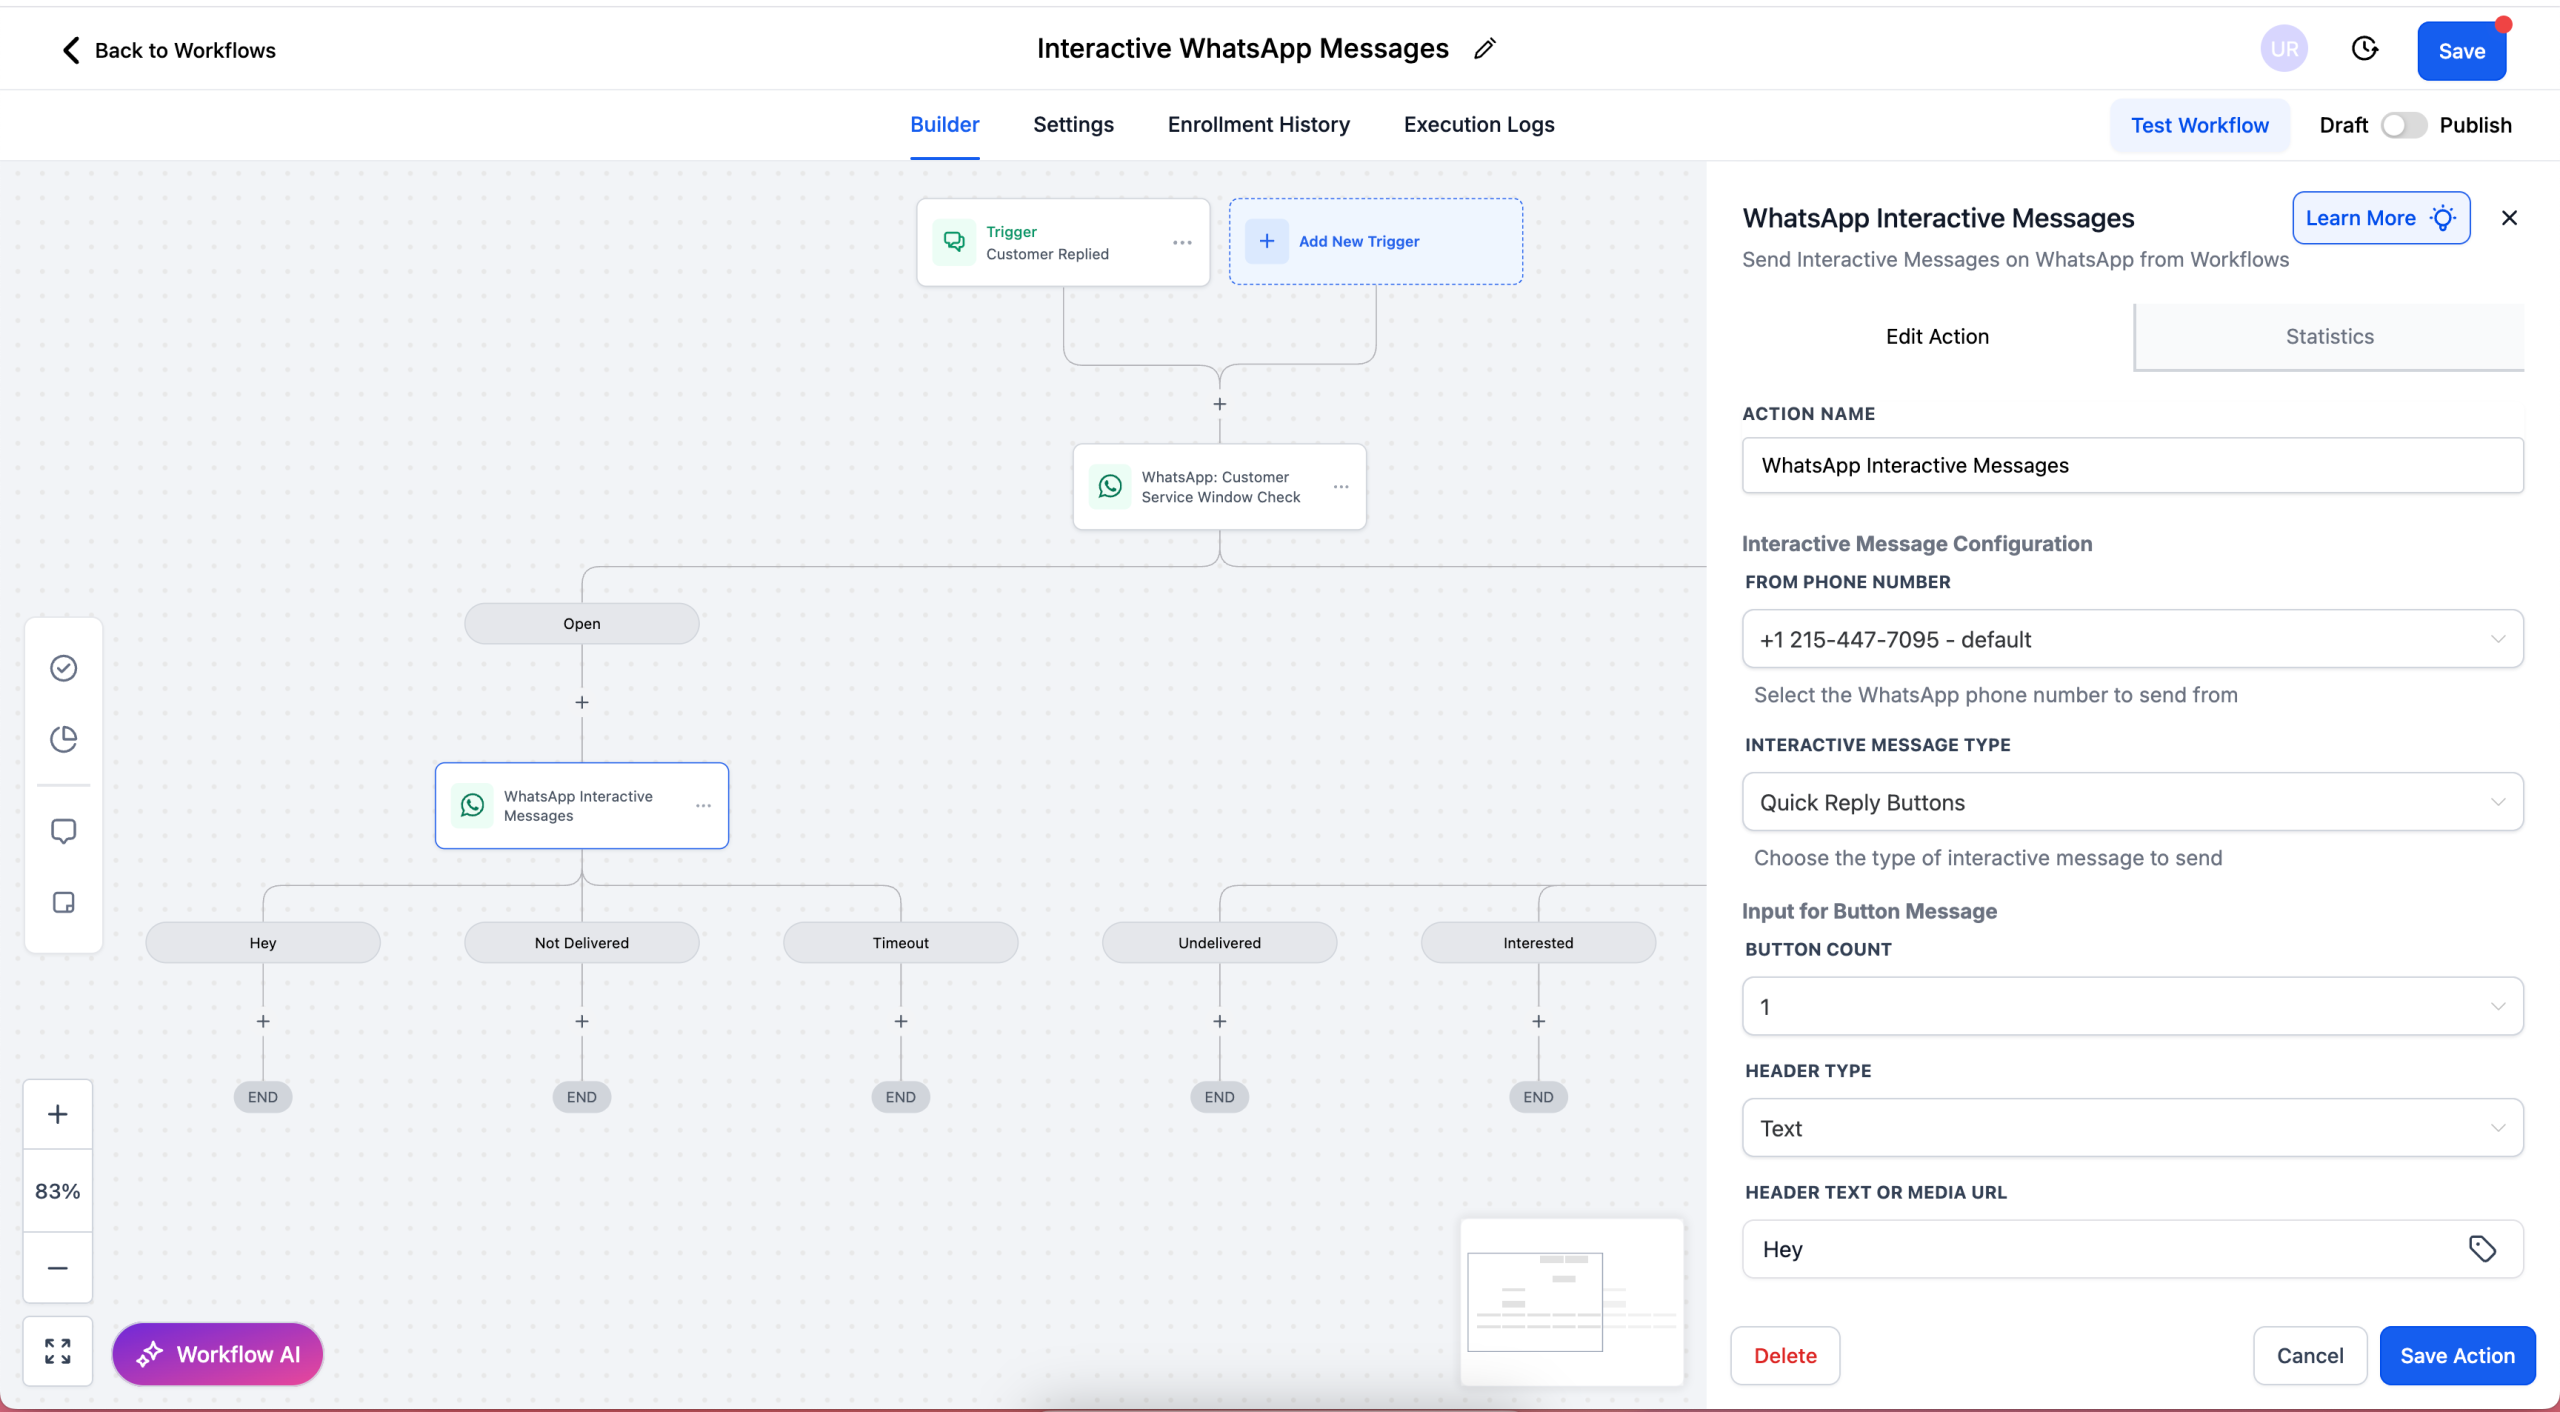
Quick Reply Buttons – Configure header, body, footer, button titles, and timeout settings.
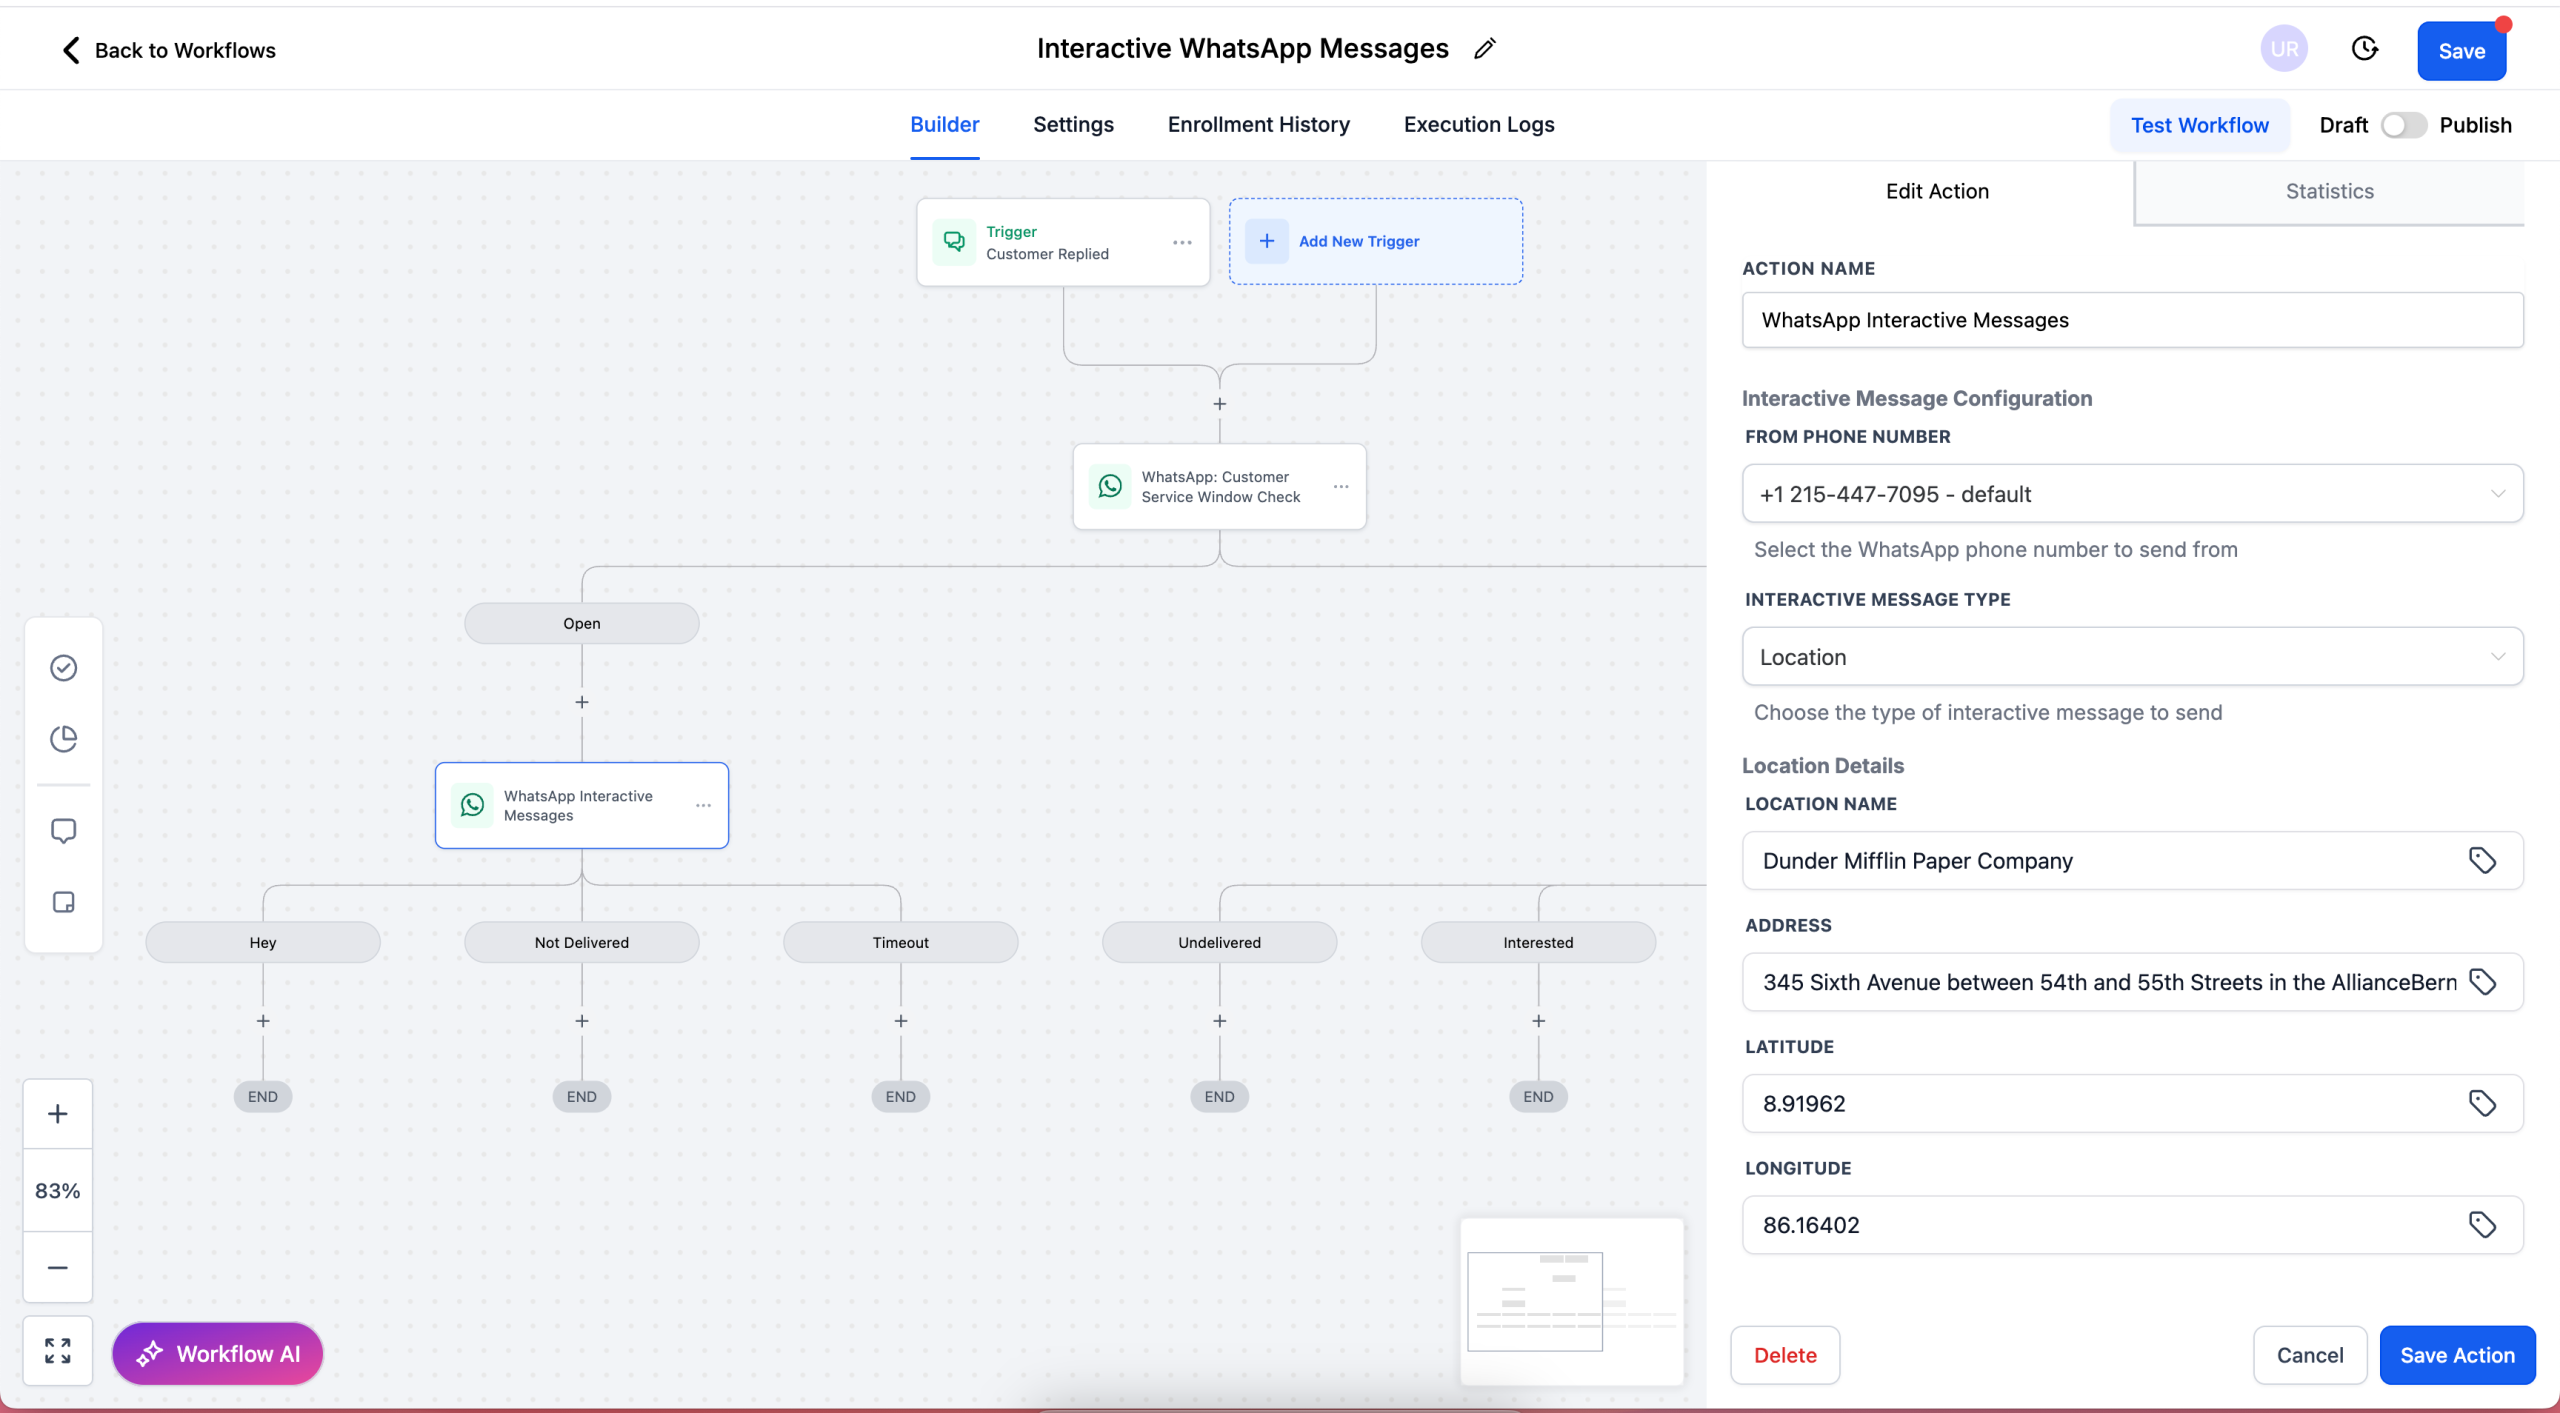
Location – Share a map card with Location Name, Address, Latitude, and Longitude.
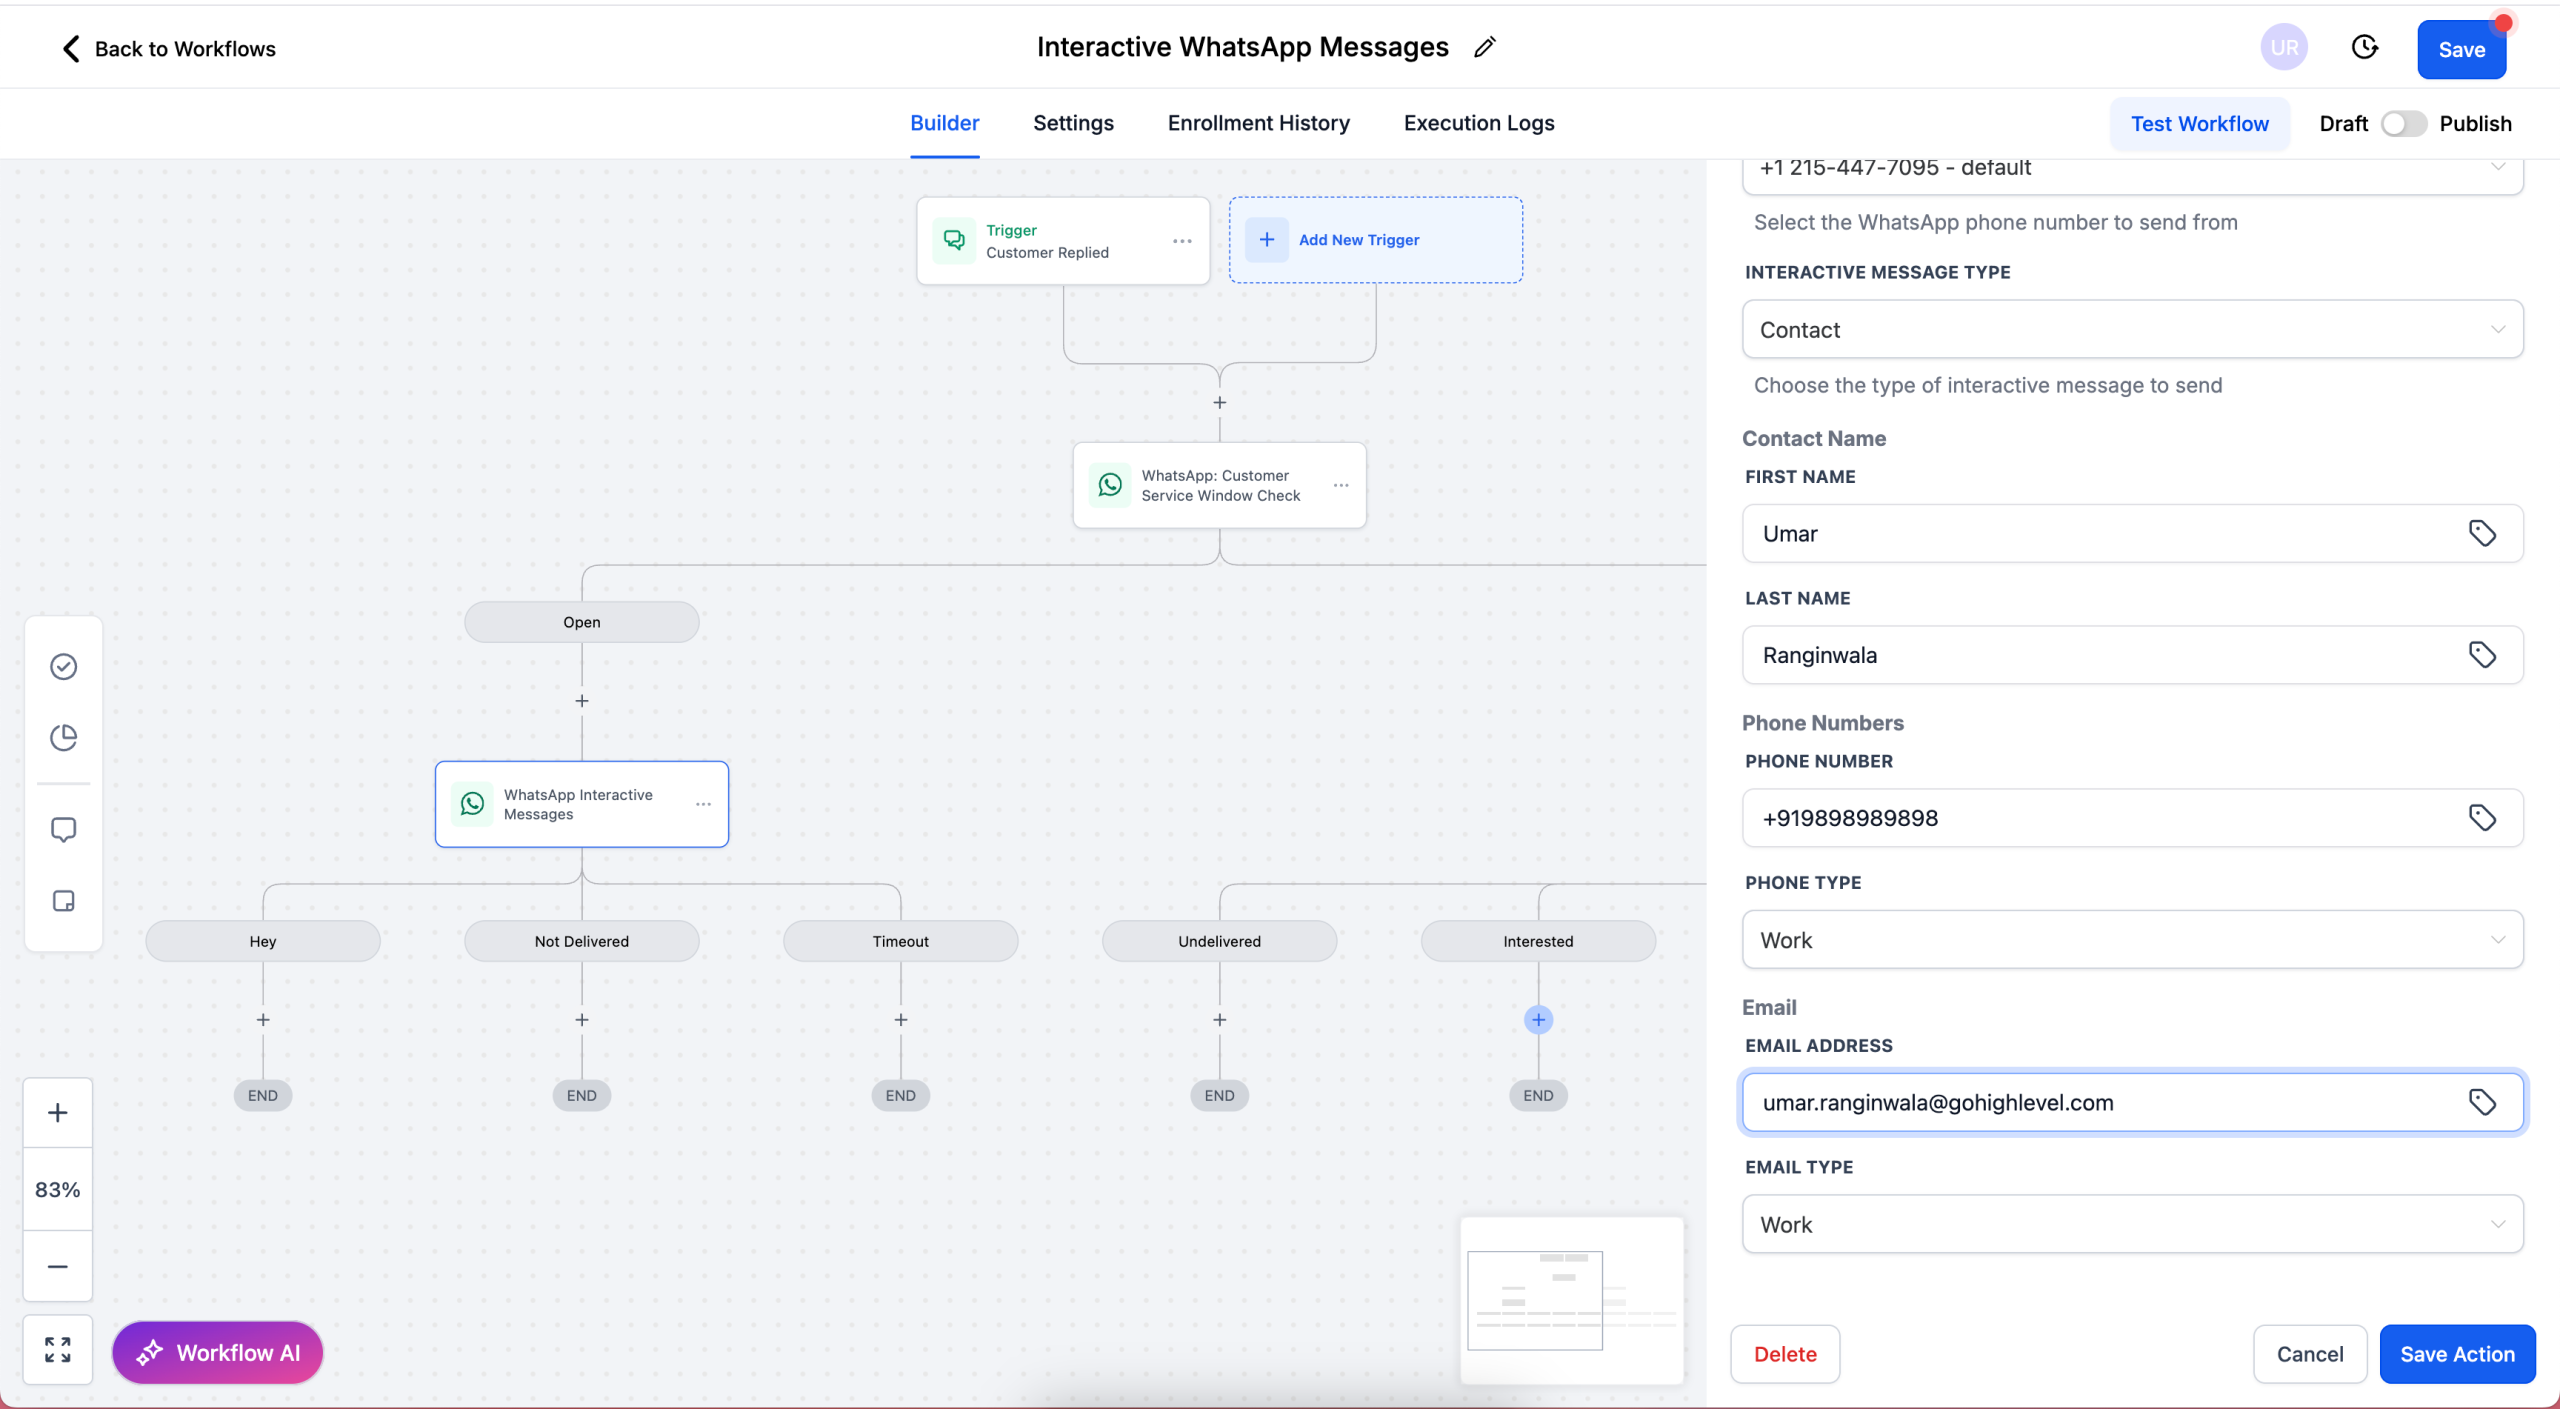
Contact – Share contact cards with First/Last Name, Phone Number + Type, and Email (optional).
📌 Coming Soon:
List Messages – Structured menus with multiple choices.
Dynamic Website Link Messages – Interactive CTAs that open trackable links.
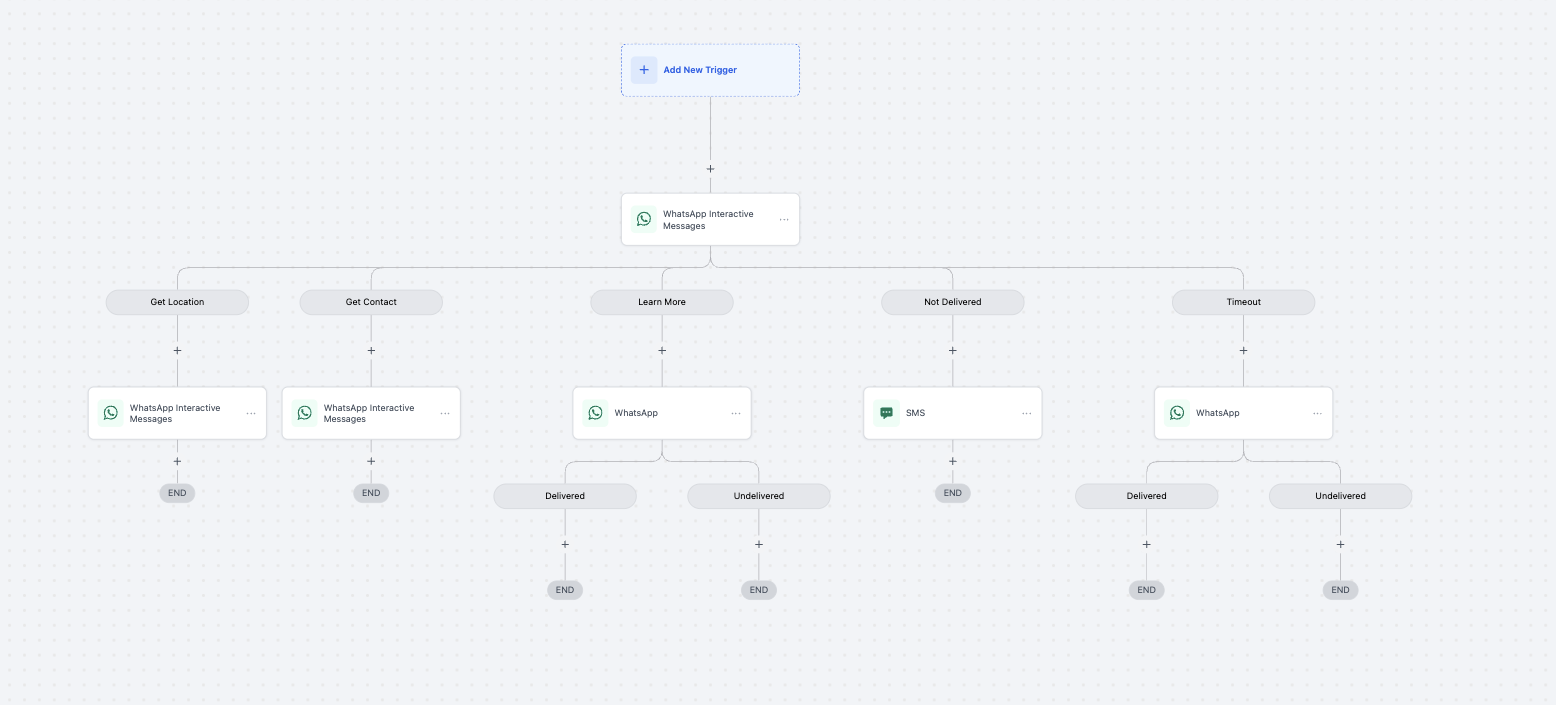
Workflow Branching
Interactive replies can now trigger workflow branches, enabling chatbot-like flows without manual message parsing.
🛠 Steps to Use
In Automations, add the action WhatsApp Interactive Messages.
Select the FROM PHONE NUMBER.
Choose your INTERACTIVE MESSAGE TYPE (Quick Reply Buttons, Location, or Contact).
Complete the required fields:
Quick Reply Buttons → header, body, footer, button titles, timeout.
Location → name, address, latitude, longitude.
Contact → name, phone number & type, email (optional).
Save and test with a sample contact to confirm the message renders in WhatsApp.
📖 For detailed setup instructions, see: Interactive WhatsApp Messages Support Article
🔑 Prerequisite: Customer Service Window
Interactive WhatsApp Messages can only be sent if the 24-hour Customer Service Window is open.
The window opens when a customer sends your business a WhatsApp message.
During this window:
You can send unlimited Interactive WhatsApp Messages at no cost.
All interactive replies (button taps, location opens, contact saves) are free.
If the window is closed, you must first send a Marketing or Utility Template to reopen it.
📖 Learn more: WhatsApp Customer Service Window Check
💰 Pricing
All Interactive WhatsApp Messages are free during an active 24-hour Customer Service Window.
There are no charges for interactive message types or customer replies once the window is open.
✅ Benefits
Richer, more structured customer interactions.
Guided journeys with buttons, location cards, and contact cards.
Unlimited free interactive messages within the service window.
Workflow automation with branching based on interactive replies.
⚠️ Limitations
WhatsApp currently supports only:
Up to 3 reply buttons per message, or
1 location card, or
1 contact card per message.
🔜 What’s Next
Support for List Messages with structured menus.
Support for Dynamic Website Link messages (trackable CTAs).
Coupon Codes in Calendars
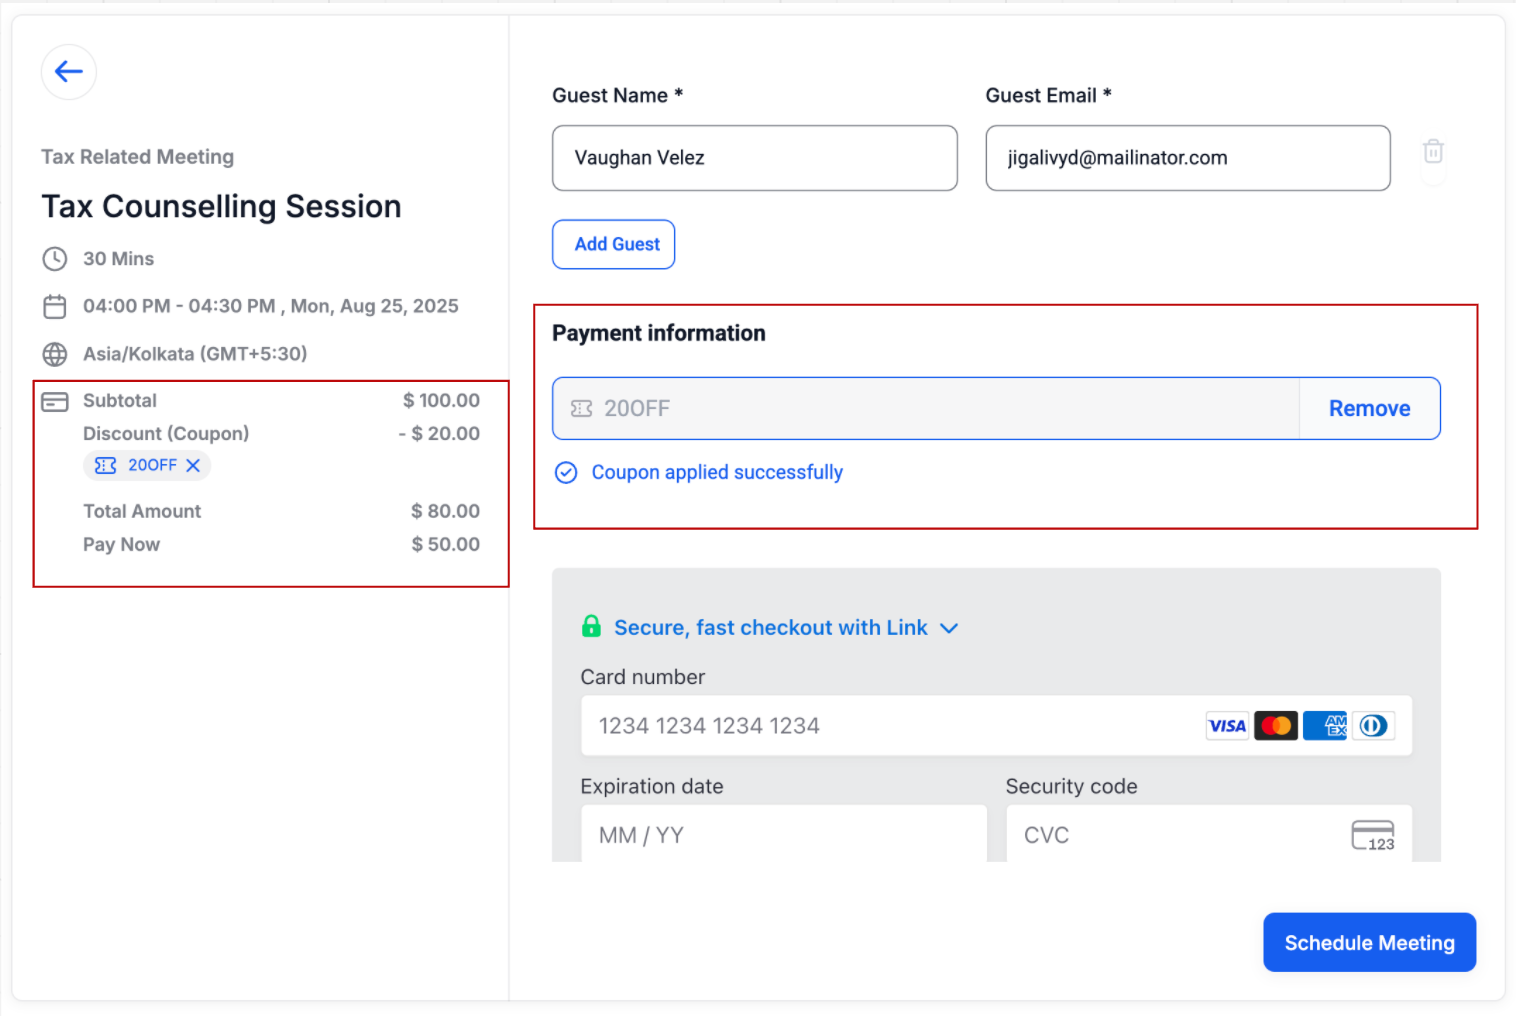
You can now create and apply Coupon Codes for calendar bookings. Customers can enter a code during booking through the calendar widget to receive discounts.
What’s New
– Percentage-based or fixed-amount coupons
– Limit usage per customer or overall
– Restrict to specific calendars or products
– Discounts reflected in the Payments Tab of the appointment
—
How to Use
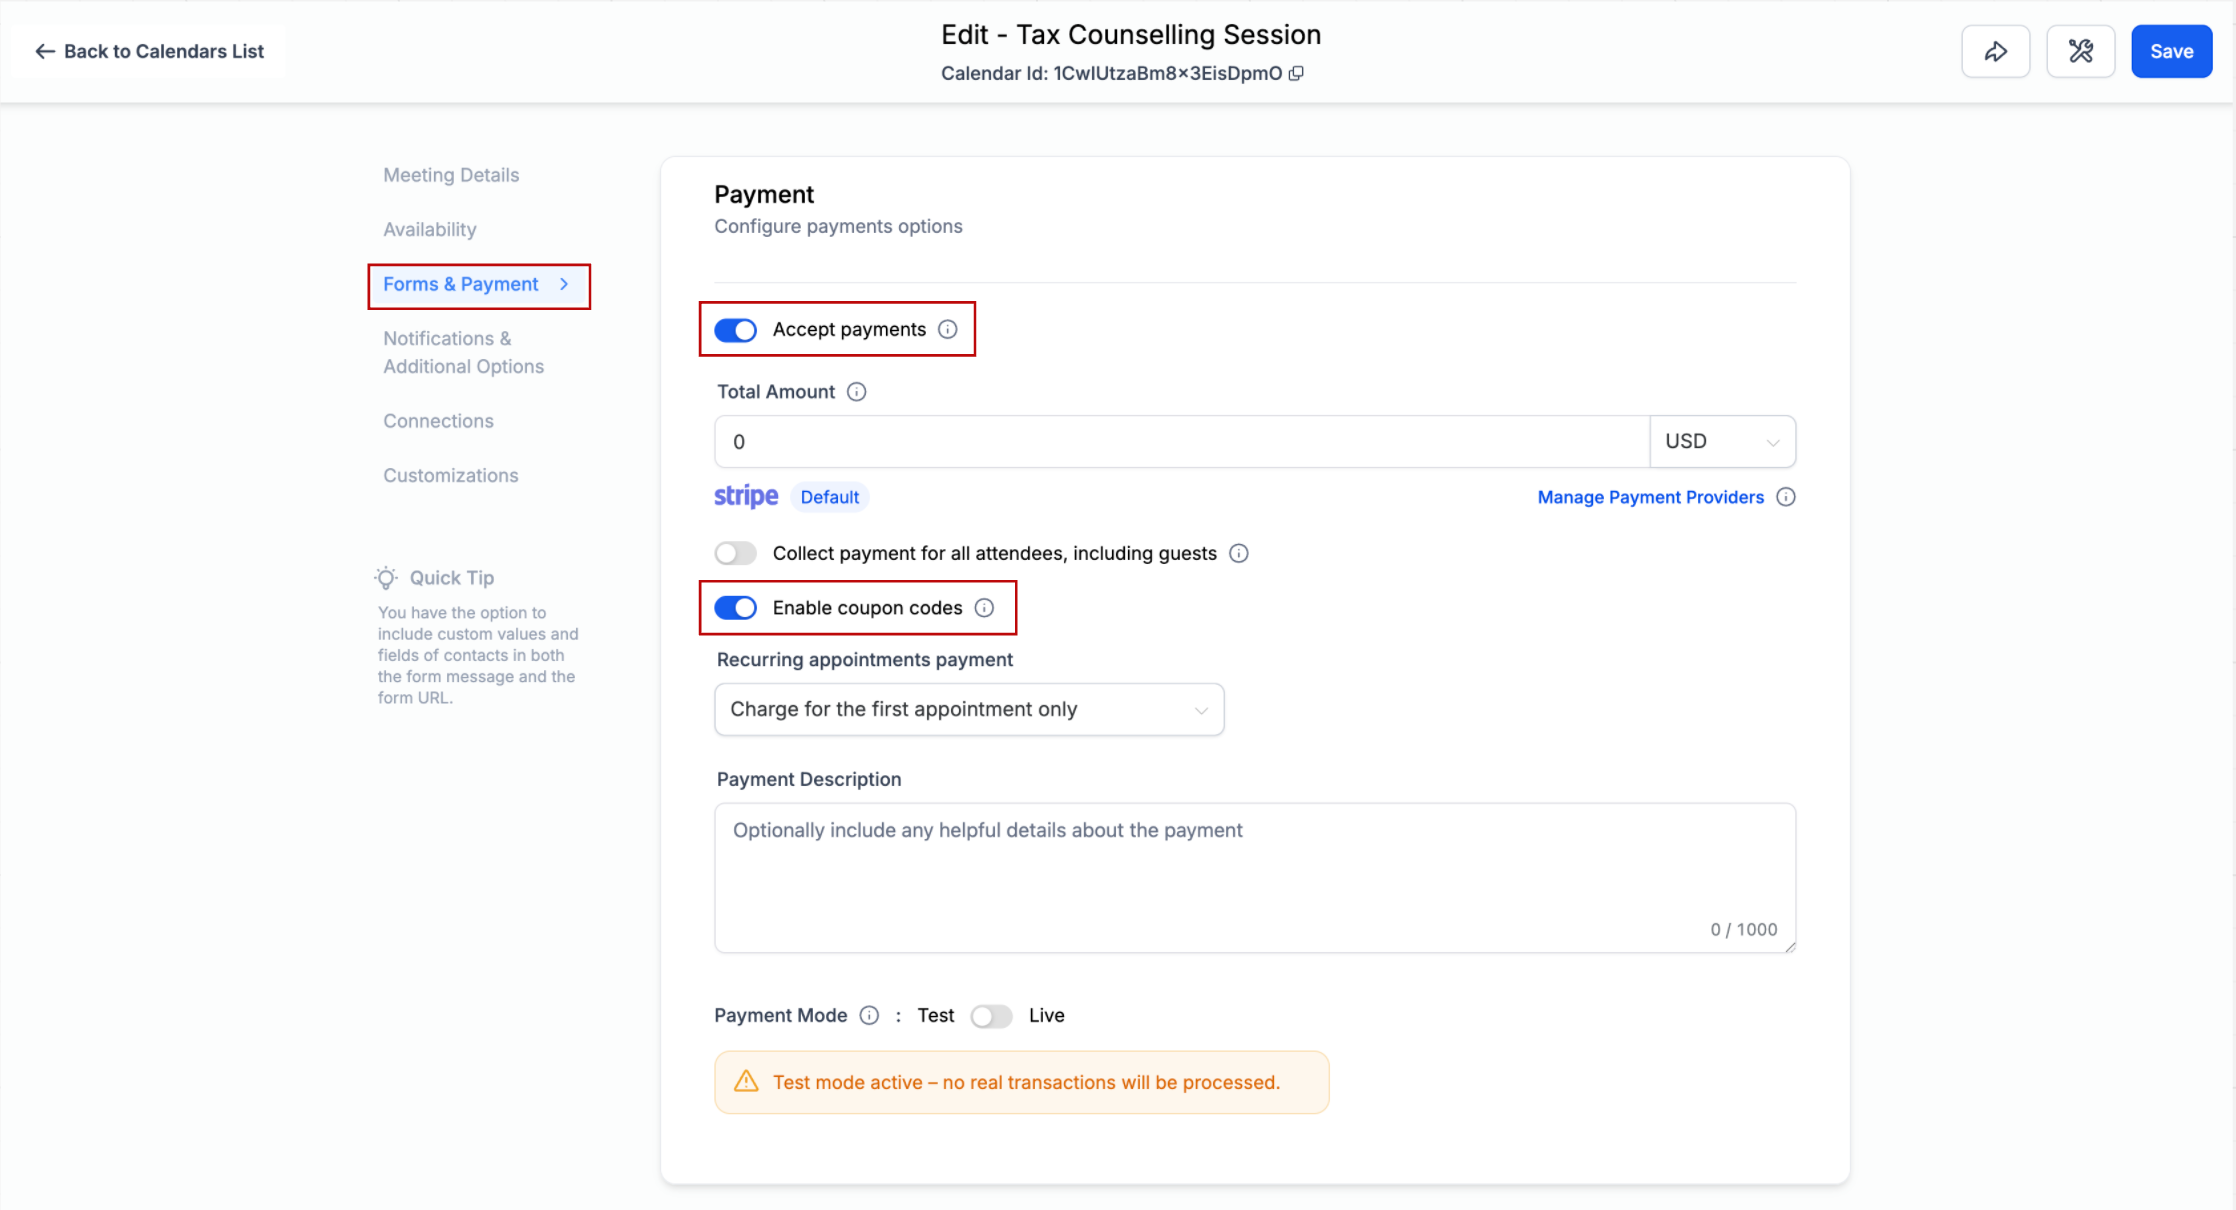
1. In Calendar Settings > Forms & Payments, enable Accept Payment and Coupon Codes for each calendar
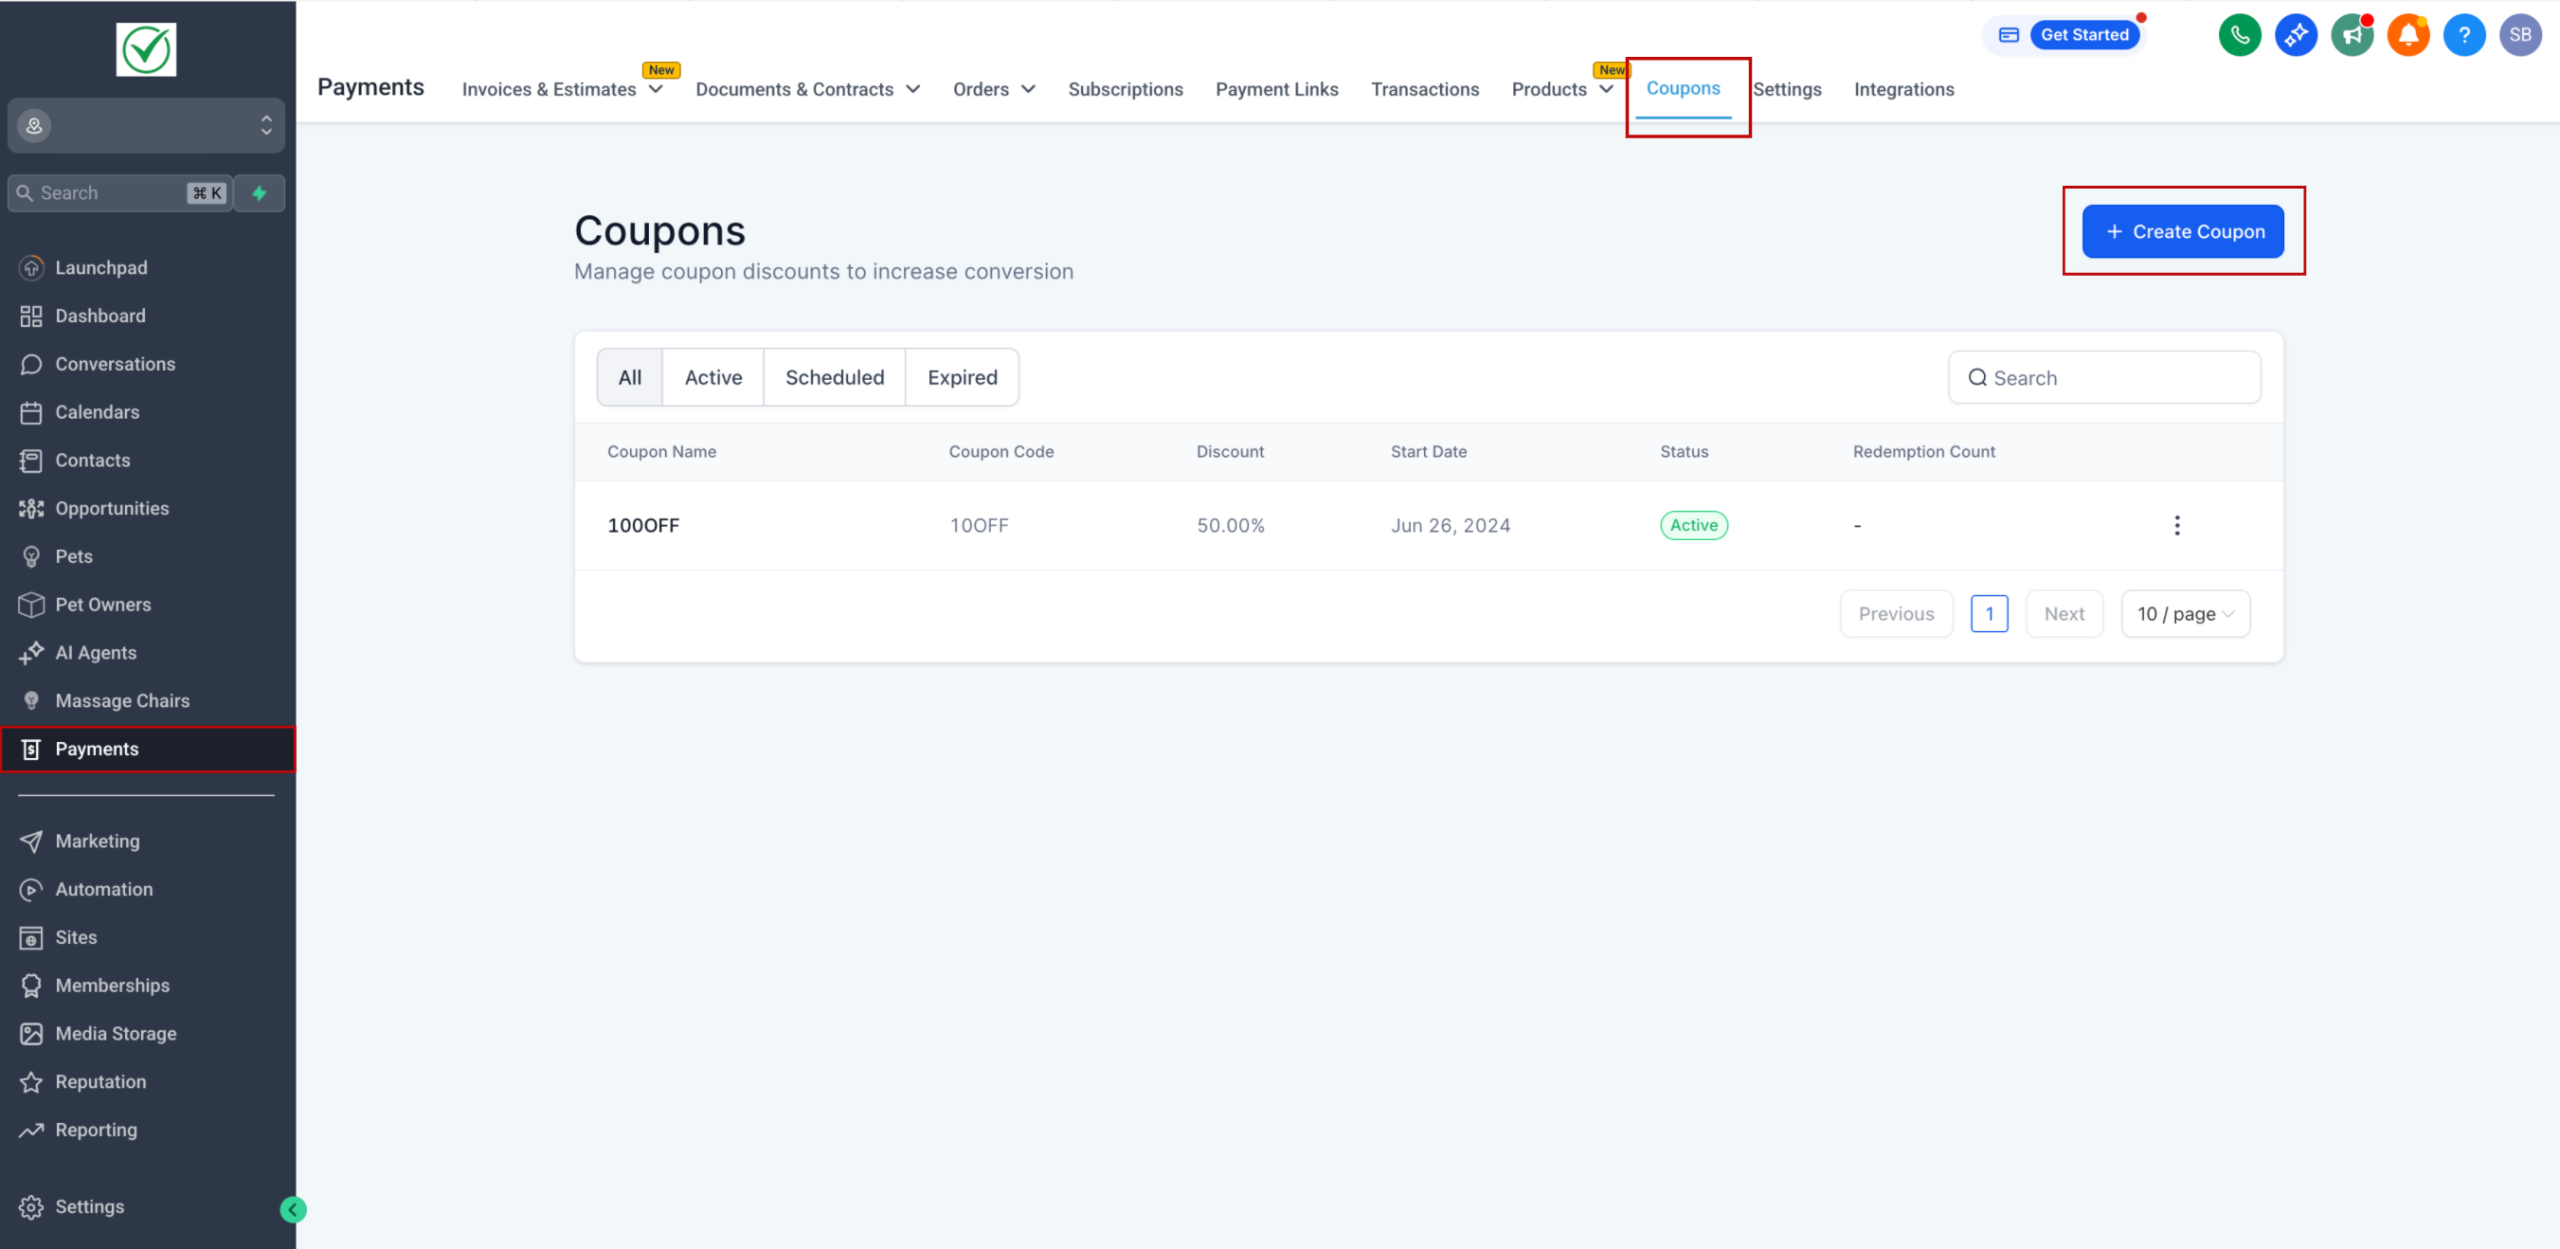
2. Go to Payments Module > Coupons to create a new coupon.
3. Set code, discount type, validity period, and usage limits. Apply to specific products or calendars if needed.
4. Customers booking via the widget will see a Coupon Code field. Valid codes apply discounts automatically where as invalid codes show an error message.
5. Coupon usage details appear in the Payments Tab of the appointment
Note: This feature is currently available via Labs. Go to Agency Settings > Labs > Sub accounts and enable Payments Tab in Appointments + Coupon Codes for your sub accounts.
—
Benefits
– Run promotions and attract new customers with discounts
– Reward loyal customers through targeted coupon campaigns
– Provide a smooth checkout experience with easy discount entry
Payments Tab in Appointment Modal
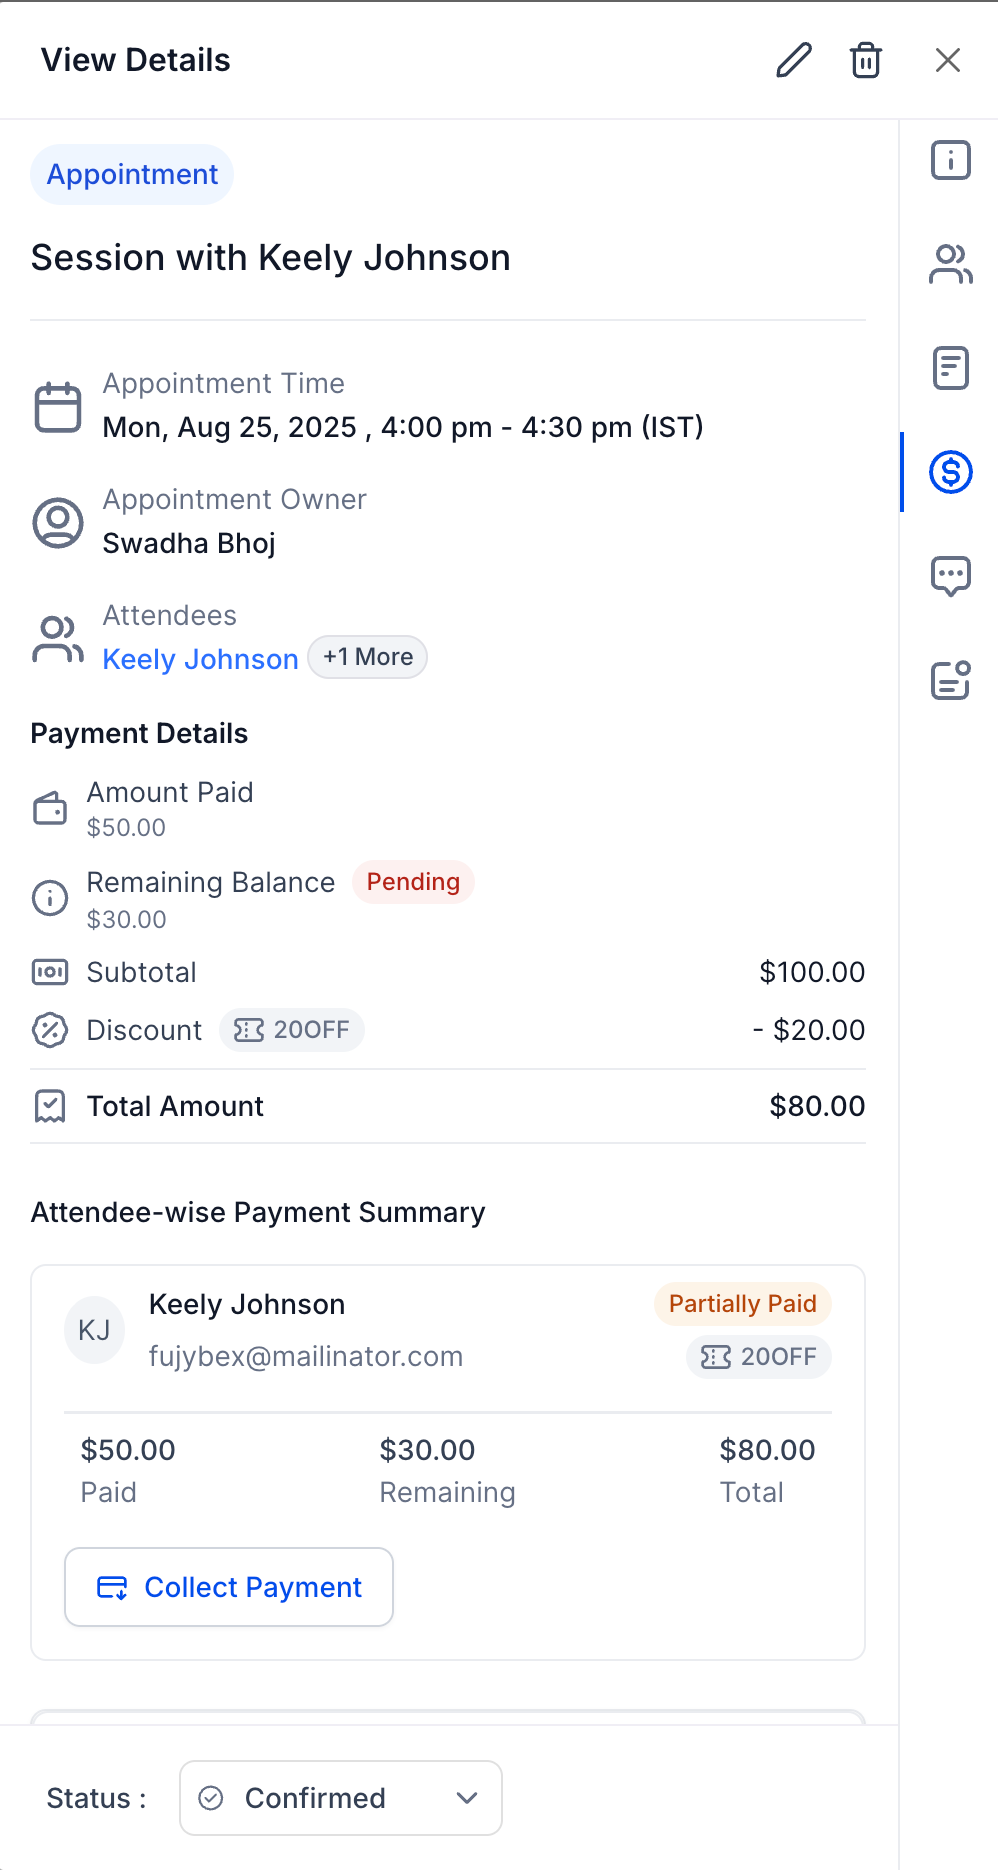
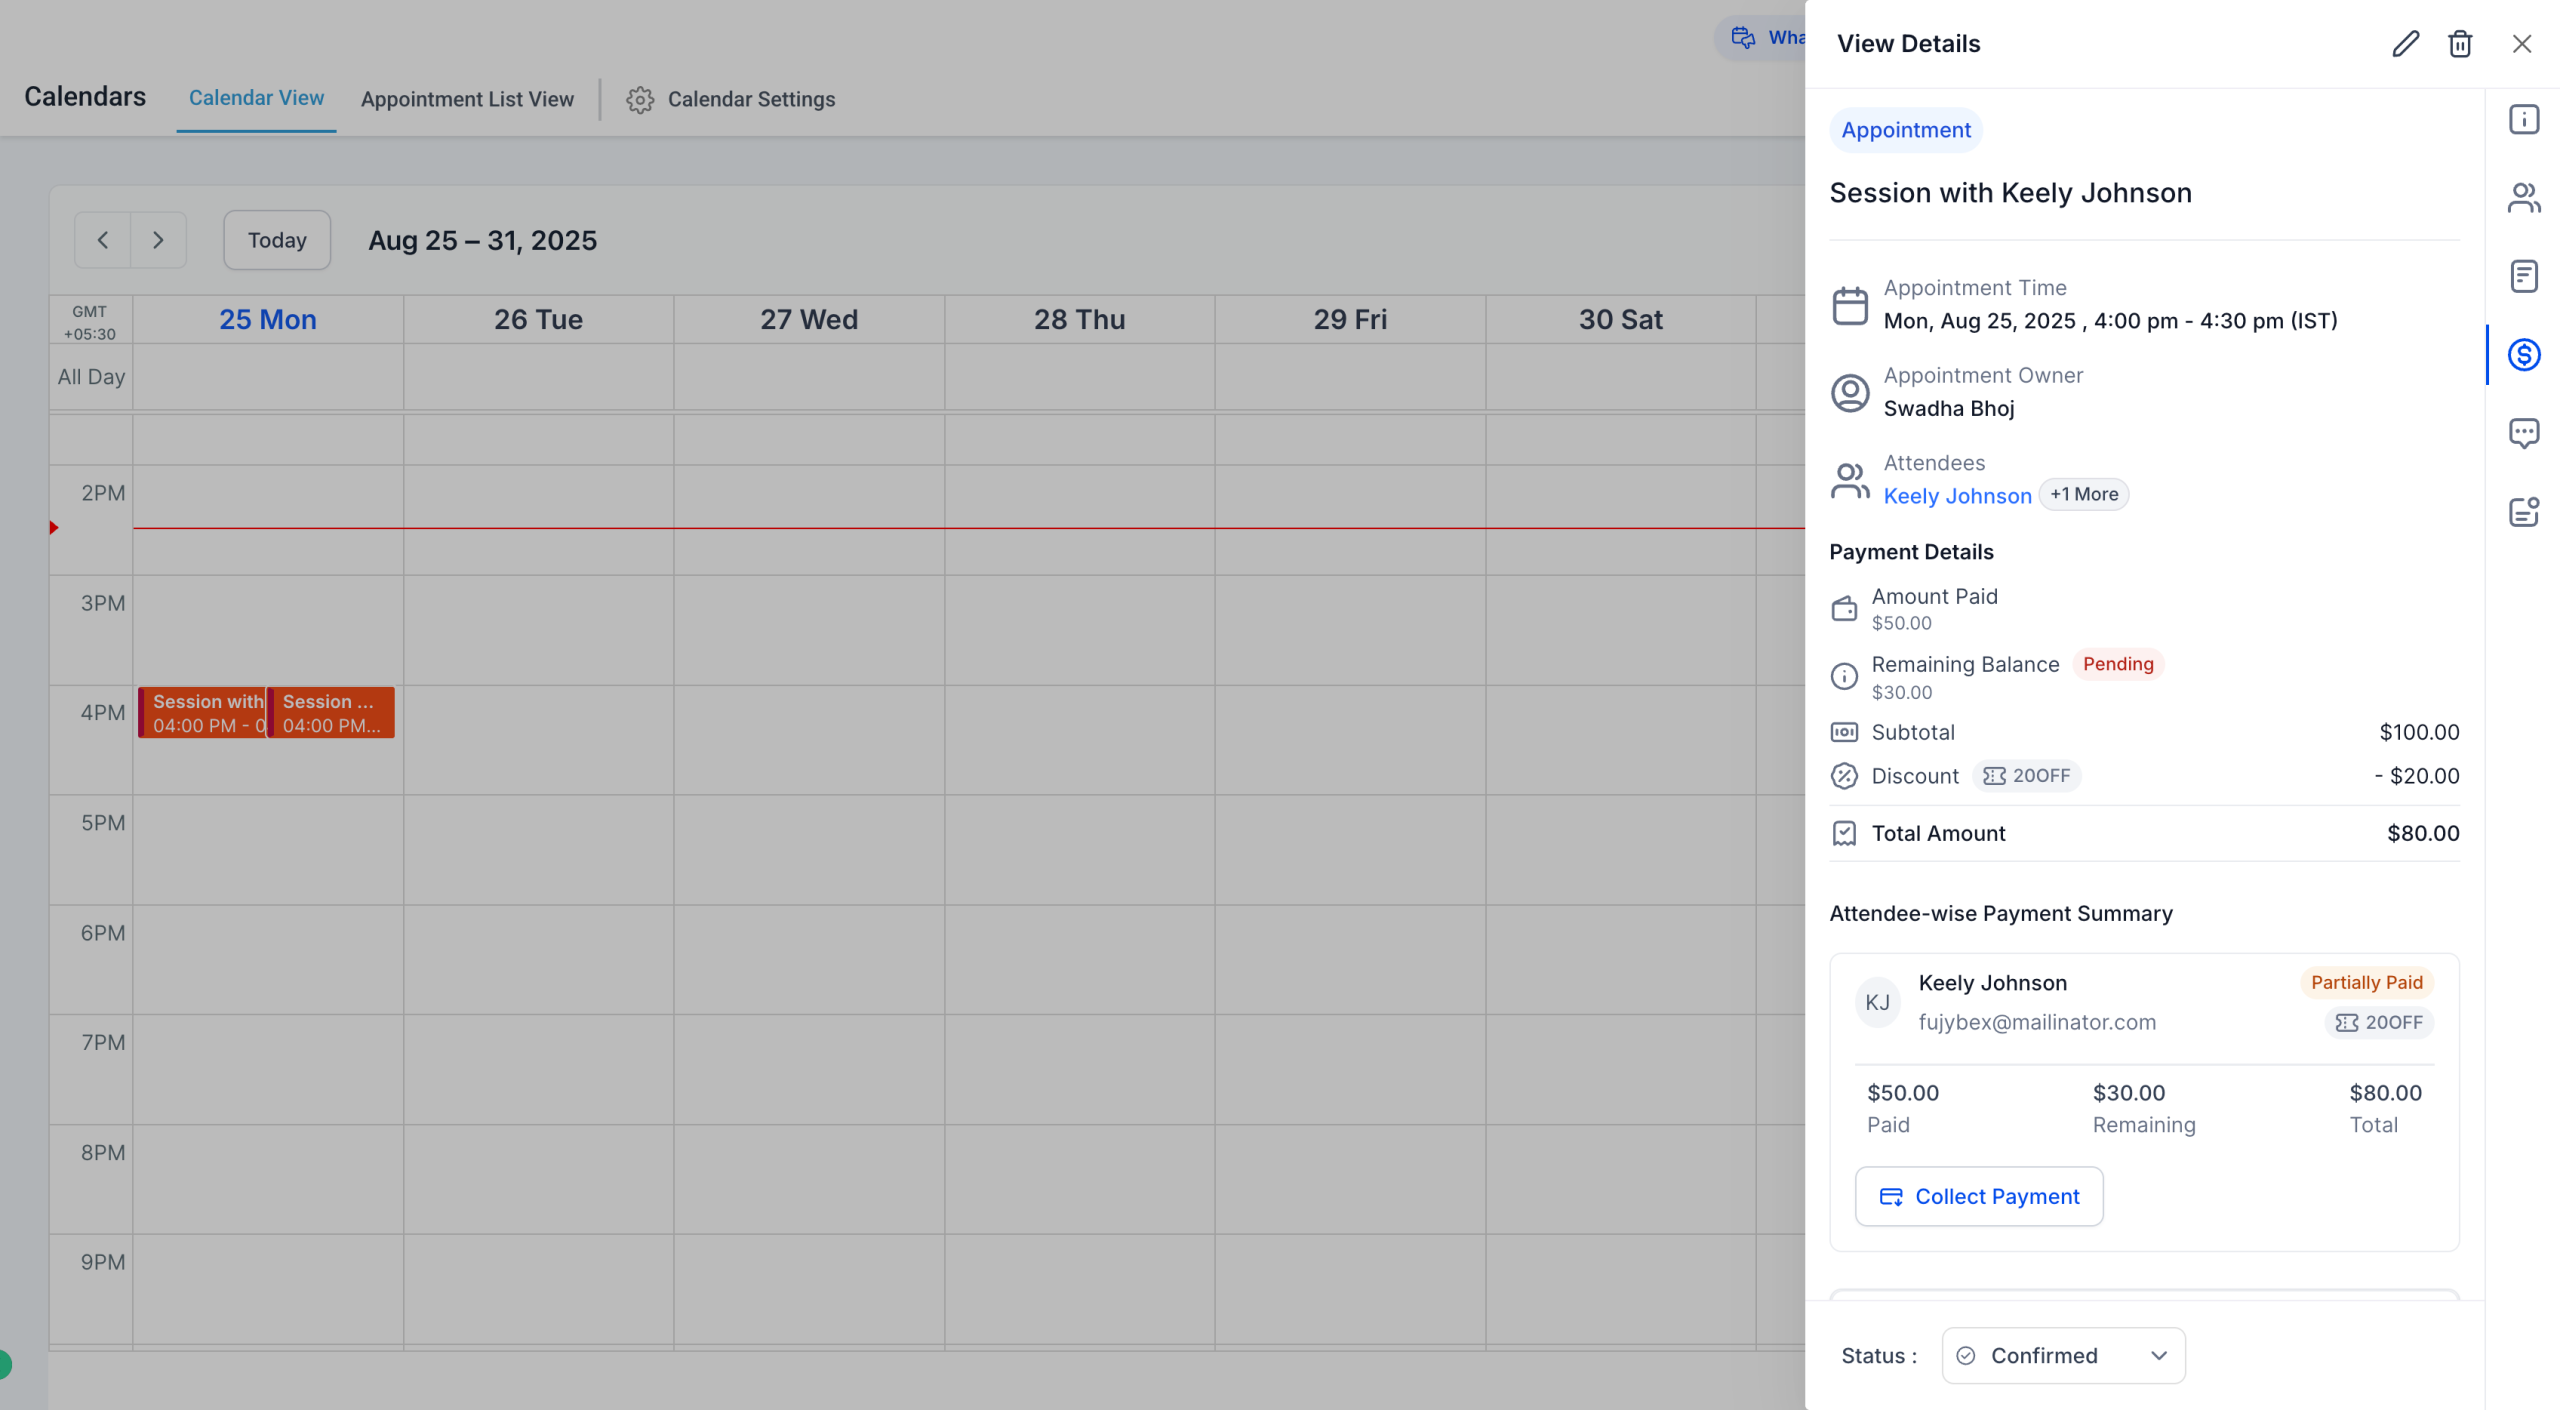
We are excited to announce that we have added a new Payments Tab inside the Appointment Modal. This gives you a complete view of all payment-related details for each appointment.
What’s New
– View amount paid, remaining balance, and total amount
– See attendee-level payment summaries
– Review all transactions tied to the appointment
– Check which coupon codes were applied and the discount amount
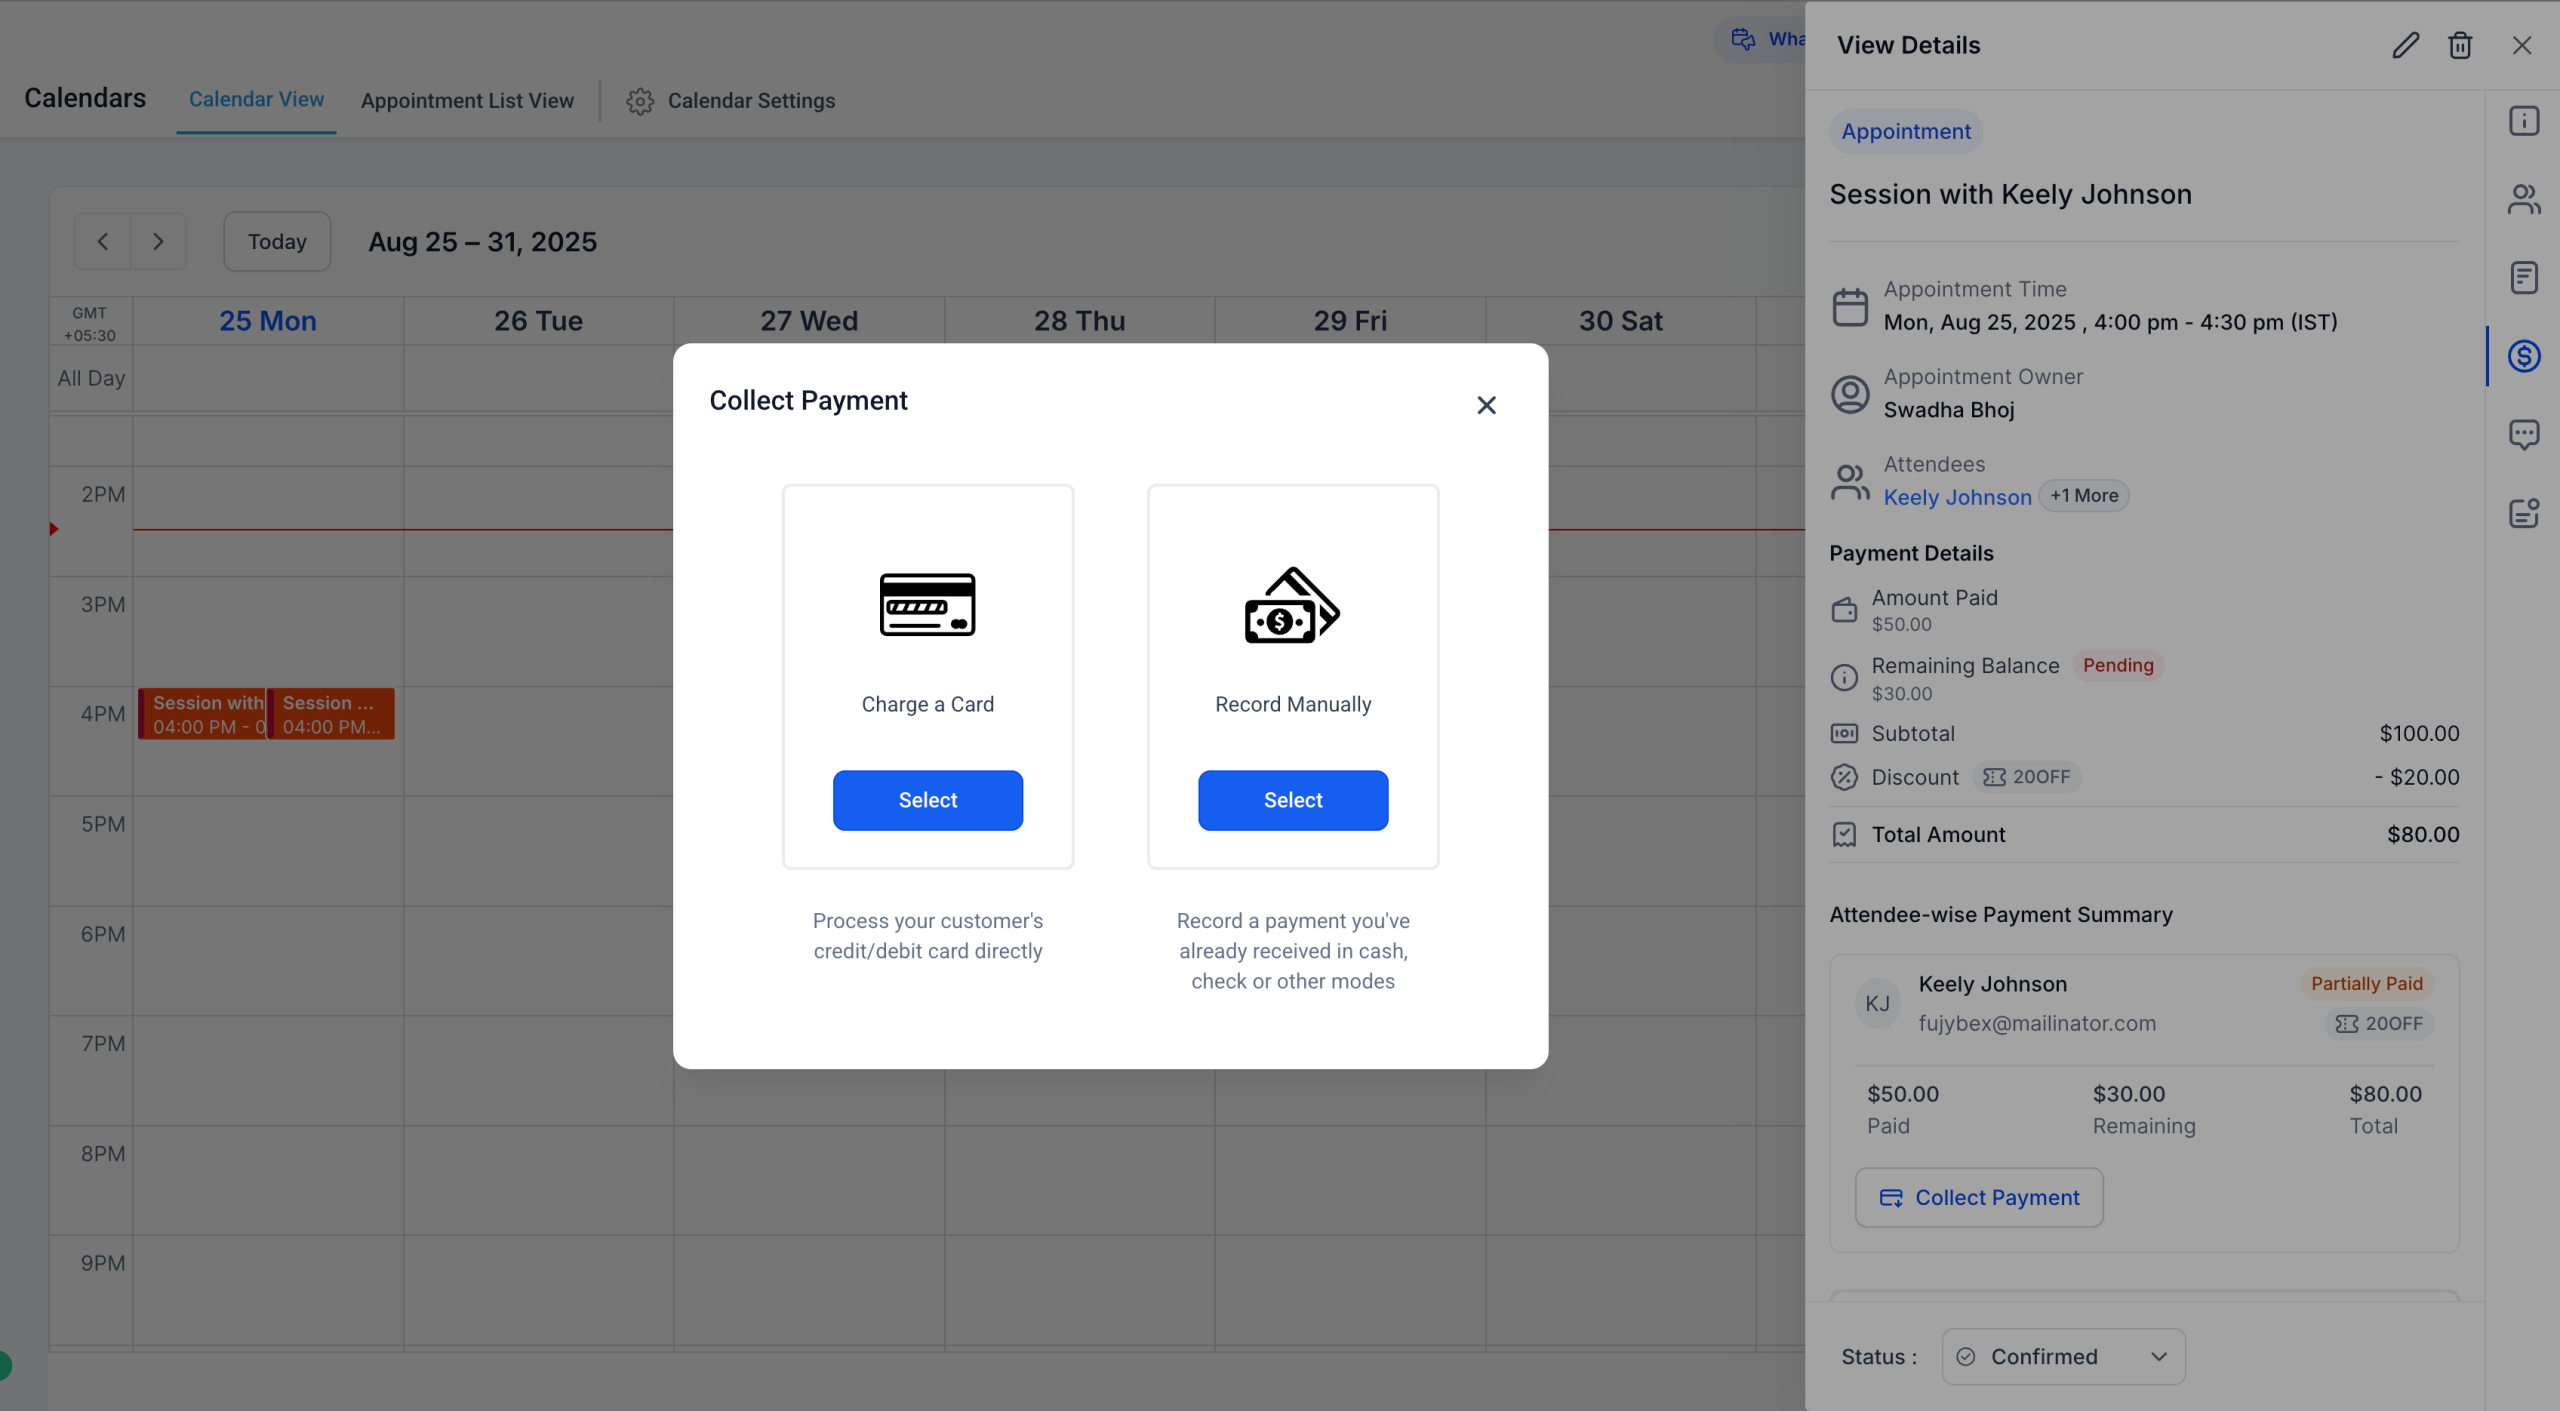
– Collect remaining payments directly through the modal
—
How to Use
1. Click on any appointment to open the appointment modal.
2. Go to the Payments Tab in the Appointment Modal.
3. Review payment details including balances, history, and discounts.
4. If there’s a balance due, click Collect Payment to either: Charge a card, or Record a manual payment
Note: This feature is currently available via Labs. Go to Agency Settings > Labs > Sub accounts and enable Payments Tab in Appointments + Coupon Codes for your sub accounts.
—
Benefits
– Manage all payment actions without leaving the appointment view
– Quickly access payment history and discount details
– Collect outstanding balances in just a few clicks
—
Important Notes
– Payments tab is supported for appointments of all calendar types, except appointments booked via Service Menu (v1) and custom recurring appointments created directly through the in-app modal
– When payments are enabled for a calendar, an associated product is automatically created (visible in the Products Tab) with a Calendar tag.
ICS Files Now Included with Appointment Notifications
🧭 Overview
We’ve improved the post-appointment booking experience by attaching ICS files to confirmation and reschedule email notifications sent to recipients. This makes it easy for the recipients to add appointments to their calendars like Google, Outlook, Apple Calendar, and others — with just one click.
✨ What’s New
– 📎 ICS files are now automatically attached to appointment confirmation and reschedule email notifications
– ☑️ These are included for contacts, guests and additional email recipients
– 🧠 ICS files are added only when necessary — to prevent redundancy or duplicates
🎯 Key Benefits
– This enhancement helps attendees, guests, and additional email recipients always have a quick, convenient way to save their appointments to their calendars. By attaching ICS files to confirmation and reschedule emails, we’ve made it easier to stay organized — no extra steps needed.
– This ensures that everyone involved in a meeting can easily add it to their calendar — improving attendance and reducing confusion.