WhatsApp x Workflow – Internal Notifications Support
Overview:
We’ve expanded the capabilities of the Internal Notification action within Workflows by adding support for WhatsApp.
What’s New:
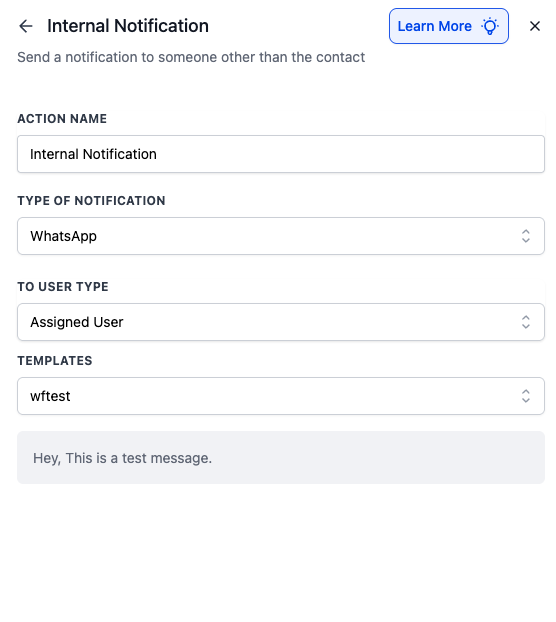
– You can now send internal WhatsApp messages to users directly from workflows, enabling faster and more seamless internal communication.
How to Use
– Add an “Internal Notification” action to your workflow.
– Select “WhatsApp” from the Type of Notification dropdown.
– Choose the appropriate User Type and Template.
That’s it – your internal WhatsApp notification is ready to go..!!
Permissions for Conversation AI
What’s New?
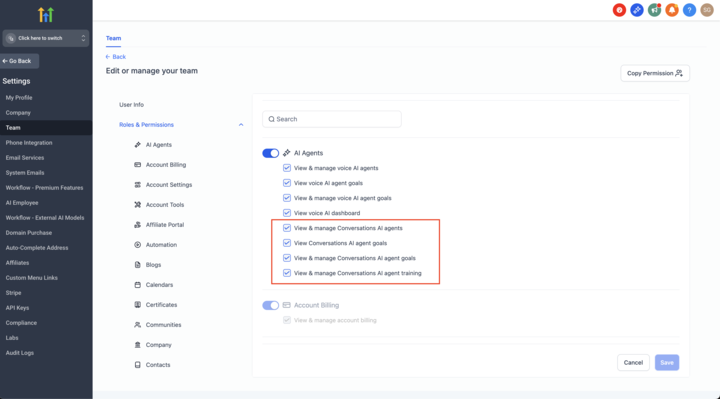
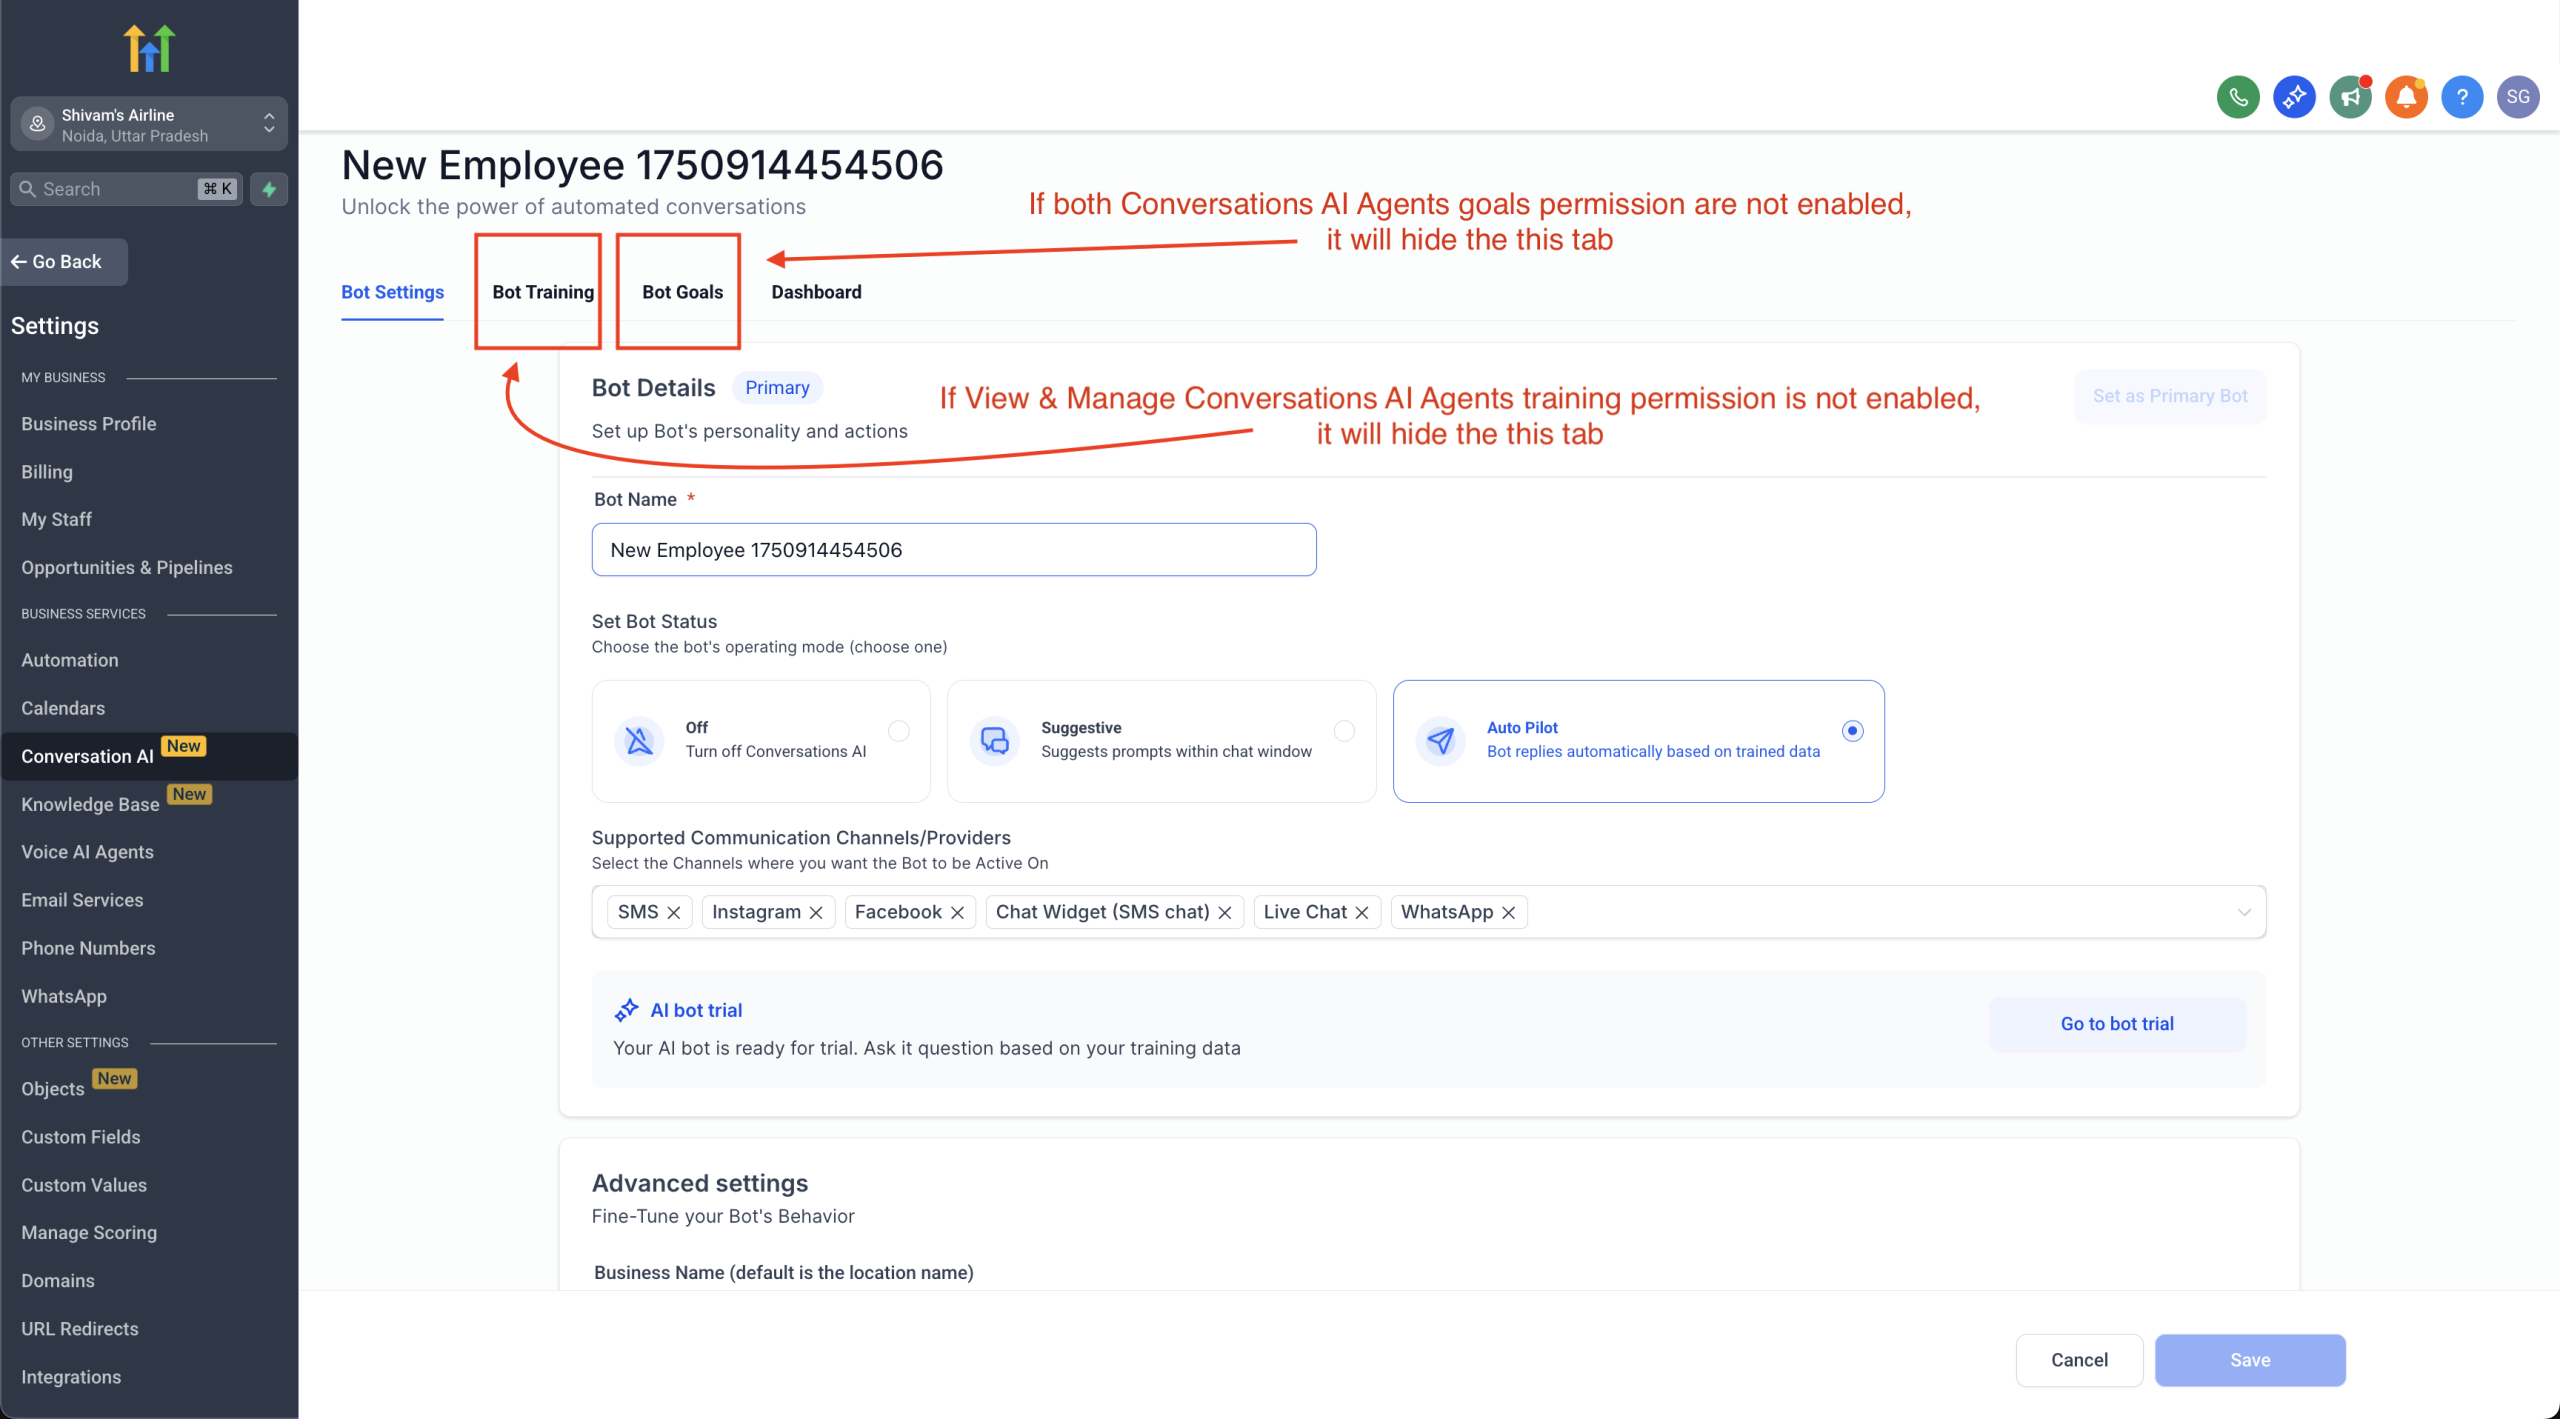
Granular Permissions for Conversation AI Agents
We’ve introduced granular permissions for Conversation AI Bots, giving you more control over who can view, manage, or configure your bots. These controls help protect important AI configurations while supporting role-based access across your team.
How It Works
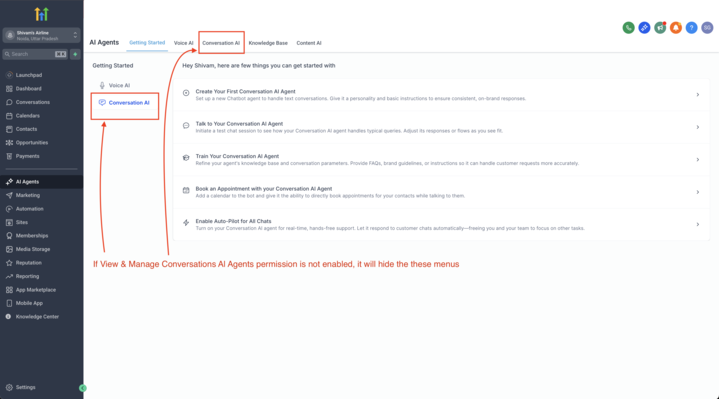
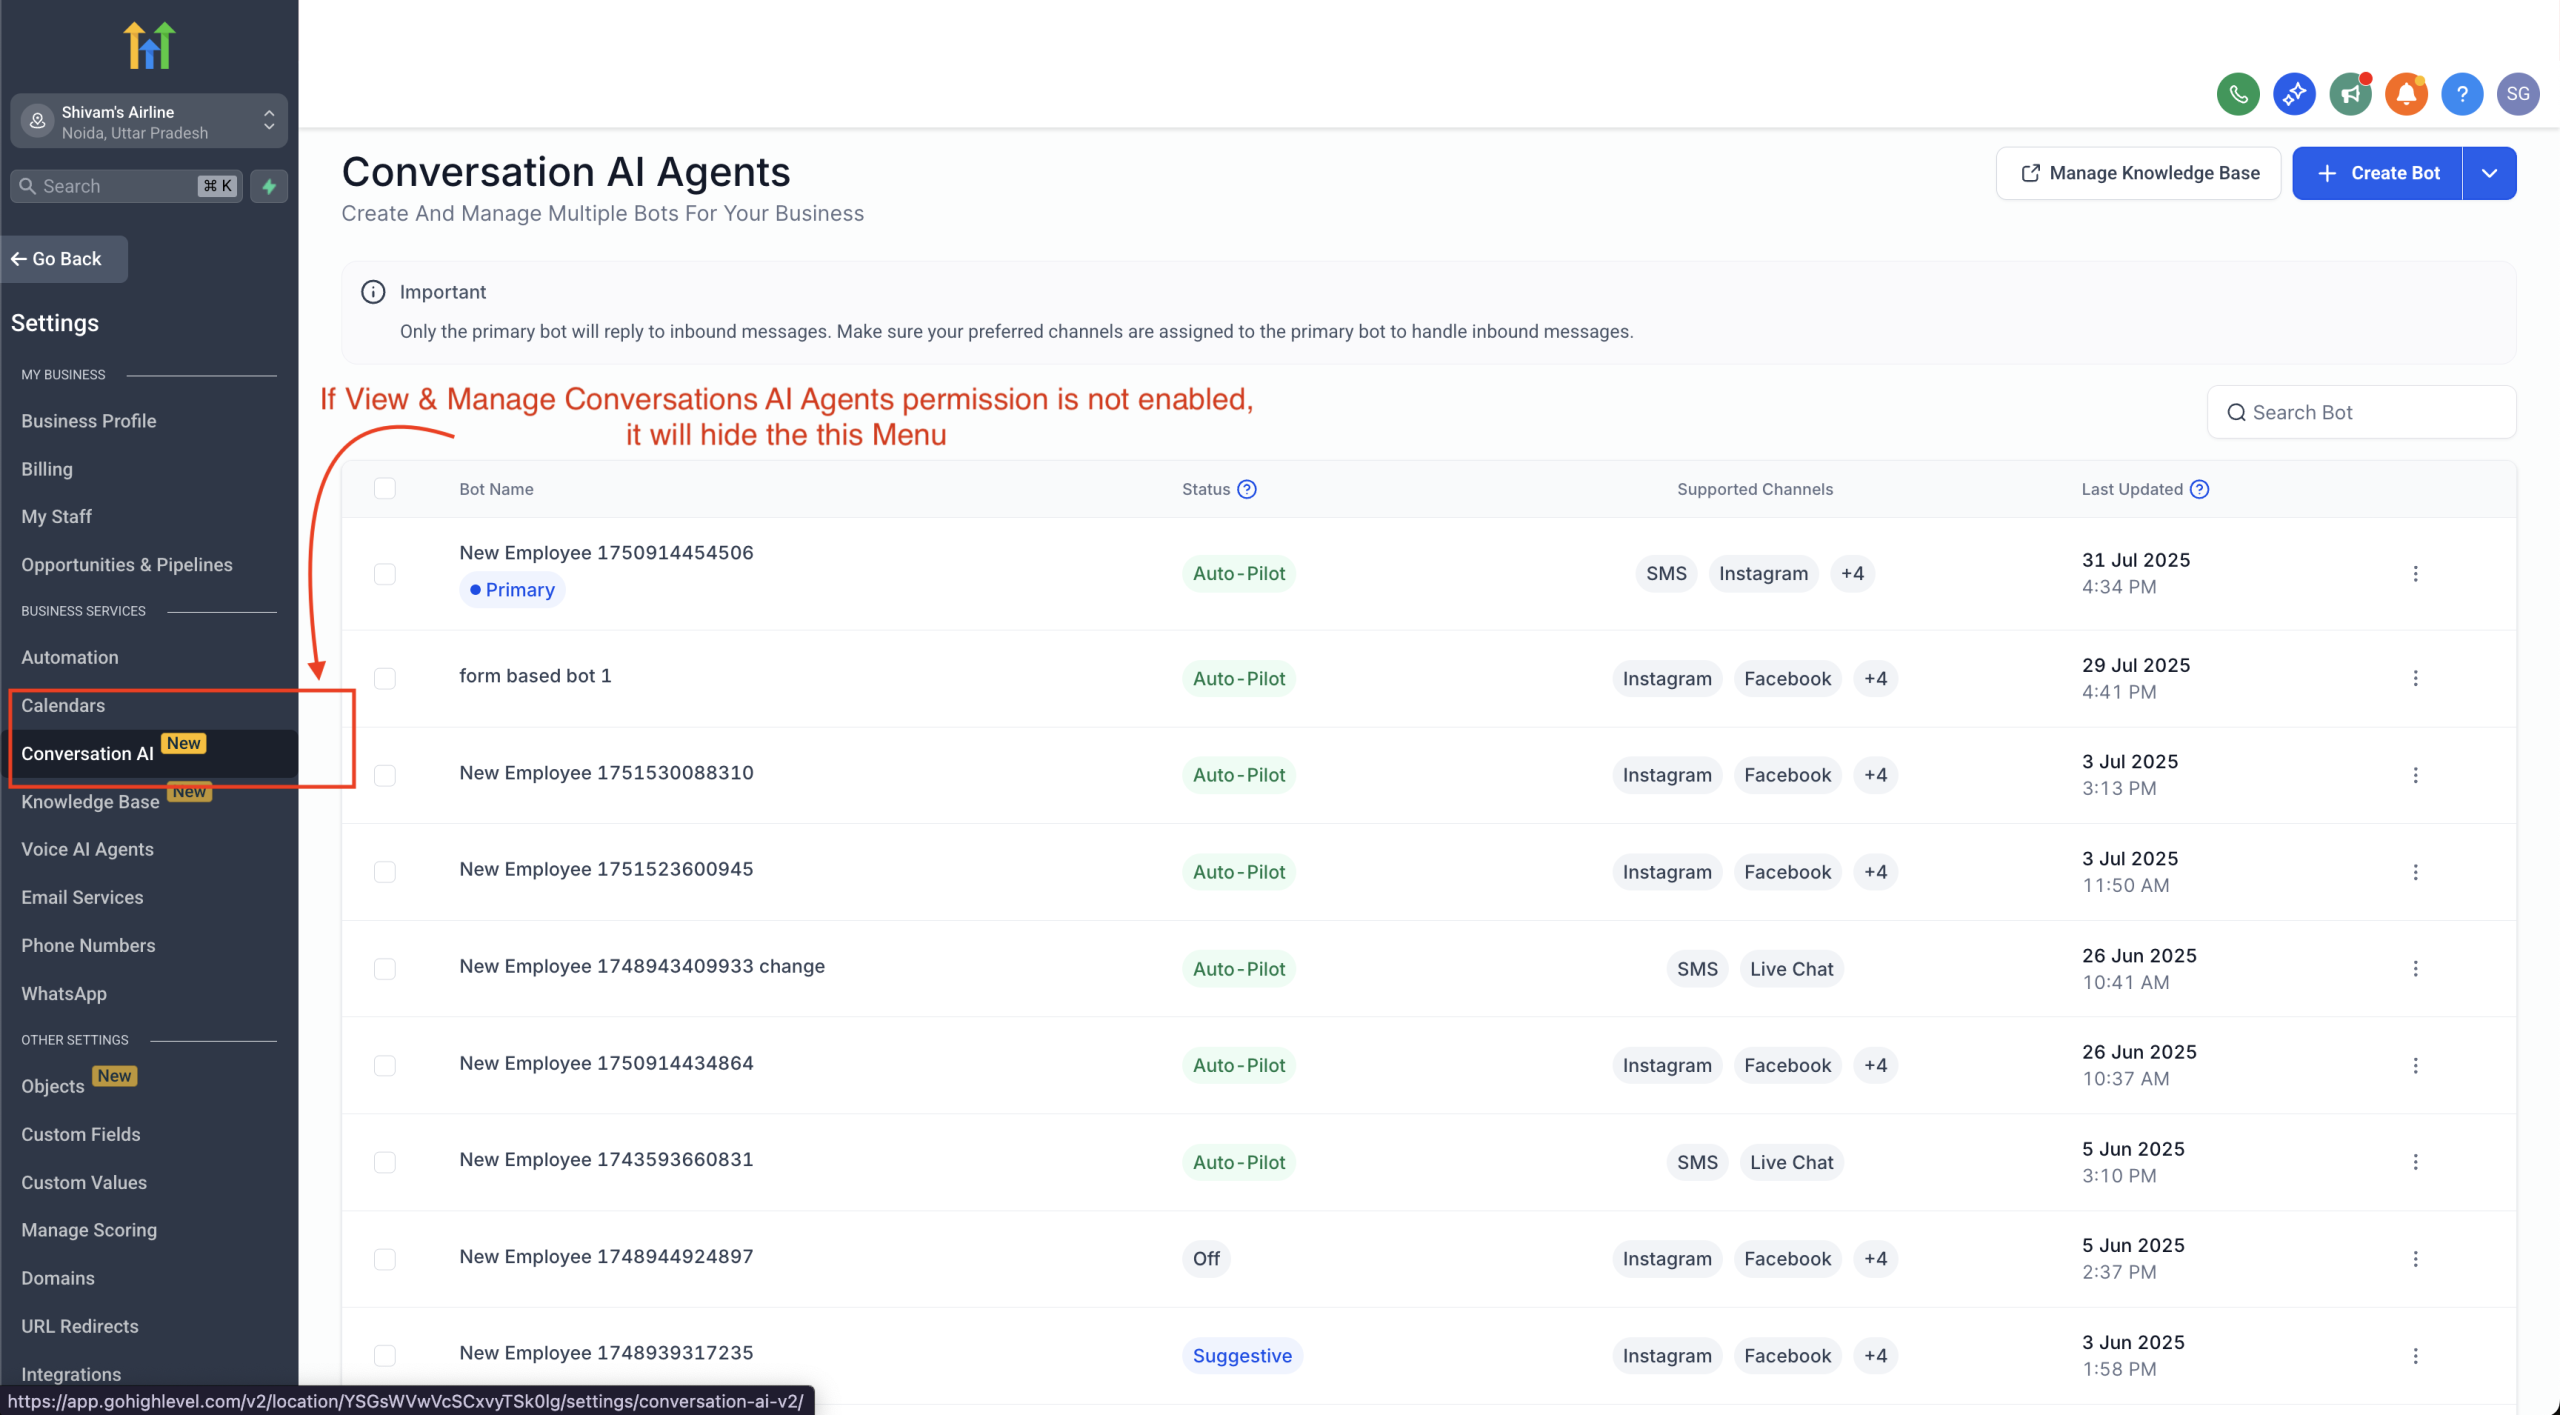
1. View & Manage Conversation AI Agents
– Enabled:
Users can create, edit, and delete bots. This also enables access to Bot Goals and Bot Training.
– Disabled:
Hides the entire Conversation AI Bots section. Users won’t be able to view, manage, or create bots, and access to Bot Goals and Training is also removed.
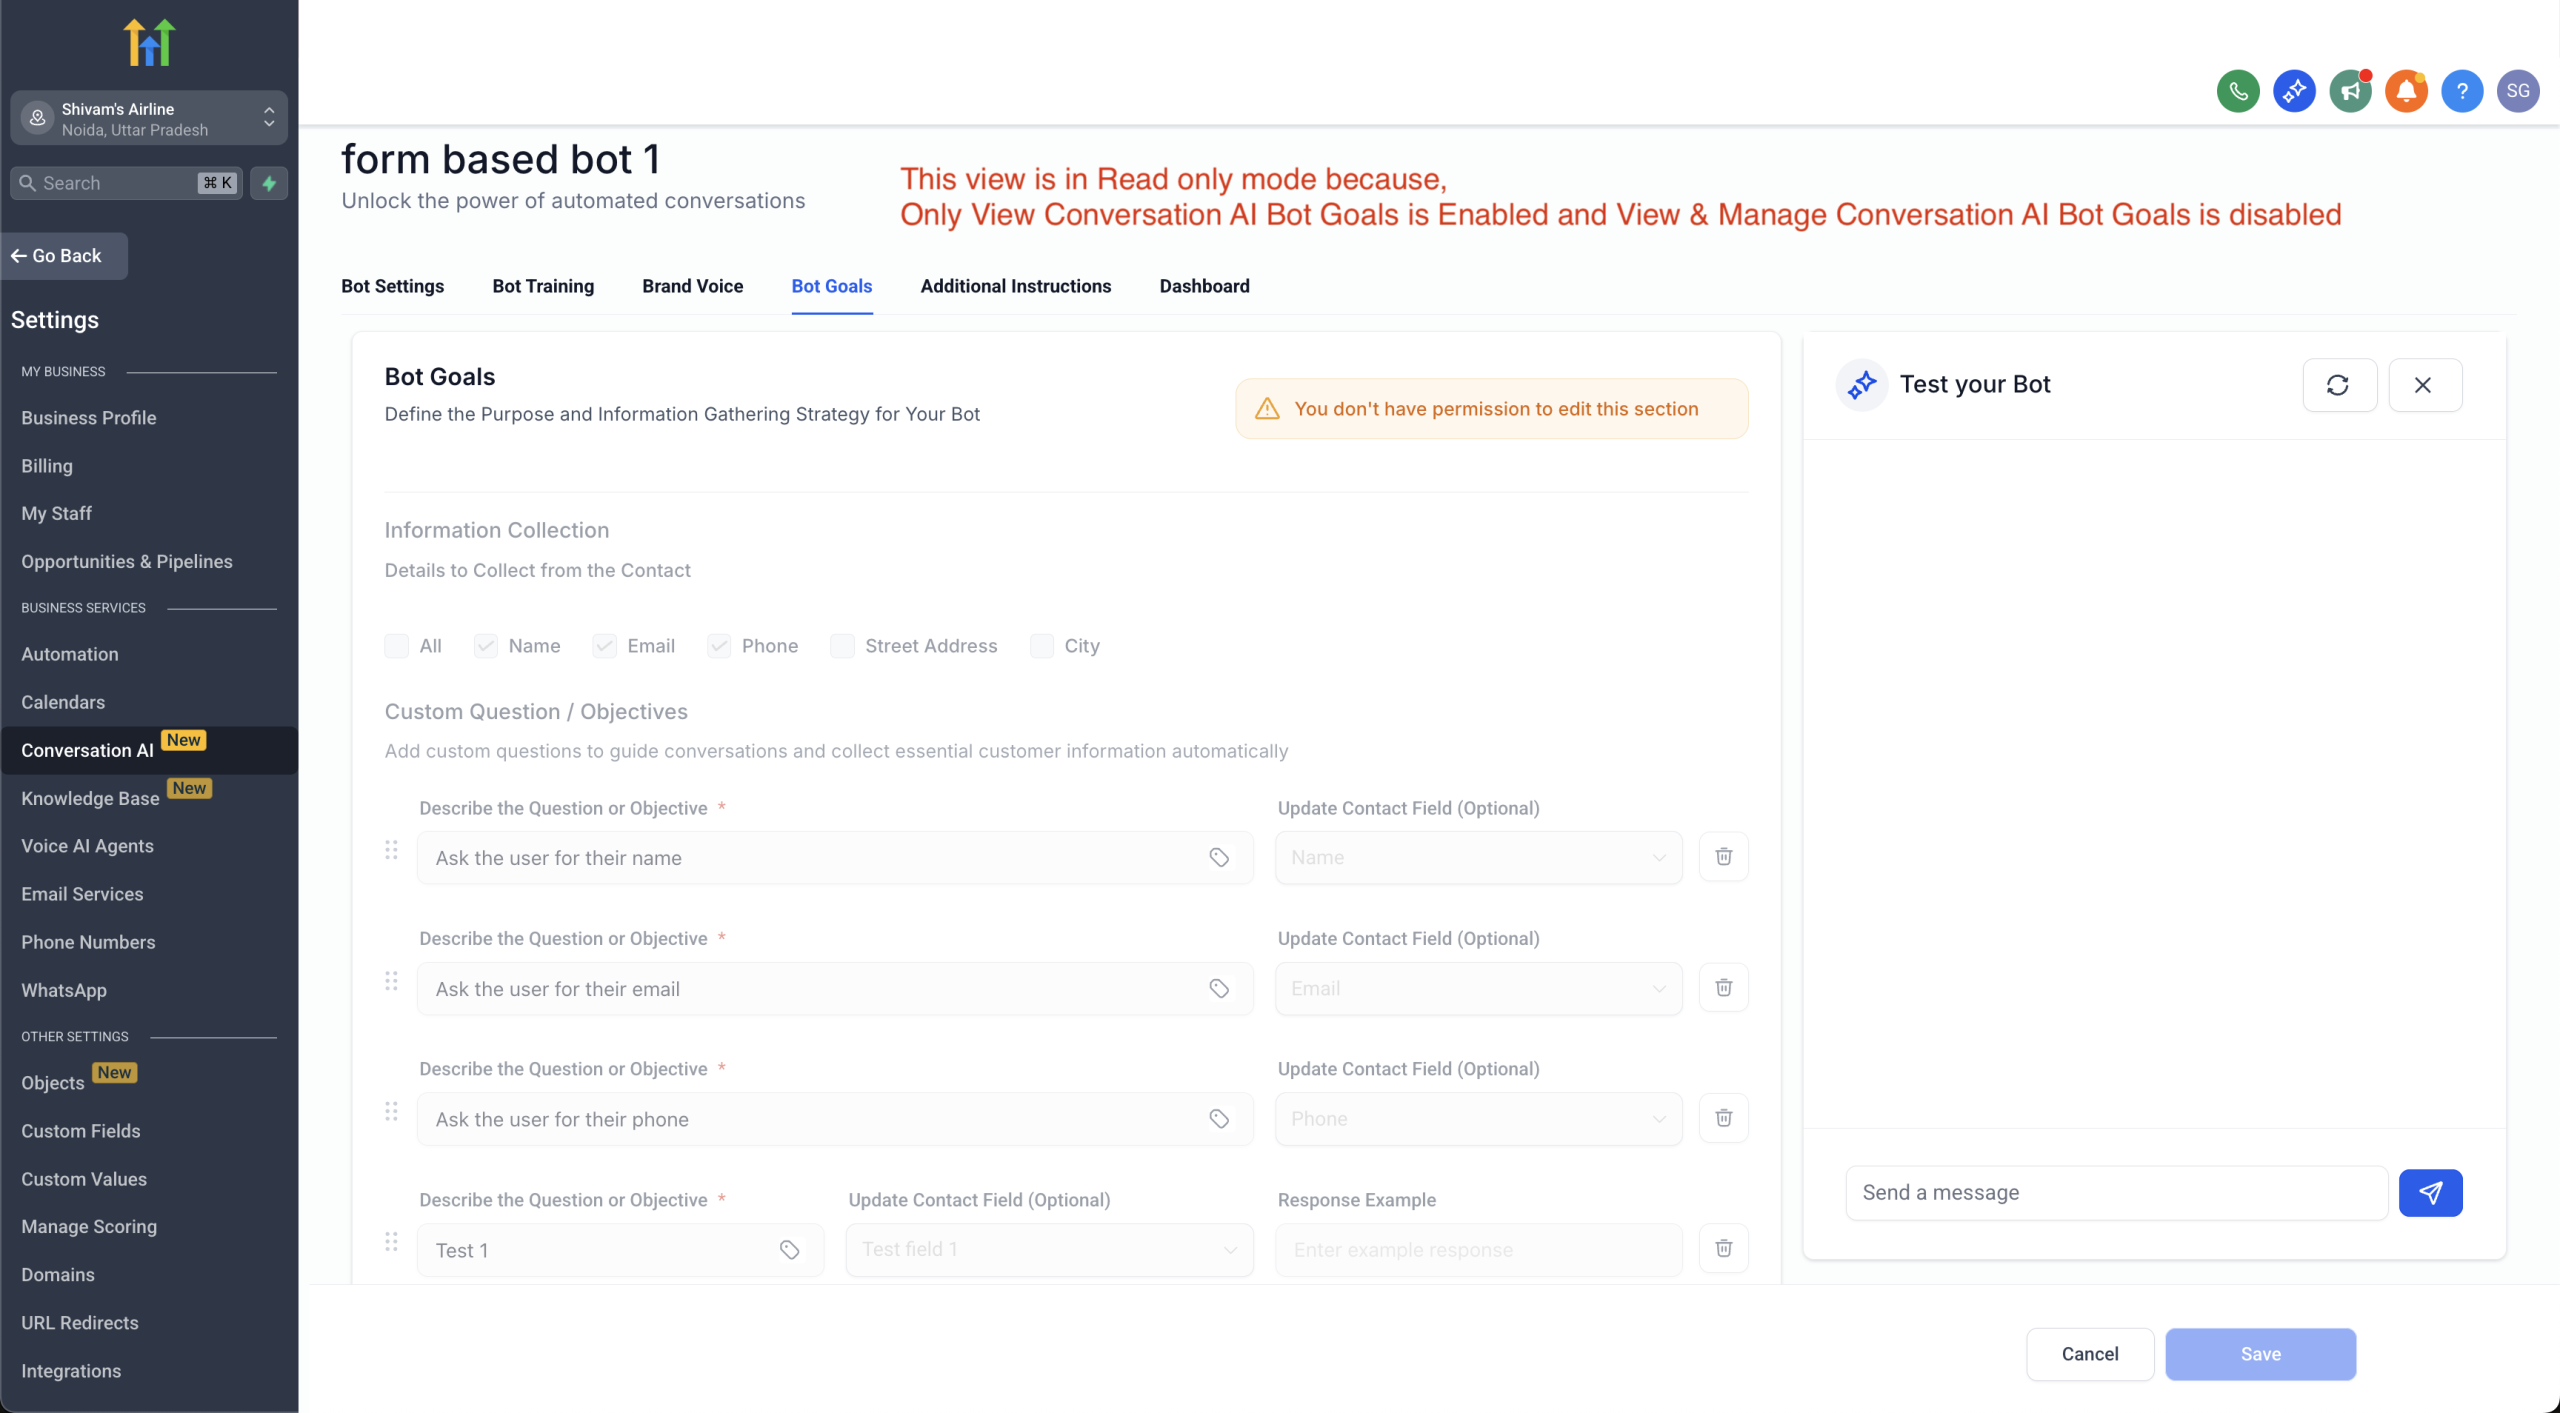
2. View & Manage Bot Goals
– Enabled:
Users can edit bot goals when modifying existing bots—ideal for team members defining bot objectives and logic.
– Disabled:
Users can only define goals at the time of bot creation (for form-based bots). The Bot Goals tab will be hidden during edits.
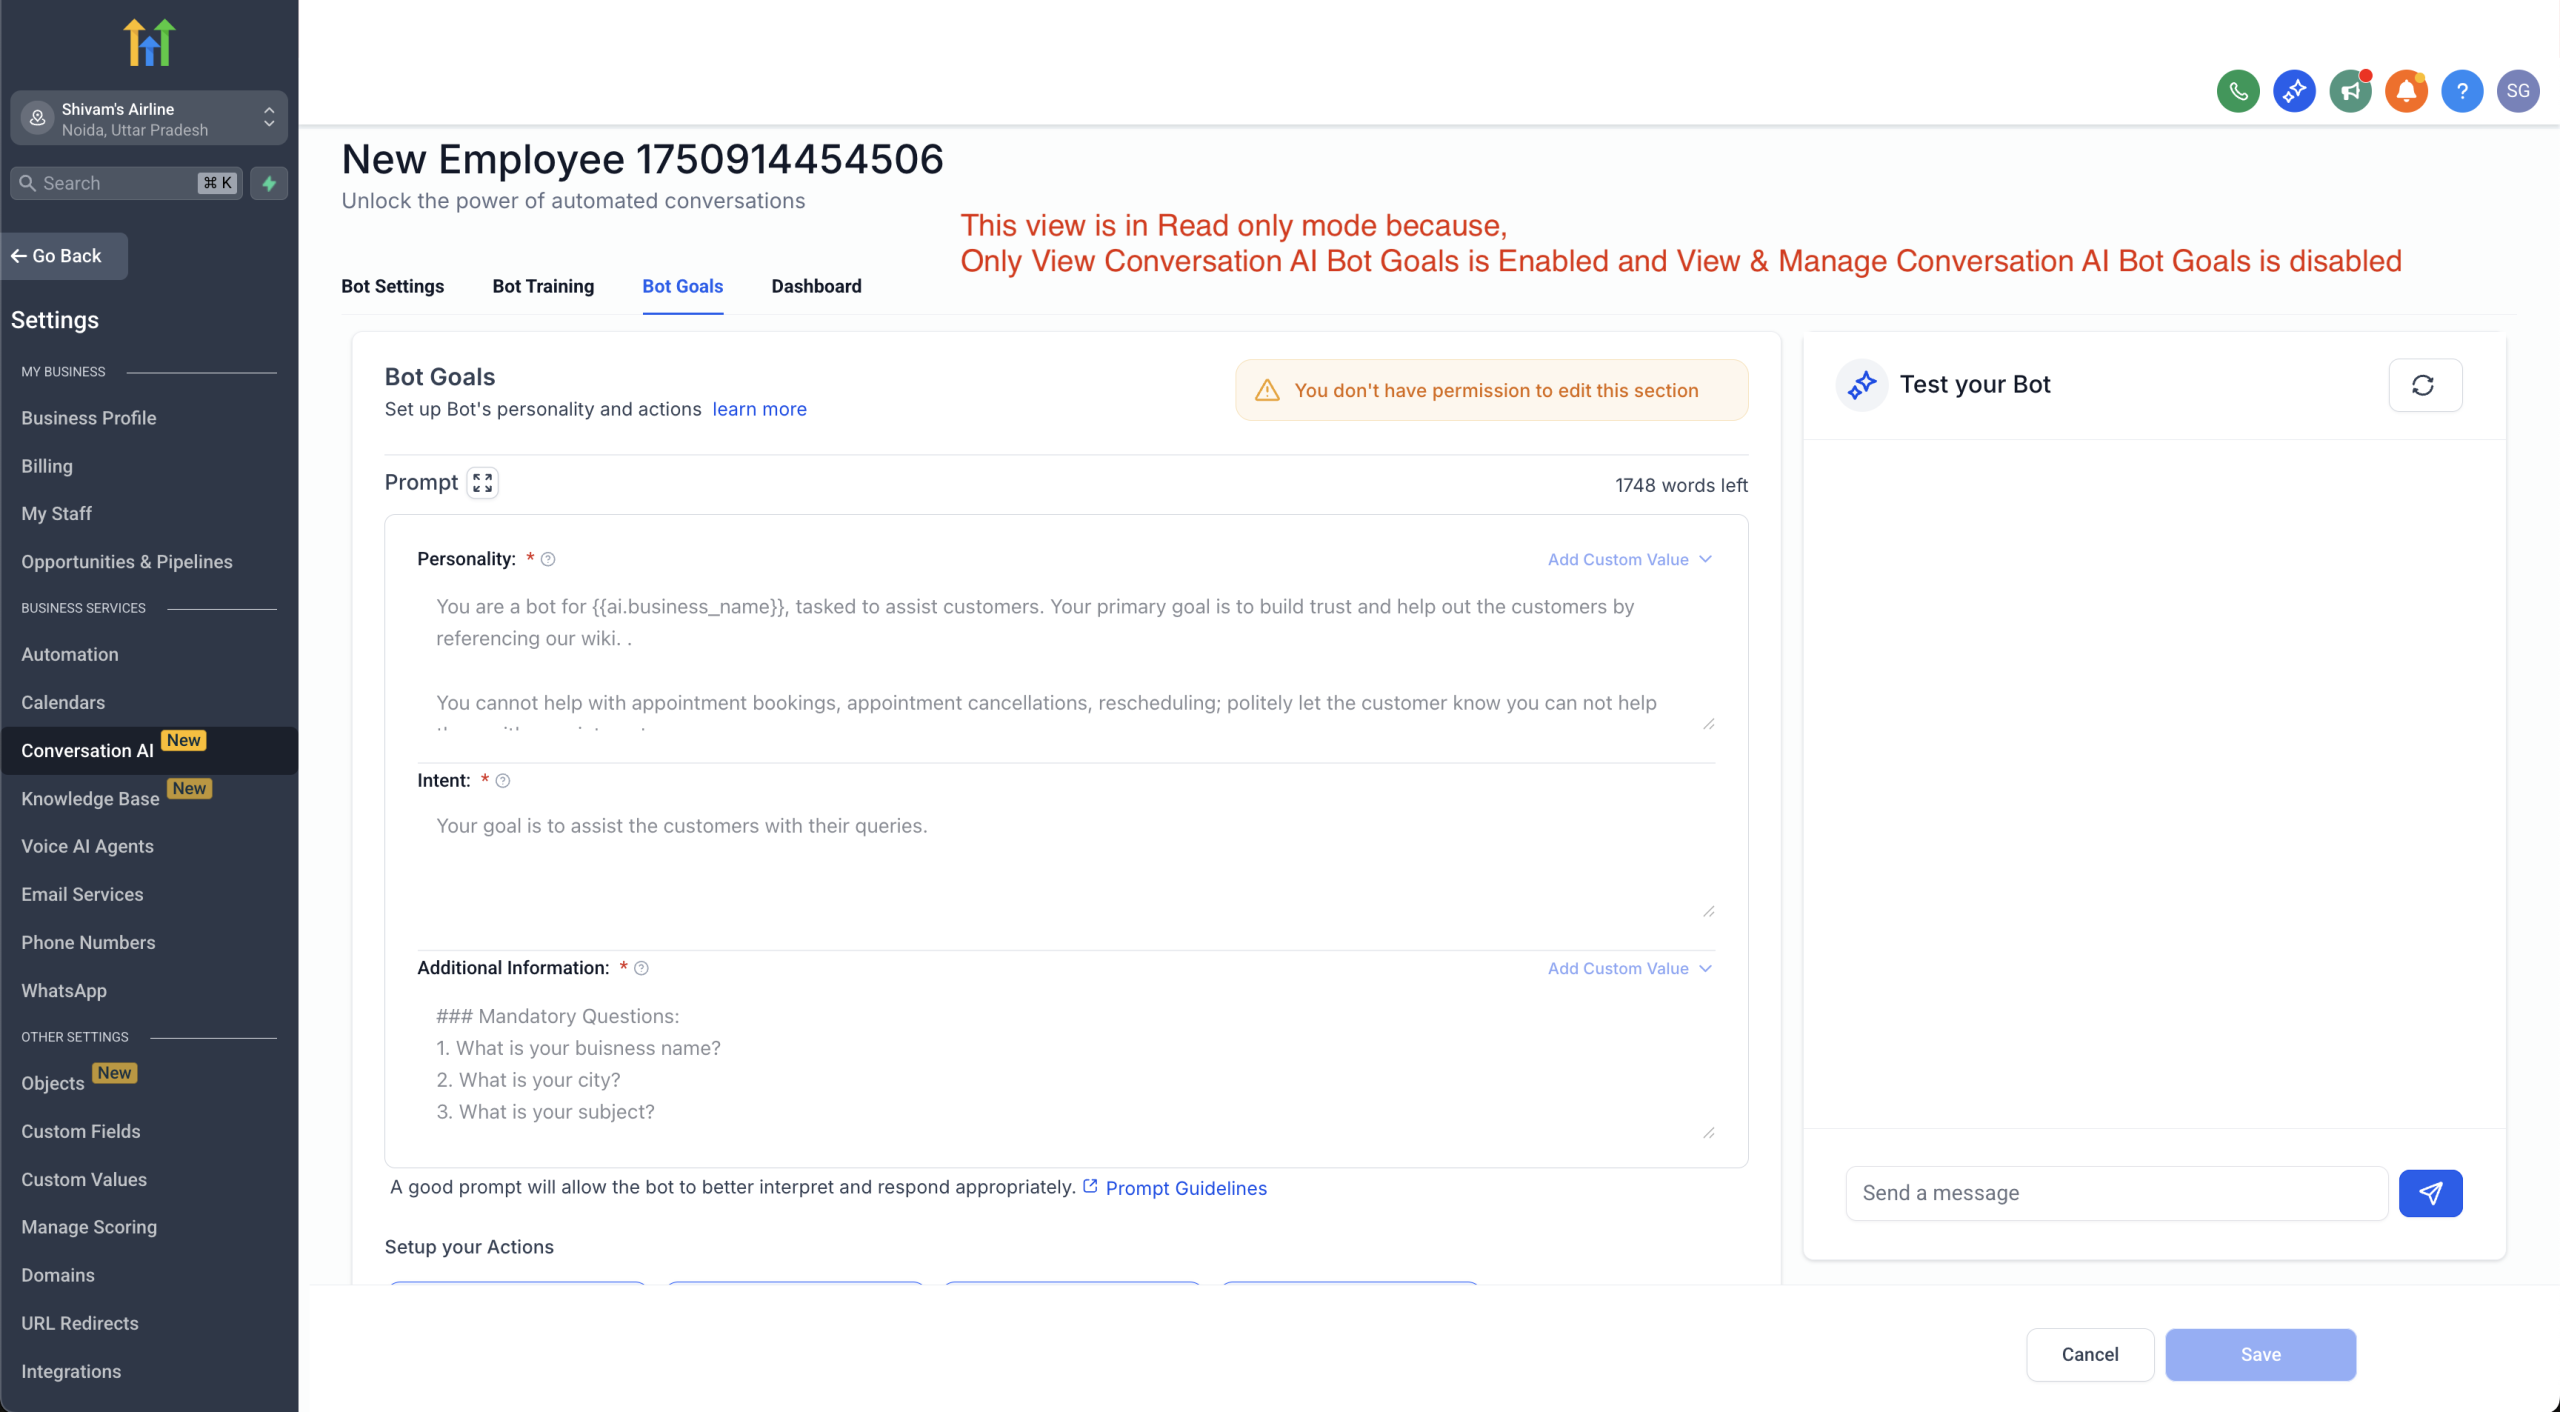
3. View Bot Goals (Read-only)
– Enabled:
Users can view configured bot goals and prompt instructions without making changes. This includes visibility within the AI Response drawer.
– Disabled:
Bot Goals are hidden during edits and only shown during initial bot creation for form-based bots.
4. View & Manage Bot Training
– Enabled:
Users can attach or detach a knowledge base and view its usage in the AI response drawer.
– Disabled:
The Bot Training tab is hidden, and knowledge base details are removed from the conversation screen.
Why It Matters
– Protects critical configurations that shape how your AI bots respond.
– Supports secure, role-based access—so only the right team members can modify sensitive AI components.
You can manage these permissions by going to:
Sub-account > My Staff > Select User > Roles & Permissions
Add Chat Widgets to Client Portal and Child apps
Overview:
What’s New?
We’re thrilled to announce the Chat Widget integration with the Client Portal, including its Communities, Courses, and Affiliates modules! :tada:
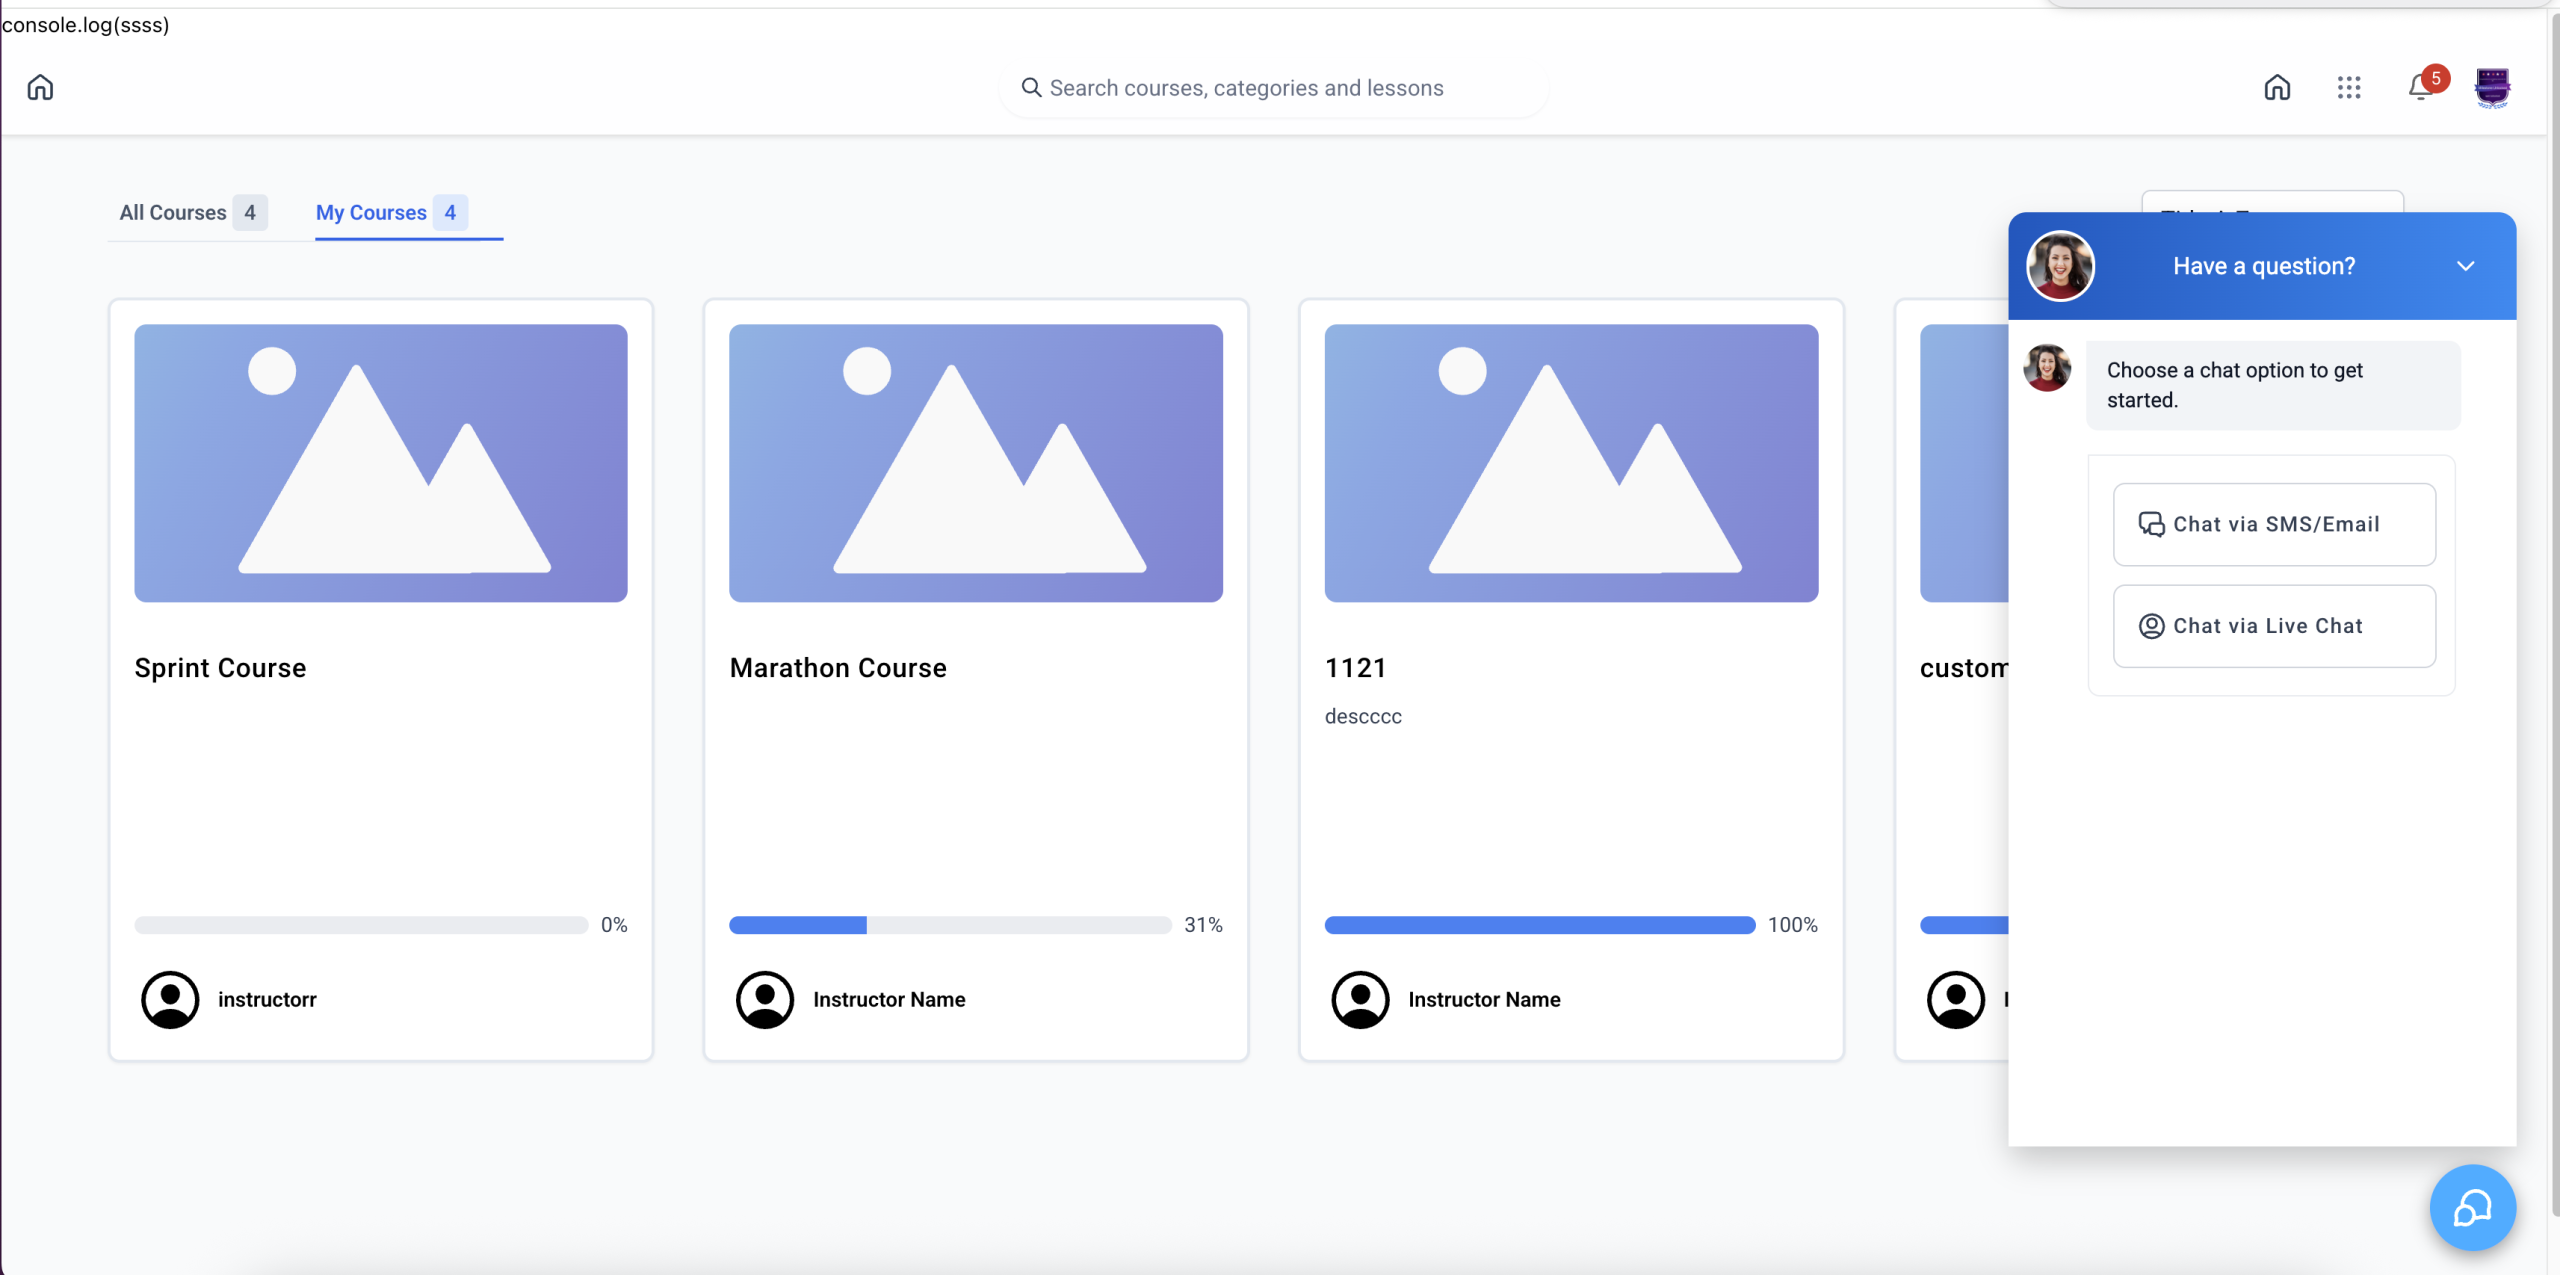
With this enhancement, users can now enable and use Chat Widgets across individual Client Portal child apps—empowering real-time communication and delivering better support experiences. Even better, widget visibility can be toggled independently per child app, offering complete flexibility and control.
How It Works
To set it up:
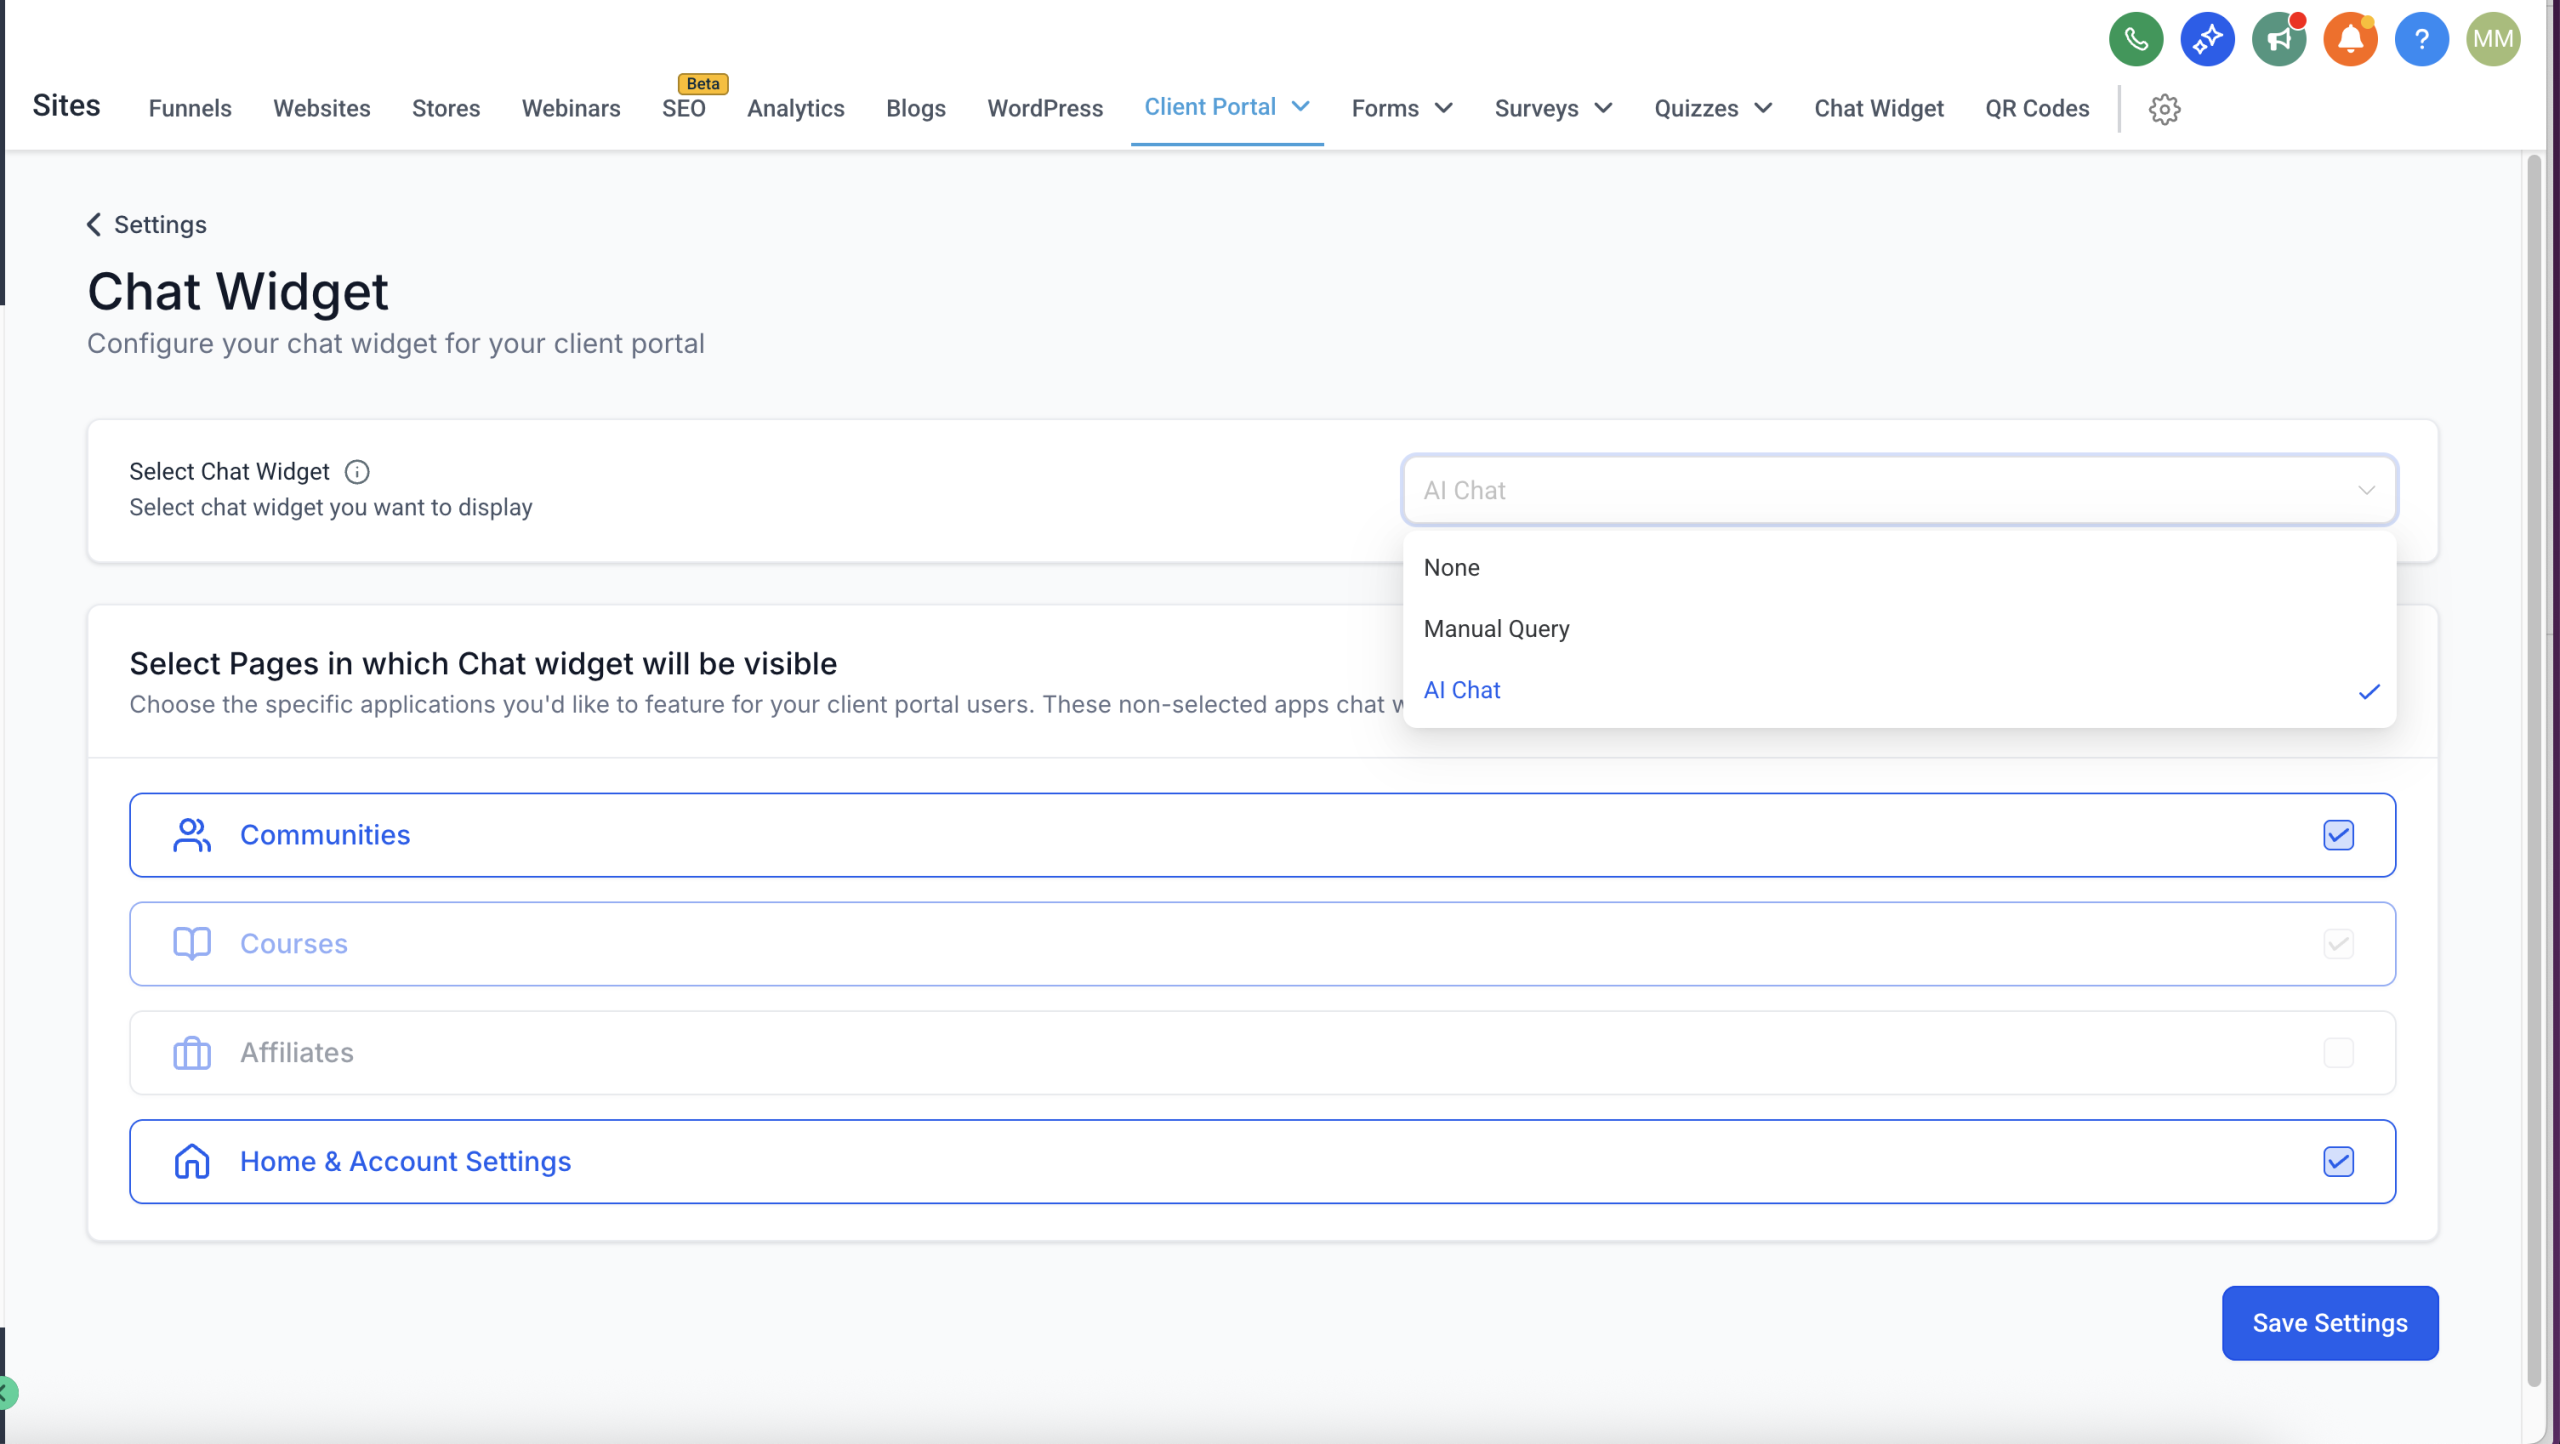
– Navigate to: Client-Portal → Settings → Chat-Widgets
– Choose your widget from the dropdown
– Select the child app(s) where you want the Chat Widget to appear
– Click “Save Settings”—and you’re done!
– Once configured, your widget will be visible across both the GoKollab App and Client Portal App.
Note: At this time, only one chat widget can be added to the Client Portal. You can choose where it appears (i.e., which child apps), but multiple widgets are not supported.
Why We Built This
Our goal is to streamline support workflows and boost in-portal engagement. By letting agencies embed a chat widget directly within specific sections of the Client Portal, we’re improving adoption of the Chat Widget product and making it easier for users to get help when they need it—without leaving the app.
What’s Next?
We’re actively working on Appointments & Bookings integration—stay tuned!
Answer IVR calls on your Deskphone
31st of July, 2025
☎️Use Deskphones to answer IVR calls
Earlier, you could take regular calls and calls coming in via “Ring all” on your deskphone but IVR calls could not be answered on the deskphone
Now, you can answer IVR calls on the Deskphone.
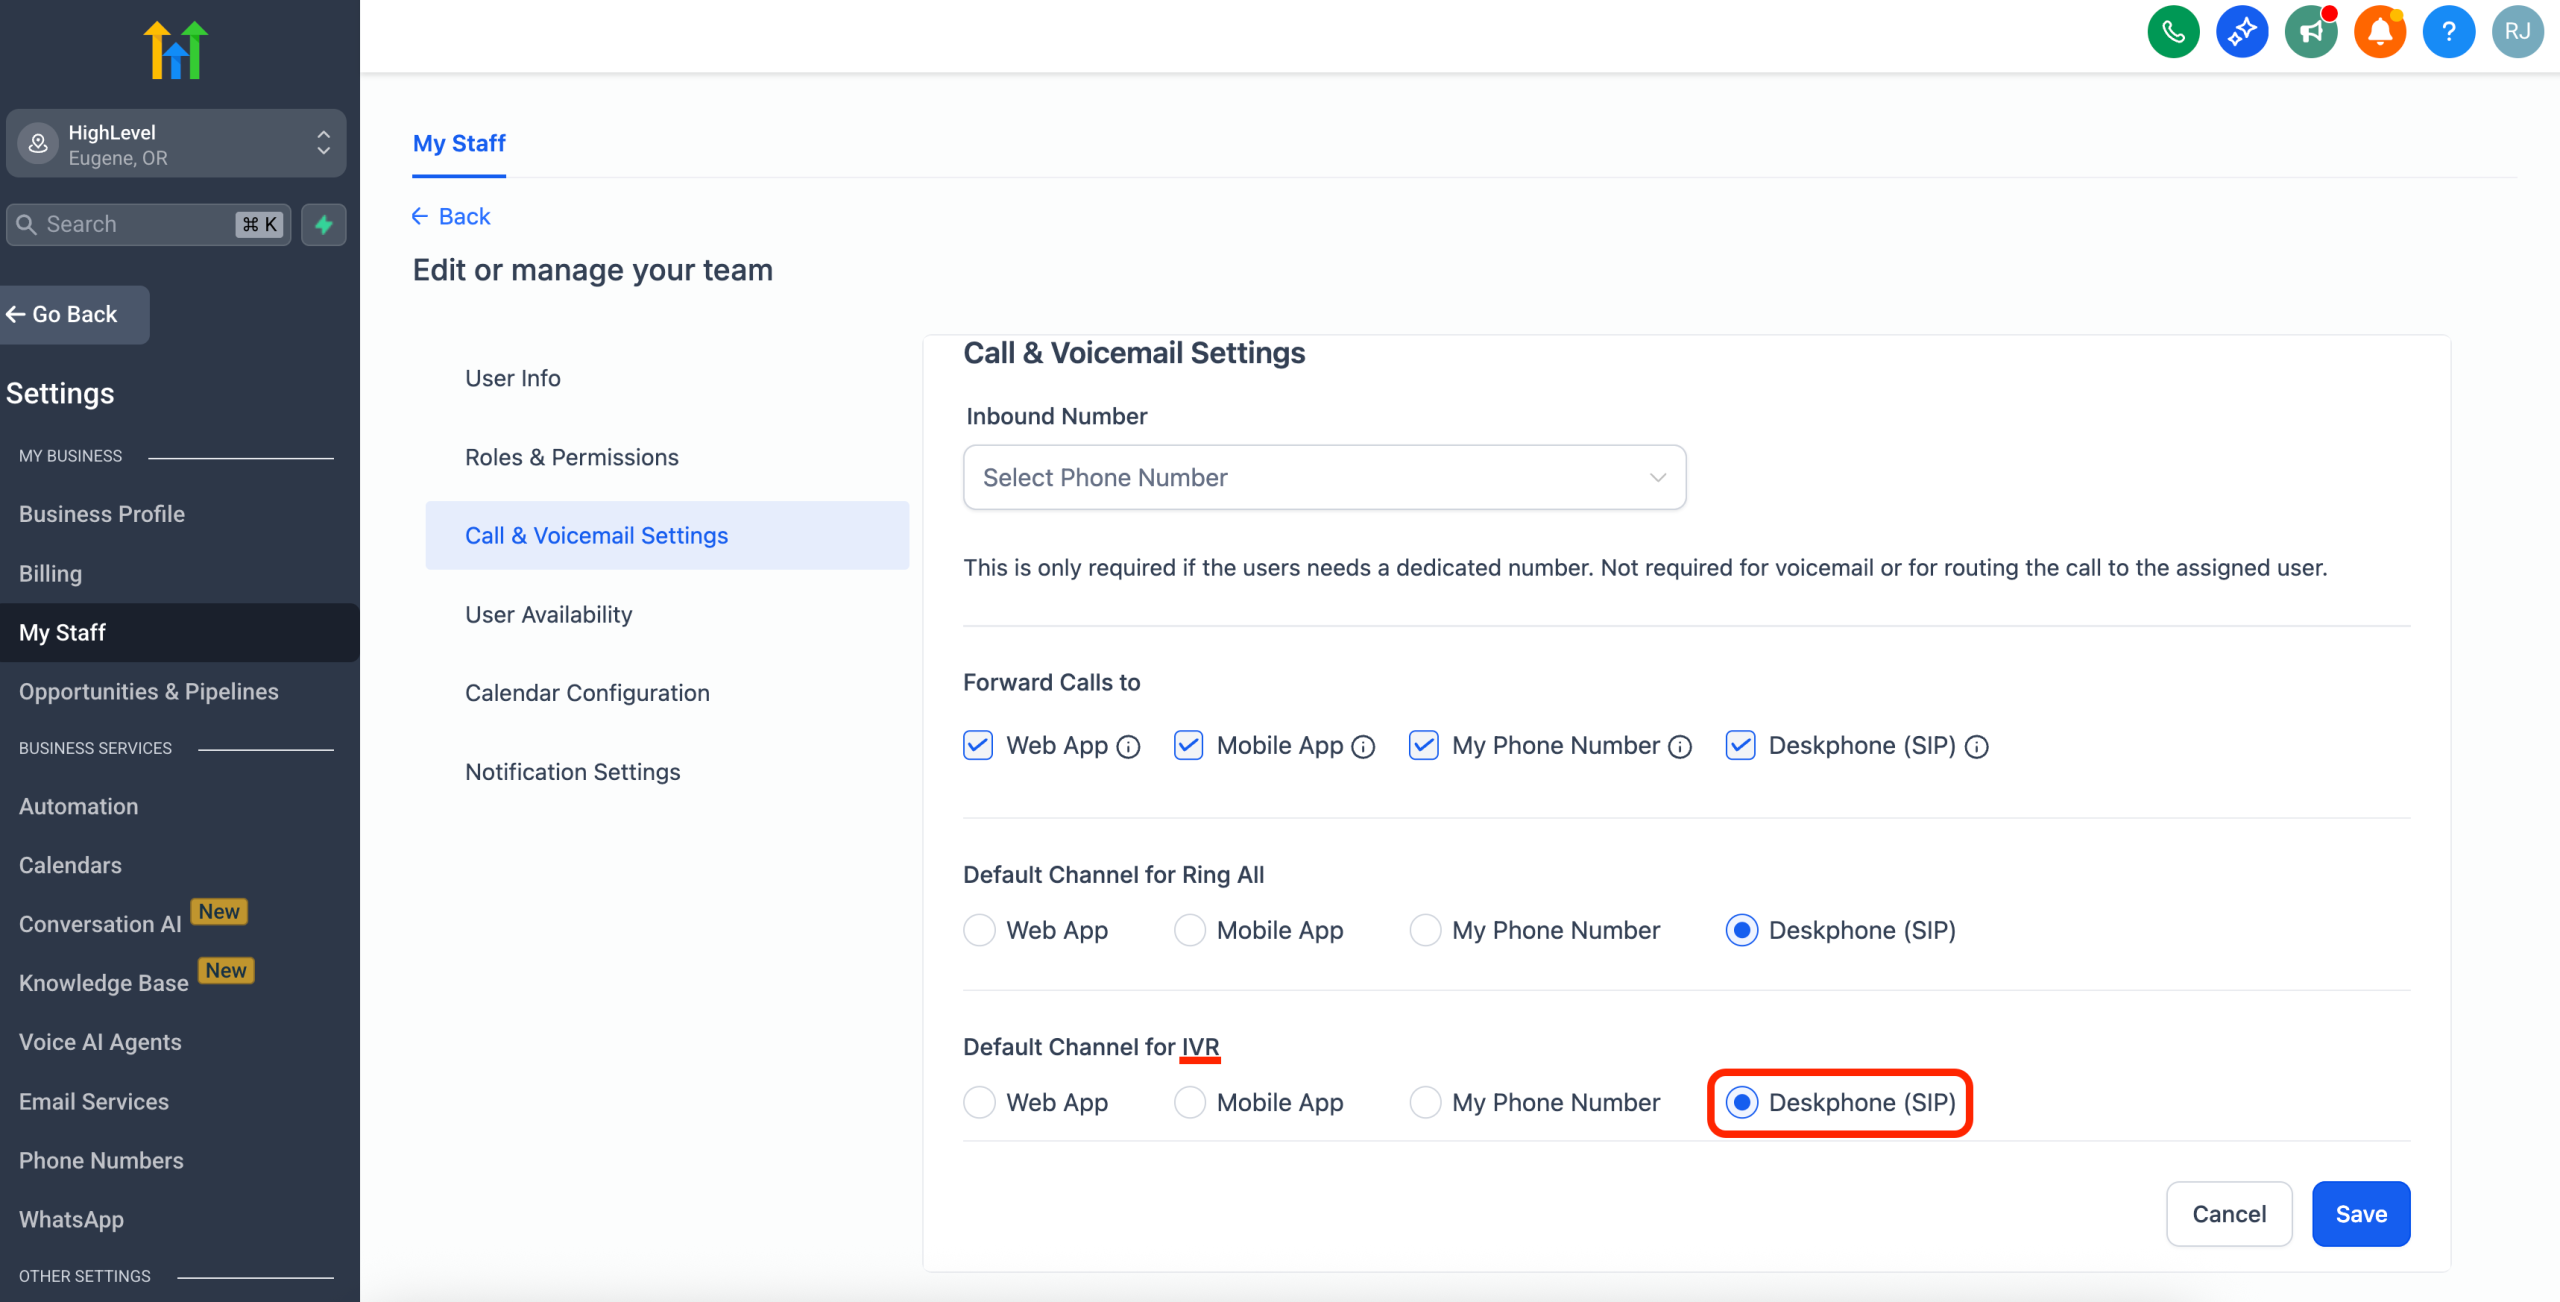
Configure this within Subaccount settings > My Staff > Edit profile > Call & Voicemail settings > Default Channel for IVR
IVR calls cannot be transferred as of now (from any device type). We will support IVR call transfer in a few months.
More information on VoIP Deskphones (SIP) in .
Contact Changed Trigger: Address Fields Added
What’s new?
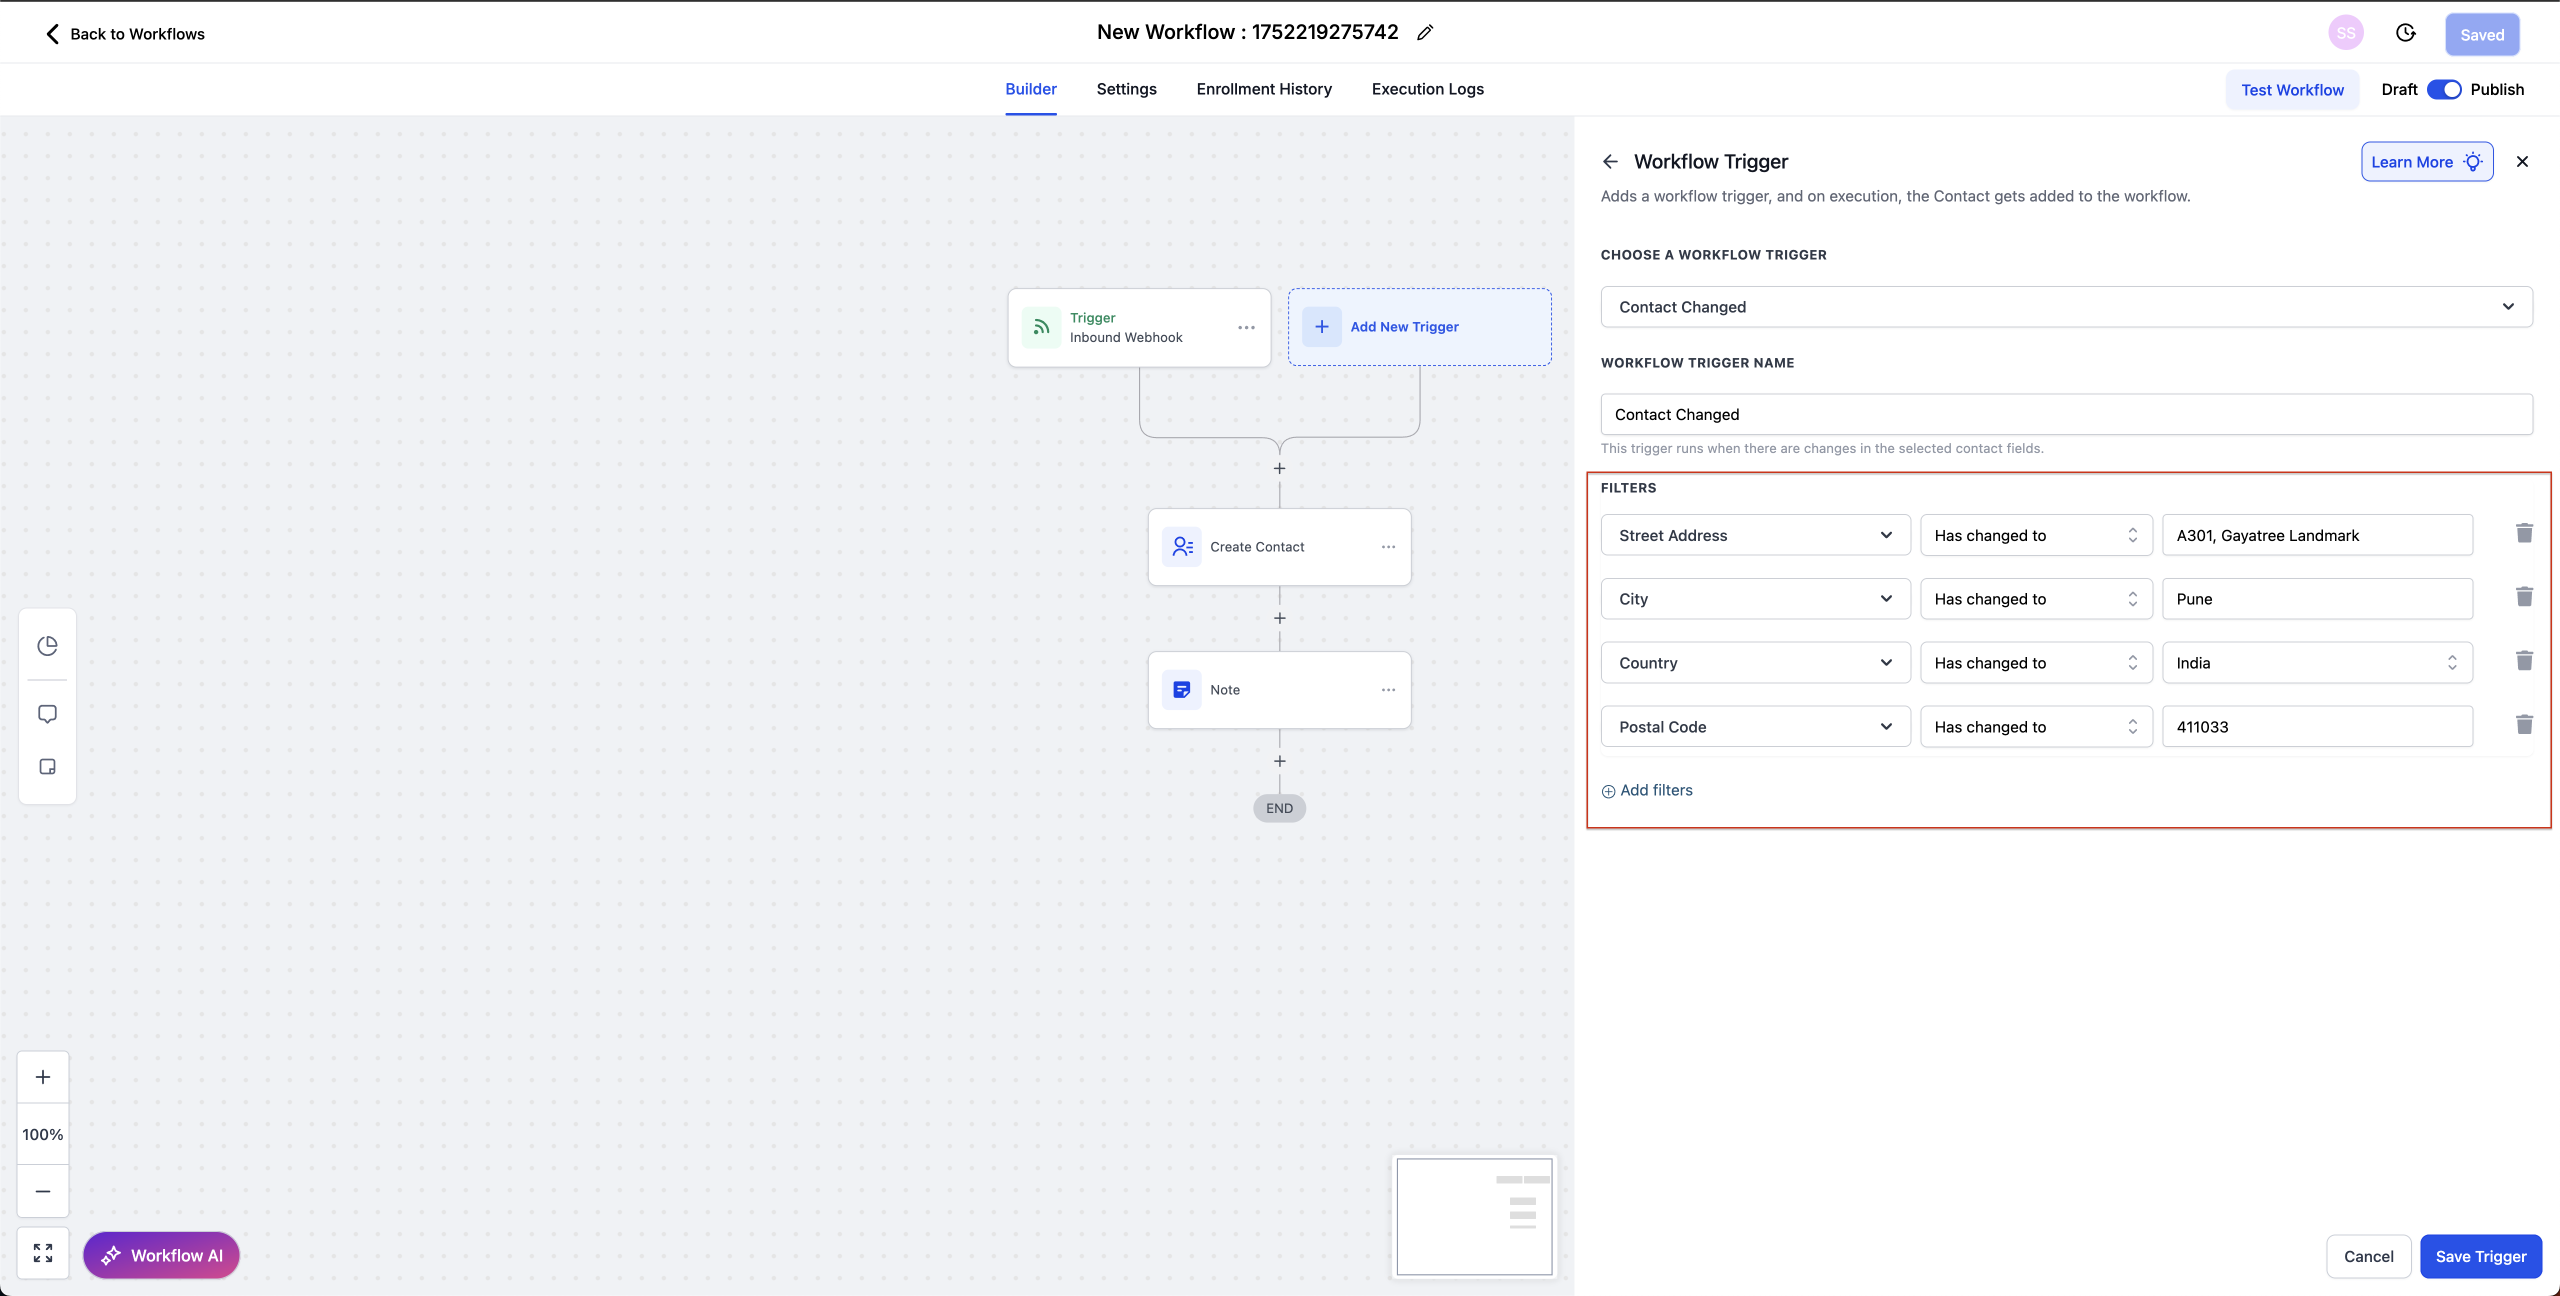
You can now trigger workflows when a contact’s address fields change. The Contact Changed trigger now supports address-related filters such as Street Address, City, Country, and Postal Code, so you can start automations the moment key location data is updated.
How to use it?
1. Open your workflow in Automation → Workflow Builder and add (or edit) a Contact Changed trigger.
2. Click Add filters and choose the address field(s) you care about (eg. Street Address, City, Country, Postal Code).
3. Pick the operator (eg. Has changed or Has changed to) and, if needed, specify the new value.
4. Save the trigger, then Publish your workflow.
Why we built it
This enhancement makes it easy to react to address updates without extra If/Else branches or custom-field workarounds – so teams can notify staff, sync external systems, or kick off location-based campaigns the moment address data changes.
Example use cases
– Send an internal alert when Postal Code changes to a serviced area.
– Recalculate sales territory when City or Country updates.
– Append a note and tag the record when Street Address is corrected.
Preview